...
The ‘survey’ sheet is structured as a table where each row represents a field in the form. Taking as example the third form element in the Table 1 (row 4), we can see that the data type, in this case, a geopoint or GPS position, is defined in the ‘type’ column, the field name is specified in the ‘name’ column, and the field question or text in the ‘label’ column. Additional text providing details about the question or requirements of the field is added in the ‘hint’ column. Finally, in the ‘required’ column, we can indicate whether the field is mandatory in the form.
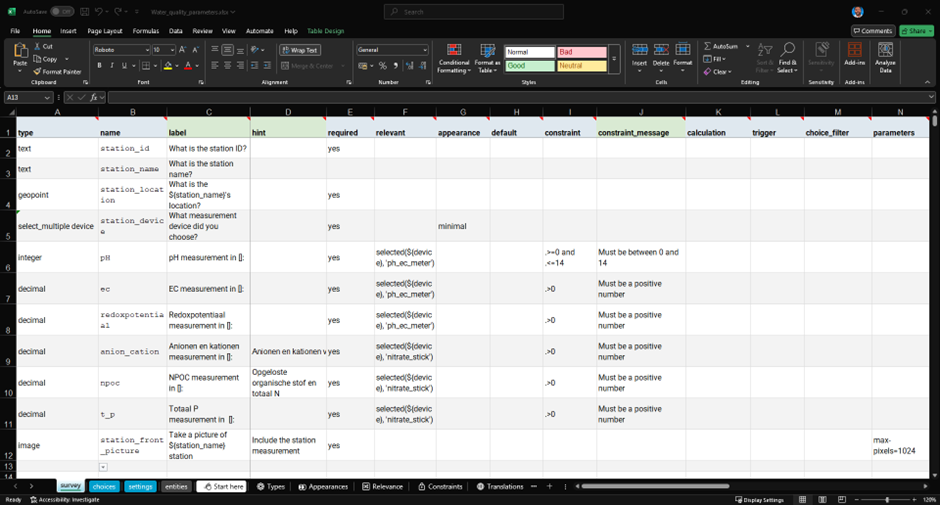
Table 1. Example on how to modify 'survey' sheet in a XLSForm template.
The ‘choices’ sheet includes details about multiple-choice questions. In our example, it refers to the fourth form element in Table 1 (row 5). This question allows for multiple selections of choices with the ‘device’ label from the ‘choices’ sheet.
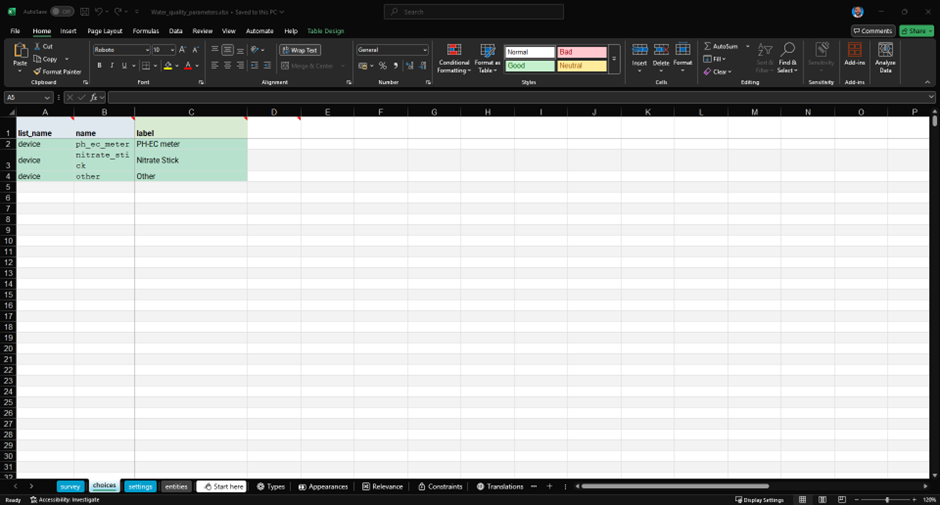
Table 2. Example on how to modify 'choices' sheet in a XLSForm template.
The ‘settings’ sheet allows users to define the overall form’s features, such as title, ID, version, and style. The form ID is used to query elements of a specific table and, therefore, must be unique within a ODK project.
The following tutorial: Creating Your First ODK Form provides a detailed step-by-step guide on this process and includes additional survey field configurations such as relevance, appearance and constraints.
ODK Central server form upload
Once the form is defined, it can be saved locally and uploaded to the Deltares Central server. To do this, you need to access and sign in to https://odk-deltares.nl/ using your ODK credentials. If you don't have them, you can contact Mario Alberto Fuentes Monjaraz (Mario.FuentesMonjaraz@deltares.nl) or Gerrit Hendriksen (Gerrit.Hendriksen@deltares.nl) to request access.
Next, in the ‘Projects’ tab, select a project where you want to create the form. If there isn’t an existing project to associate your form with, you can create one by following these instructions: Creating a Project in ODK Central. After selecting a project, click the ‘New Form’ button. In the pop-up window, you can upload the previously created ODK XLSForm.
In this process, the XLSForm is validated and converted into an XML file that can be previewed in a web browser. The form can also be tested using the ‘Testing’ tab, where a link to the survey or a QR code to access the survey via a mobile app is available. This allows users to fill out the form and test its functionality for field observations. After testing, the form can be published using the ‘Publish Draft’ button.
More details about this process can be found here: ODK Central Forms Upload.
ODK app users access
The published form, now available on the Central server, cannot be accessed by external users for field observations unless one of the following conditions is met: a) a Public Access Link is created, or b) app users are added to the project.
Create a Public Access Link
To create a web link, select the recently published form displayed in the selected Project window. After selecting the form, you can create a Public Access Link by clicking the ‘Create Public Access Link’ button in the Public Access tab. A pop-up window will appear where you can provide a name for the link and decide whether users can fill out the form only once in their browser. People with access to the link can access and fill out the form.
Add App Users
To create an app user, click the ‘Create App User’ button in the App User tab found in the Project window. A pop-up window will appear where you can enter the user's name. After providing the name, a QR code will appear. This code needs to be scanned by the user using the ODK mobile app to set up the project information and forms on their phone. Once the App User is created for the project, you can assign them access to the forms through the Form Access tab.
ODK mobile app set up and field observations
To load the project form on your mobile device, simply install the ODK Collect app from Google Play (available only on Android). Then, scan your App User QR code by pressing the Add Project button displayed after pressing the top-right corner of the mobile app.
After adding the project, a field observation can be made by pressing the ‘Start New Form’ button and filling out the fields in the form. The form can be saved as a draft if some information is missing or submitted if the information is complete. Unfinished forms can be accessed through the Drafts button, while submitted forms can be found under the Sent button, where the answers can be viewed. If there is an issue with any of the surveys, it can be deleted in the Delete Form section.
The app is intuitive, and after some interaction with it, the user can easily familiarize themselves with all the functionalities.
ODK field observations database access
The data gathered by the users can be accessible through the Central server application, or through an API. Both methods allow to query the data and access subsets of the project database.
To explore the field observations in the Central server, select the project and form of interest, then go to the ‘Submission’ tab. In this tab, you can view all submitted field observations as tabular data, where each column corresponds to a survey field and each row to a field observation. The data can be filtered by criteria such as submitter or submission date and downloaded in .csv format or as a zip file if images are included, using the Download button.
The data can also be accessed via the API using the pyODK Python package. Find a simple example [here: GitHub link] demonstrating how to connect to the Central server and retrieve data for a given form_id and project_id. The following tutorial: ODK Central API & pyODK provides a full guide on setting up pyODK and retrieving, loading, or updating data from the Central server.
Full documentation on accessing field observations can be found in the ODK Central Submissions Guide.