Forecast Manager
The Forecast Management display offers following functionality:
- management of forecasts
- setting current forecast
- change expiry time of forecasts
These three basic functions are available via individual tabs in the display.
The meaning of the icons in the table is as follows:
- the current forecast is marked with

- an approved forecast is marked with

- a partly failed forecast is marked with

The coloured circle icons indicate which state the system has used for each run:
In fact there are 6 different options (A to F) which can occur. The below mentioned table explains them.
Option | Manual Forecast (Dialog) | Scheduled Forecast Task | Result | Icon | Remarks |
|---|---|---|---|---|---|
A | User selects cold state | - | cold state used |
| as expected: |
B | User selects warm state | - | cold state used |
| not as expected: |
C | User selects warm state | - | warm state used |
| as expected: |
D | User selects no specific start state | Forecast runs with configured properties | cold state used | no | as expected: |
E | User selects no specific start state | Forecast runs with configured properties | cold state used |
| not as expected: |
F | User selects no specific start state | Forecast runs with configured properties | warm state used | no | as expected: |
The icons with more details:
 cold state start as selected by user. In this case the cold state id and state start time are shown in the tooltip.
 warm state start as selected by user. In this case the state search period is shown in the tooltip.
 cold state start as a warm state in the selected search period could not be found. In this case the module instance id and the state search period are shown in the tooltip.
- no state icon: default state start. No specific state start selected by user.
The tables in the display tabs can be sorted by clicking the headers of the columns.
Filter visible forecasts (available since build 18784)
For each table in the display tabs the list of visible forecasts can be filtered using the buttons next to the table. First select the text to use as a filter. Either click on a table cell to select all text in that cell (the selected cell will be recognisable since it has no gray background, as opposed to the other cells in the selected table row). Or click and drag inside a table cell to select part of the text in that cell (the selected text will be highlighted). Then click the 'Filter By Selection' button to filter the list of visible forecasts on the selected text. After filtering only forecasts that contain the filter text in the corresponding column will be visible. Repeat this process to use multiple filters.
For example, after filtering on the selected text 'Thames' in the 'Workflow' column, only forecasts that have a workflow name that contains 'Thames' will be visible (like e.g. 'Thames_Forecast' and 'Thames_Update').
It is also possible to use a displayed icon as a filter. First click on a table cell that contains an icon. Then click the 'Filter By Selection' button to filter the list of visible forecasts on the selected icon. After filtering only forecasts that have the same icon in the corresponding column will be visible. This can be used for instance to filter only approved forecasts.
To remove the filters, click the 'Remove Filter' button. All forecasts in the table will be visible again.
Forecast Overview tab
The Forecast Overview tab allows for:
- Downloading individual forecasts from the Central Database
- Redownloading individual forecasts from the Central Database under another synchronisation profile
- Selecting a forecast and adding it to the forecast filter in FEWS Explorer
- Rerunning a forecast

When moving the mouse over the forecast list a tool tip indicates whether the forecast has been fully successful or not.
Adding workflows to forecast list box of FEWS Explorer
When the tab is opened, the forecasts that are available in the Local Data store are displayed in the lower listing. Forecasts can be selected with the mouse and made available in the Forecast List Box of FEWS Explorer for review and analysis by pressing [Open ].
Please note that only forecasts that are visible in the forecast filter box of the FEWS Explorer can be viewed and edited with the Data Display and Editor. The current forecast is an exception, because it's always shown in the Data Display and -Editor, but not displayed in the forecast filter box.
All forecasts listed in the forecast filter box can be removed from the display (not from the local data store) by clicking the right mouse button with the cursor placed in the list box. A button appears with 'Remove all'. Pressing this button will remove the list of forecasts from the filter box.
Rerun a forecast
A forecast can be rerun by pressing the [Run ] button after selecting the forecast form the forecast list. The selected forecast will be completely rerun and saved as a new forecast in the data base. This option can be useful when rerunning an Archived Forecast.
Download a forecast from Central Database (only in OC)
Forecasts that are available in the Central Database, but not in the Local Data store are listed in the top panel. Forecasts can be selected with the mouse and downloaded to an OC by pressing [Download ].
Please note that the download may require some time. When downloaded the forecast will be visible in the lower listing.
Redownload a forecast from Central Database (only in OC)
When logged in, the Operator Client (OC) allows for different synchronisation profiles to be used. If an individual forecast has been downloaded in the past under a minimal synchronisation profile, then only part of the data may have been downloaded. To download all data for such a forecast, log in under a full synchronisation profile, select the forecast in the lower listing with the mouse and redownload all data for the forecast to the OC by pressing [Redownload ].
Please note that redownloading may require some time. After redownloading the forecast will still be visible in the lower listing.
Current Forecast tab
A few definitions are required at the start of this section:
- Current Forecast
The Current Forecast is a combination of forecasts made for the whole region, which together form the current forecast. The current forecast is automatically downloaded to OCs. Location related icons are refreshed on the basis on the current forecast. The current forecast is always displayed in the Data Editor and -Display.
- Approved Forecast
Approved Forecasts have been approved by the system or manually by an FDO to become the Current Forecast. The latest Approved Forecast is the Current Forecast.
- Other Forecasts
Besides Approved Forecasts, the system may be populated with other forecasts that are the result of manual or scheduled forecasts with or without application of what-if scenarios.
Under normal conditions the Current Forecast will be updated automatically by the system on the basis of the results of a successfully completed scheduled forecasting run. There is always a Current Forecast that covers the whole region: all fluvial and coastal forecasting locations. The forecasts that together form the Current Forecast are listed in the upper table of the tab. These forecast are marked with the icon  .
.
A forecaster can amend the Current Forecast by replacing it partly or fully with the results individual forecast runs. These 'other' forecasts can for example be the result of running what-if scenarios. The Current Forecast tab allows for selection of individual forecasts that should become part of the Current Forecast.
To change the Current Forecast, select a forecast run that should become part of the Current Forecast in the lower column of the tab. Upon pressing [Approve] the selected forecast will become part of the Current Forecast.
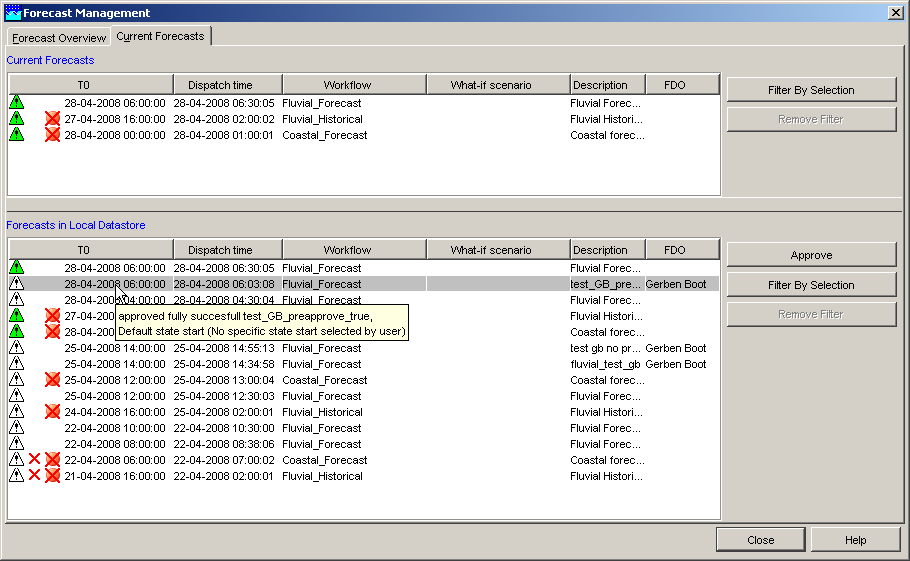
In the list of forecasts that together form the Current Forecast, 'overlapping' forecasts may be displayed. A forecaster may for example run a what-if scenario for part of a catchment for which already an automatic forecast has been made that is part of the Current Forecast. When the forecast with the what-if scenario should now become part of the Current Forecast it can be selected in the lower table of the Current Forecast tab and with [Approve] moved to the upper table. The upper table now displays both forecast runs: the original forecast whole catchment and the forecast with the what-if scenario for part of the catchment. The system will override the data of the original workflow for the part of the catchment that has been rerun when presenting the Current Forecast.
Forecast Expiry Time tab (available since build 19708)
The Forecast Expiry Time tab allows for:
- Deleting individual forecasts from the Central Database
- Changing the expiry time of individual forecasts in the Central Database
Deleting a forecast from the Central Database (only in OC)
When logged in, forecasts that are available in the Central Database are listed in the table. Please note that only forecasts for which the user has delete permission are visible in the table. Forecasts can be selected with the mouse and marked for deletion by pressing [Delete]. Forecasts marked for deletion will be deleted in the next rolling barrel run. Only forecasts for which the user has delete permission can be deleted.
Changing the expiry time of a forecast in the Central Database (only in OC)
When logged in, forecasts that are available in the Central Database are listed in the table. Please note that only forecasts for which the user has delete permission are visible in the table. The expiry time of each forecast is visible in the Expiry Time column. When the expiry time of a forecast has passed, the forecast will be deleted from the Central Database. Forecasts that will expire within 10 days are displayed in strikethrough text in the table.
To change the expiry time of individual forecasts, select the forecasts in the table with the mouse and press [Change Expiry Time]. In the dialog that appears, select a new expiry time and press [Apply] to change the expiry time of the selected forecasts. The expiry time can only be changed for forecasts for which the user has delete permission.

Display configuration
It is possible to add display configuration for forecast management, for more information click here.