...
The export can be used to automatically upload GLD_Addition documents at: https://basisregistratieondergrond.nl/werken-bro/producten-diensten/bronhouderportaal/
Getting BRO GLD IDs
To get the BRO GLD IDs, you need to start the registration in the BRO for a groundwater filter. To achieve this you need to upload a BRO GLD Start Registration xml file to the bronhouder portal. The bronhouder portal will give you (if the BRO GLD Start Registration xml is valid) back to GLD ID.
To make the BRO GLD Start Registration xml files, the attached tool can be used. Note: the tool itself doesn't fall under support of Deltares and it is the responsibility of the configurator to use it correctly!
maak_gld_start_registraties.zip
BRO_GLD_Addition_Server Export Configuration
...
The following are the required properties that have to be configured:
- projectId: a project Id (projectnummer) provided by BRO which can be found by logging in on bronhouderportaal-bro.nl
- chamberOfCommerceNumber: will be used to set the value of the brocom:chamberOfCommerceNumber element.
- qualityRegime: will be used to set the brocom:qualityRegime value. Can be either IMBRO or IMBRO/A
- skipBroValidation: default false. Before uploading the GLD_Addition document to the BRO, the XML document will be validated using the validation API of the BRO. This is an optional feature and can make the export take a lot of time. The uploaded document will also be validated again after upload by the BRO. To disable validation, set the skipBroValidation property to true.
Optional properties that can be configured:
- unitOfMeasurement: optional property to set the unit of measurement. Default value is 'm'.
- skipBroValidation: skip the initial validation step (document processing always includes the second validation step).
- splitFiles: default truesplitFiles: default false. If set to true, timeseries that have 10000 or more time steps, will be splitted split in files with 9999 timesteps. The BRO Portal currently doesn't support more than 9999 time steps.
- statusQualityControl: default '"goedgekeurd" allowed values are:
"afgekeurd", "goedgekeurd", "nogNietBeoordeeld", "onbeslist", "onbekend" - observationType: default "reguliereMeting" allowed values are:
"reguliereMeting", "controleMeting" - statusCode: default is none allowed values are:
"volledigBeoordeeld", "voorlopig", "onbekend" - processReference: default "NEN_EN_ISO22475v2006_C11v2010" allowed values are:
"NEN5120v1991", "NEN_EN_ISO22475v2006_C11v2010", "NEN_ISO21413v2005", "NPR_ISO.TR23211v2009", "RWSgwmon", "STOWAgwst", "vitensMeetprotocolGrondwater", "waternetMeetprocedure", "onbekend" - measurementInstrumentType: default "druksensor" allowed values are:
"akoestischeSensor", "akoestischHandapparaat", "analoogPeilklokje", "druksensor", "elektronischPeilklokje", "opzetStuk", "radarsensor", "stereoDruksensor", "onbekend", "onbekendPeilklokje" - processType: default "" allowed values are:
"Algorithm", "Manual Method", "Sensor", "Simulation", "Unknown" - evaluationProcedure: default "oordeelDeskundige" allowed values are:
"brabantWater2013", "eijkelkampDataValidatiev0.0.9", "oordeelDeskundige", "PMBProtocolDatakwaliteitscontroleQC2018v2.0", "RWSAATGrondwaterv1.0", "validatieprocedureEvidesWaterbedrijf", "vitensBeoordelingsprotocolGrondwater", "waternetBeoordelingsprocedure", "warecoWaterDataValidatieProtocolv20200219", "onbekend" - airPressureCompensationType: default is none, allowed values are:
"capillair", "gecorrigeerdLokaleMeting", "KNMImeting", "monitoringnetmeting", "putlocatiemeting", "onbekend"
Setting a property to an empty value "" will have the same result as omitting the property from the XML configuration.
The "onbekend" value that is listed for some properties can only be used in combination with qualityRegime IMBRO/A, which can be selected during registration of a GLD and cannot be changed afterwards.
For each exported XML file a BRO ID is required. This can either be the same as the internal locationId or (preferably) should be configured as a location attribute. In the latter case idmapping is required. The location attribute that holds the BRO ID should be mapped, using a location id function. For example:
...
The BRO_GLD_Addition_Server can be configured as follows.
| Code Block | ||||
|---|---|---|---|---|
| ||||
<?xml version="1.0" encoding="UTF-8"?> <timeSeriesExportRun xmlns="http://www.wldelft.nl/fews" xmlns:xsi="http://www.w3.org/2001/XMLSchema-instance" xsi:schemaLocation="http://www.wldelft.nl/fews http://fews.wldelft.nl/schemas/version1.0/timeSeriesExportRun.xsd"> <export> <general> <general> <exportType>BRO_GLD_Addition_Server</exportType> <serverUrl>https://demowww.bronhouderportaal-bro.nl</serverUrl> <!-- BRO can take a long time to upload. Set timeout to 5 minutes --> <connectionTimeOutMillis>300000</connectionTimeOutMillis> <!-- username and password can be acquired from the BRO portal bij getting a token. --> <user>myuserid<<user>$BRO_USER$</user> <password>mytokenvalue<<password>$BRO_TOKEN$</password> <idMapId>IdExportBro<<idMapId>IdExportBRO</idMapId> </general> <properties> <properties> <string key="chamberOfCommerceNumber" value="XXXXX$KVK_NUMMER$" ></string>> <string key="projectId" value="$BRO_PROJECTID$"/> <string key="qualityRegime" value="IMBRO/A" ></string>> <bool <!-- Validation can take quite some time. To skip BRO validation, set this property to true. Validation will also be done in the portal. --> key="skipBroValidation" value="true"/> <bool key="skipBroValidationsplitFiles" value="falsetrue" ></bool> > </properties> <timeSeriesSet> <moduleInstanceId>ImportEllitrack<<moduleInstanceId>Productie</moduleInstanceId> <valueType>scalar</valueType> <parameterId>GW.m<<parameterId>STIJGHTE</parameterId> <locationSetId>Peilbuizen<locationSetId>Export_BRO</locationSetId> <timeSeriesType>external historical</timeSeriesType> <timeStep unit="nonequidistant"/> <relativeViewPeriod unit="day" start="-10" end="0" startOverrulable="true" endOverrulable="false"/> <readWriteMode>read complete forecast<only</readWriteMode> </timeSeriesSet> </export> </timeSeriesExportRun> |
Acquire a BRO
...
Authenication token
Since 01/03/2024, version 2 of the BRO REST API is available. Acquiring a authenication token has slightly changed and is explained below.
To get a BRO Aanlever token, login authentication token, follow the following steps (an explanation on what the role of tokens is and how to create them is also provided on BRO Wiki)
- Login to the BRO portal (Demo or Production environment)
...
- with your personal (organizational) credentials;
- Navigate to the top menu item "Organization" (NL: Mijn organisatie);
- Navigate to the tab "Options" (NL: Opties);
- Select "Authentication Token";
- Create a token here;
- The token is shown only once;


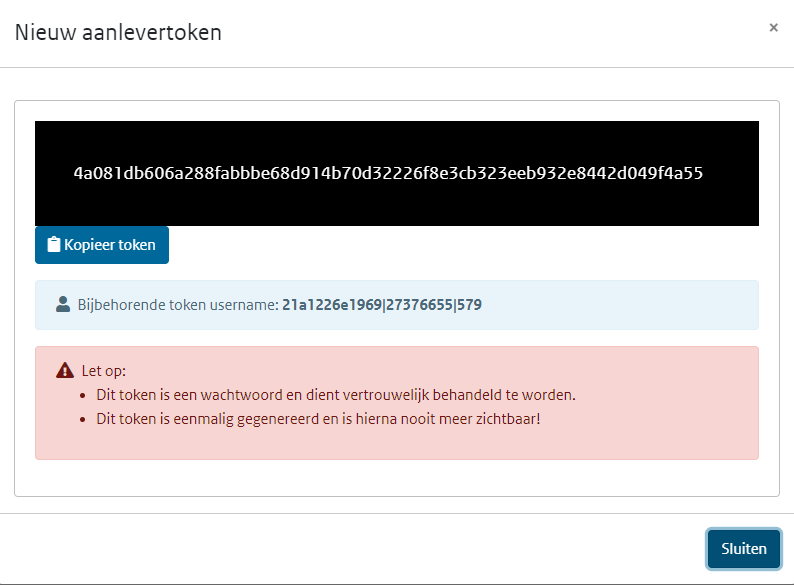
In the configuration example above you should:
- fill in the "token username" (from the light blue bar above) in the <user> element
- fill in the "token" (from the black bar above) in the <password> element
You can reset (or remove and create) your token here. Be aware that you have to change the configuration files which contain the BRO token!!!