...
What | ModifierTypes.xml |
|---|---|
Required | no |
Description | Definition of modifiers in an IFD environment |
schema location | httphttps://fewsfewsdocs.wldelftdeltares.nl/schemas/version1.0/modifierTypes.xsd |
Contents
| Table of Contents |
|---|
...
Below an overview of all the modifiers in FEWS.
...
Modifier | Type | Description | |
|---|---|---|---|
| missing value modifier | time series modifier | Set the values of a time series to missing over a certain period of time | |
| time series modifier | time series modifier | This modifier can be used to modify the values of a time series by defining new time value pairs. It is also possible to define an operation like add 2 or divided by 3 for a certain period. It is also possible to set all the values to missing for a certain period (comparable to the missing value modifier) | |
| constant value modifier | time series modifier | Set the values of a time series to a fixed value over a certain period of time | |
| enumeration modifier | time series modifier | The user can select an option from a pre-defined list of options. For each option a value will be defined which will stored in the time series. This modifier is usually applied to an empty time series. | |
| single value modifier | time series modifier | This modifier can be used to apply a certain value at a certain time to a time series. | |
| typical profile modifier | time series modifier | This modifier can be used to shift an existing timeseries in time. | |
| mark unreliable modifier | time series modifier | This modifier can used to set the values of a modifier to unreliable over a certain period of time. | |
| blending steps modifier | transformation/module parameter module | This modifier can be used to adjust the amount of "blending steps" which will be used in the adjustQ transformation. | |
| disable adjustment modifier | transformation/module parameter module | With this modifier it is possible to disable the adjustQ transformation | |
| time shift constant modifier | transformation/module parameter module | With this modifier it is possible to modify the amount of time steps which will be used in the timeShiftConstant transformation | |
| reverse order modifier | transformation/module parameter module | With this modifier it is possible to reverse the order of the time series in the mergeSimple transformation | |
| compound modifier | time series modifier | This modifier can be used to define a value at a single date/time for 1 or more time series by using sliders. | |
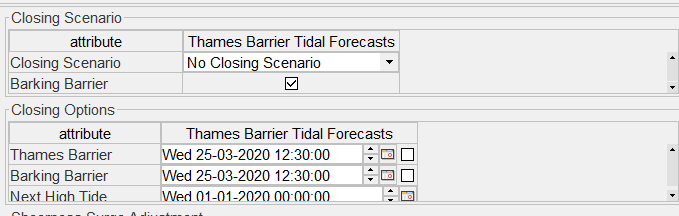
| high low surge selection modifier | time series modifier | ||
| switch option modifier | time series modifier | Modifier which can used to set a value for each time step for a set of time series. It is only possible to define a value for a one of the time series in the entire set. | |
| option modifier | time series modifier | This modifier can be used to set a single value at a single time for a set of time series. It is only possible to define a value for a one of the time series in the entire set. | |
| module parameter modifier | module parameter modifier | Generic module parameter modifier panel which can used for all modifiers. | |
| priority modifiertime | series model parameter modifier | Orders a list of priorities | |
| multiple model module parameter modifier | module parameter modifier | The module parameter modifier can be used to modify multiple model parameters in a single modifier. | |
| unit hydrograph modifier | module parameter modifier | The unit hydrograph modifier can be used to modify the area elevation curve of the unit hydrograph model. | |
| merge weighted modifier | transformation/module parameter modifier | This modifier can be used to modify the parameters of the mergeWeighted function. | |
| table rating curve modifier | time series modifier | ||
| shift multiply rating curve modifier | time series modifier | The rating curve can be modified by shifting the entire curve or by multiplying the entire curve with a defined factor. | |
| location attribute modifier | location attribute modifier | A modifier for modifying location attributes. | |
| spatial profile modifier | time series modifier | ||
| spatial copy modifier | time series modifier |
...
| Code Block | ||
|---|---|---|
| ||
<?xml version="1.0" encoding="UTF-8"?> <parameters xmlns:xsi="http://www.w3.org/2001/XMLSchema-instance" xmlns="http://www.wldelft.nl/fews/PI" xsi:schemaLocation="http://www.wldelft.nl/fews/PI httphttps://fewsfewsdocs.wldelftdeltares.nl/schemas/version1.0/pi-schemas/pi_modelparameters.xsd" version="1.5"> <group id="default" readonly="false" modified="false"> <parameter id="UHG_DURATION" name="UHG_DURATION"> <intValue>6</intValue> </parameter> <parameter id="UNIT" name="UNIT"> <stringValue>ENGLISH</stringValue> </parameter> <parameter id="UHG_INTERVAL" name="UHG_INTERVAL"> <intValue>6</intValue> </parameter> <parameter id="DRAINAGE_AREA" name="DRAINAGE_AREA"> <dblValue>3103.0</dblValue> </parameter> <parameter id="CONSTANT_BASE_FLOW" name="CONSTANT_BASE_FLOW"> <dblValue>111.0</dblValue> </parameter> <parameter id="UHG_ORDINATES" name="UHG_ORDINATES"> <table> <columnTypes A="double"/> <row A="7499.0"/> <row A="16872.0"/> <row A="29370.0"/> <row A="39993.0"/> <row A="48116.0"/> <row A="43742.0"/> <row A="38118.0"/> <row A="31869.0"/> <row A="24995.0"/> <row A="18747.0"/> <row A="13123.0"/> <row A="8123.0"/> <row A="5436.0"/> <row A="3874.0"/> <row A="2625.0"/> <row A="1687.0"/> <row A="1000.0"/> <row A="500.0"/> <row A="250.0"/> <row A="62.0"/> <row A="0.0"/> <row A="0.0"/> <row A="0.0"/> <row A="0.0"/> <row A="0.0"/> <row A="0.0"/> <row A="0.0"/> <row A="0.0"/> </table> </parameter> </group> <group id="default" readonly="false" modified="true"> <validPeriod> <timeZone>0.0</timeZone> <startDate date="2012-09-09" time="12:00:00"/> <endDate date="2012-09-27" time="12:00:00"/> </validPeriod> <parameter id="UHG_DURATION" name="UHG_DURATION"> <intValue>6</intValue> </parameter> <parameter id="UNIT" name="UNIT"> <stringValue>ENGLISH</stringValue> </parameter> <parameter id="UHG_INTERVAL" name="UHG_INTERVAL"> <intValue>6</intValue> </parameter> <parameter id="DRAINAGE_AREA" name="DRAINAGE_AREA"> <dblValue>3103.0</dblValue> </parameter> <parameter id="CONSTANT_BASE_FLOW" name="CONSTANT_BASE_FLOW"> <dblValue>0.0</dblValue> </parameter> <parameter id="UHG_ORDINATES" name="UHG_ORDINATES"> <table> <columnTypes A="double"/> <row A="8666.18"/> <row A="19498.05"/> <row A="33941.3"/> <row A="46217.72"/> <row A="24331.23"/> <row A="50550.24"/> <row A="23027.725"/> <row A="36829.26"/> <row A="28885.35"/> <row A="21664.88"/> <row A="15165.53"/> <row A="9387.31"/> <row A="6282.09"/> <row A="4476.97"/> <row A="3033.57"/> <row A="1949.57"/> <row A="1155.65"/> <row A="577.82"/> <row A="288.91"/> <row A="71.65"/> <row A="0.0"/> <row A="0.0"/> <row A="0.0"/> <row A="0.0"/> <row A="0.0"/> <row A="0.0"/> <row A="0.0"/> <row A="0.0"/> </table> </parameter> </group> </parameters> |
...
Time series modifiers
Time series modifiers modify time series. It is possible to apply more than 1 modifier to a single time series. A single time series modifier can be applied to multiple time series. The original time series will always be left unchanged in the database. When a time series is retrieved from the database first the original time series will be retrieved. After retrieving the time series from the database the modifiers will be applied to the time series. The modifiers will be applied from old to new. Rating curves can also be modified in FEWS. Since rating curves are considered to be a form of time series, rating curve modifiers are a special type of time series modifiers. Time series modifiers can be created by using the modifiers panel or by modifying a time series directly in the time series plot or time series table.
...
By default, local modifiers are committed when the user starts a server run in which these modifiers are used. When this option is enabled the modifiers will be committed directly after the moment they are changed.
Location attribute modifiers
Currently there is only one type of modifier, the locationAttributeModifier, available to modify location attributes. This type has however a lot of configuration options so it can be used in a lot of different ways.
Location Attribute Modifier
This type is the only type available to modify location attributes. The section will explain the available configuration options in detail.
Basic examples
Although this modifier type offers a lot of configuration options, it is possible to configure a basic location attribute modifier without much effort.
Below an example.
| Code Block | ||||
|---|---|---|---|---|
| ||||
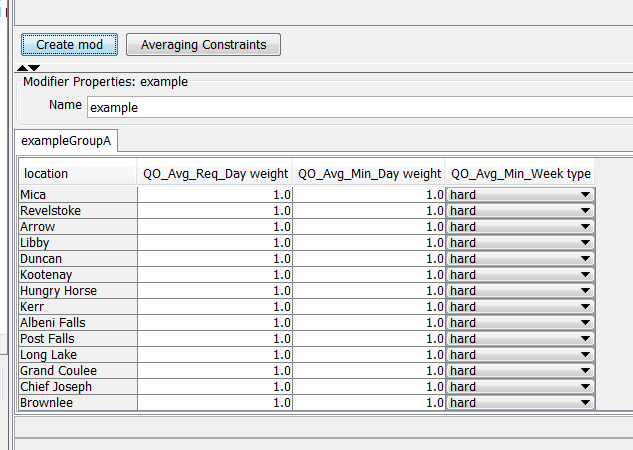
		<locationAttributeModifier id="example" name="example">
			<modifiableGroup name="exampleGroupA">
				<locationSetId>MODIFIABLE_PROJECTS_QO_Avg_Min</locationSetId>
				<attribute id="wQO_Avg_Req_Day_RT">
					<comment>Original value: @wQO_Avg_Req_Day_RT@</comment>
				</attribute>
				<attribute id="wQO_Avg_Min_Day_RT">
					<comment>Original value: @wQO_Avg_Min_Day_RT@</comment>
				</attribute>
			</modifiableGroup>
</locationAttributeModifier> |
The basic example above configures a modifier which can be used to modify two attributes of all the locations in locationSet MODIFIABLE_PROJECTS_QO_Avg_Min.
Below a screenshot of this modifier in the modifiers panel.
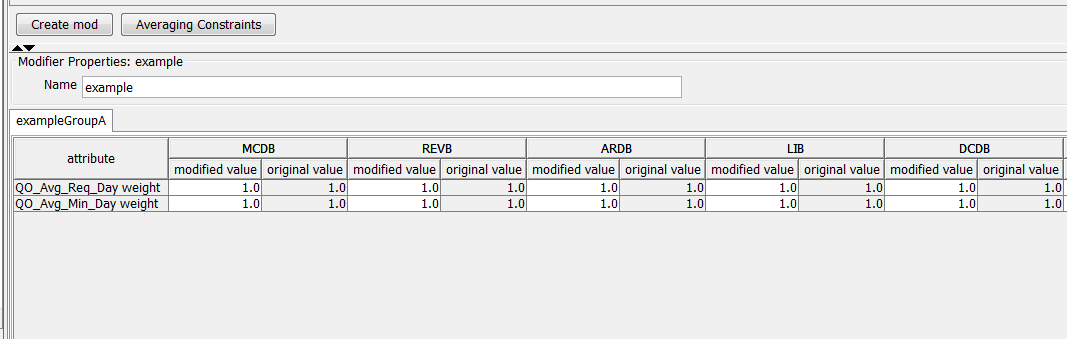
The modifier shows the original and the modified values by default. To hide the original values you can use the option <showOriginalValues>
| Code Block | ||
|---|---|---|
| ||
<locationAttributeModifier id="example" name="example">
			<modifiableGroup name="exampleGroupA">
				<locationSetId>MODIFIABLE_PROJECTS_QO_Avg_Min</locationSetId>
				<attribute id="wQO_Avg_Req_Day_RT">
					<comment>Original value: @wQO_Avg_Req_Day_RT@</comment>
				</attribute>
				<attribute id="wQO_Avg_Min_Day_RT">
					<comment>Original value: @wQO_Avg_Min_Day_RT@</comment>
				</attribute>
				<tabularLayout>
					<showOriginalValues>false</showOriginalValues>
				</tabularLayout>
			</modifiableGroup>
</locationAttributeModifier> |
When this option is set to false, the original values will be hidden in the panel.

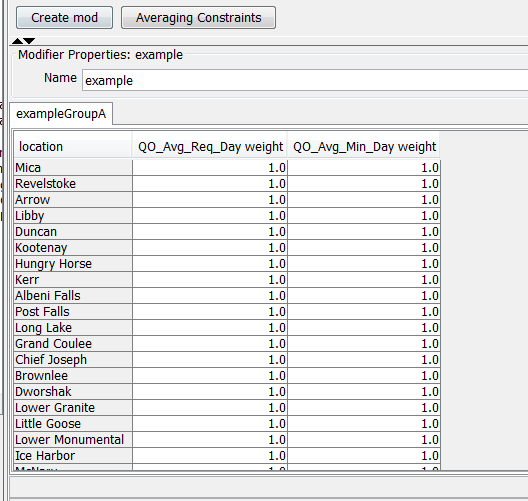
In the example above the attributes are located in the rows of the table and the locations are positioned in the columns of the table. To switch the locations to the rows and the attributes to the columns the option <locationOrientation> can be used.
Below an example.
Valid time
The behaviour of the valid time for simulated time series and external historical time series is as follows:
When modifiers are defined in the period before valid time, they will always be valid.

The situation changes when modified values are placed in the future. When the valid time is on or after time zero, all modified values are valid and will be used.
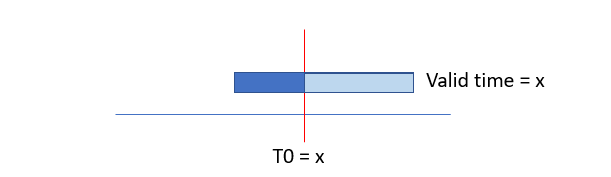
Later, when time has proceeded and valid time is before time zero, the modified values AFTER valid time are not valid anymore.

The behaviour of the valid time for external forecasting time series is as follows:
If a modifier has a valid time then it will only be applied if the external forecast time is the same as the valid time. If a modifier doesn't have a valid time then it will always be valid.
Assigning modifiers to whatifs
By default, modifiers are always applied to the workflow
With the introduction of the new WhatIf Templates/WhatIf Editor functionality in 2021.01, one can configure the system to allow modifiers to be created in the What-If Editor and only to be applied in a whatif.
This behavior is specified in element <whatIfModifierType> available in each modifierType, which offers four options:
- always apply in workflow (default)
- apply according to creation method (since 2022.02)
- apply modifier if referenced in a what-if workflow
- never apply in a what-if workflow (i.e. always apply unless running a workflow with a whatif attached)
ModifierTypes configured with case 1 (always apply in workflow) represent the default behaviour. The associated Modifiers can be created in the ModifiersDisplay or in the TimeSeriesDisplay. These modifiers can not be created in the WhatIf Editor.
ModifierTypes configured with case 2 (apply according to creation method) can be created in the ModifiersDisplay or in the WhatIf Editor. When created in the ModifiersDisplay the modifier will apply in the regular forecast workflow, but will never be applied in a what-if forecast workflow. When created in the WhatIf Editor, theyare tied to a specific what-if and will only be applied in the associated what-if forecast workflow.
ModifierTypes configured with case 3 (apply modifier if referenced in a whatif workflow) can only be created in the WhatIf Editor. The created modifier is directly associated with the whatif-instance and will only be applide in a whatif workflow. The created modifier will never be applied in a regular workflow.
ModifierTypes configured with case 4 (never apply in a what-if workflow) allows creation of modifiers in the ModifiersDisplay or in the TimeSeriesDisplay. These modifiers can not be created in the WhatIf Editor.the created modifier will only apply in a regular forecast and not in a what-if forecast.
Modifiers can become part of a what-if by referencing the modifierType in the whatifTemplates.
Visibility of modifiers in the IFD
When a modifier is of a type without a What-if modifier type configured then the modifier is visible when the modifier is used at the selected topology node or what-if node. But when the modifier is of a type with a What-If modifier type configured then different rules apply.
| What-If modifier type | Topology Node | What-If Node |
|---|---|---|
| always apply in workflow (default) | visible when applicable for the selected node | visible when applicable for the selected node |
| never apply in what-if workflows | visible when applicable for the selected node | never visible |
| apply if referenced in what-if workflow | never visible | visible when applicable for the selected node |
| apply according to creation method | visible when applicable for the selected node | never visible |
Location attribute modifiers
Currently there is only one type of modifier, the locationAttributeModifier, available to modify location attributes. This type has however a lot of configuration options so it can be used in a lot of different ways.
Location Attribute Modifier
This type is the only type available to modify location attributes. The section will explain the available configuration options in detail.
Basic examples
Although this modifier type offers a lot of configuration options, it is possible to configure a basic location attribute modifier without much effort.
Below an example.
| Code Block | ||||
|---|---|---|---|---|
| ||||
<locationAttributeModifier id=" | ||||
| Code Block | ||||
| ||||
<locationAttributeModifier id="example" name="example"> <modifiableGroup name="exampleGroupA"> <locationSetId>MODIFIABLE_PROJECTS_QO_Avg_Min</locationSetId> <attribute id="wQO_Avg_Req_Day_RT"> <comment>Original value: @wQO_Avg_Req_Day_RT@</comment> </attribute> <attribute id="wQO_Avg_Min_Day_RT"> <comment>Original value: @wQO_Avg_Min_Day_RT@</comment> </attribute> <tabularLayout> <showOriginalValues>false</showOriginalValues> <locationOrientation>row</locationOrientation> </tabularLayout>modifiableGroup> </modifiableGroup> </locationAttributeModifier> |
Below a screenshot of the display.
The basic example above configures a modifier which can be used to modify two attributes of all the locations in locationSet MODIFIABLE_PROJECTS_QO_Avg_Min.
Below a screenshot of this modifier in the modifiers panel.
The modifier shows the original and the modified values by default. To hide the original values you can use the option <showOriginalValues> In the examples above only one modifiableGroup was defined. It is also possible to define a location attribute modifier with multiple modifiableGroups. Below a config example.
| Code Block | ||
|---|---|---|
| ||
<locationAttributeModifier id="example" name="example"> <modifiableGroup name="exampleGroupA"> <locationSetId>MODIFIABLE_PROJECTS_QO_Avg_Min</locationSetId> <attribute id="wQO_Avg_Req_Day_RT"> <comment>Original value: @wQO_Avg_Req_Day_RT@</comment> </attribute> <attribute id="wQO_Avg_Min_Day_RT"> <comment>Original value: @wQO_Avg_Min_Day_RT@</comment> </attribute> <attribute id="QO_Avg_Min_Week_constraintType_RT"><tabularLayout> <selection> <predefined> <option>hard</option><showOriginalValues>false</showOriginalValues> <option>soft</option> </tabularLayout> </predefined>modifiableGroup> </selection> <comment>Original value: @QO_Avg_Min_Week_constraintType_RT@</comment> </attribute> <tabularLayout> <showOriginalValues>false</showOriginalValues> <locationOrientation>row</locationOrientation> </tabularLayout> </modifiableGroup> <modifiableGroup name="exampleGroupB</locationAttributeModifier> |
When this option is set to false, the original values will be hidden in the panel.
In the example above the attributes are located in the rows of the table and the locations are positioned in the columns of the table. To switch the locations to the rows and the attributes to the columns the option <locationOrientation> can be used.
Below an example.
| Code Block | ||
|---|---|---|
| ||
<locationAttributeModifier id="example" name="example"> <modifiableGroup name="exampleGroupA"> <locationSetId>MODIFIABLE_PROJECTS_QO_Avg_Min</locationSetId> <attribute id="wQO_Avg_MinReq_WeekDay_RT"/> </modifiableGroup> </locationAttributeModifier> |
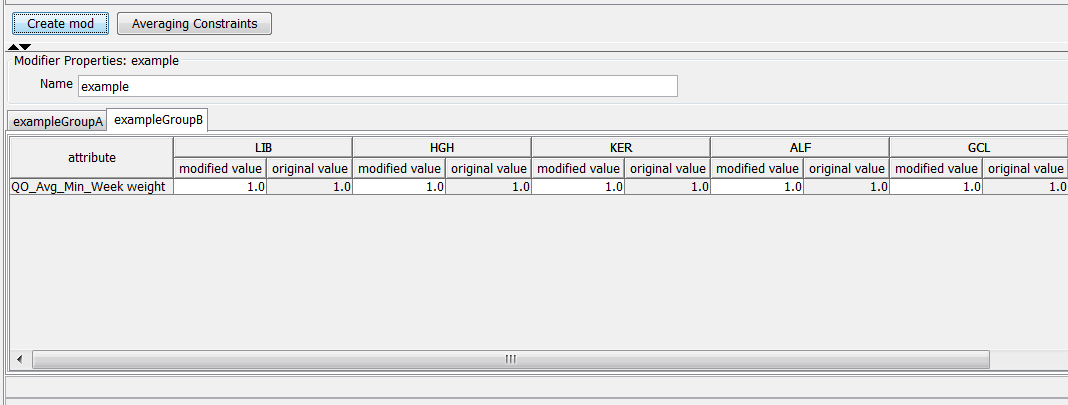
Because there are two modifiable groups defined in the config, the display will show two tabs instead of only one.
Attribute config options
The following config options are available for the <attribute> element:
- read only,
- visible,
- timeSeriesValueClosestToStateSelectionStartTime,
- useSystemTimeAsDefaultvalue,
- useTimeOfFirstReliableValueInTimeSeries,
- selection,
- conditional selection,
- comment.
Read only
This option will make attribute read-only in the display
Visible
It is possible to configure an export-button in the location attribute panel. In some cases it is necessary to export a complete set of location attributes which includes attributes which should not be editable or visible in the location attribute modifiers panel. For this special case it is possible to define location attributes which are invisible. These attributes will be exported to file but will not be editable in the location attribute modifiers panel.
TimeSeriesValueClosestTostateSelectionStartTime
This option can be used to define a set time series from which the value of the attribute should be derived.
The value will be determined in the following way:
- Select the time series from the defined set which has the same location as the location from the location attribute,
- Select the value at the selected state time from the IFD. If a state selection period is defined the start of the period will be used to select a value.
Below a config example.
		<comment>Original value: @wQO_Avg_Req_Day_RT@</comment>
				</attribute>
				<attribute id="wQO_Avg_Min_Day_RT">
					<comment>Original value: @wQO_Avg_Min_Day_RT@</comment>
				</attribute>
				<tabularLayout>
					<showOriginalValues>false</showOriginalValues>
					<locationOrientation>row</locationOrientation>
				</tabularLayout>
			</modifiableGroup>
</locationAttributeModifier> |
Below a screenshot of the display.
In the examples above only one modifiableGroup was defined. It is also possible to define a location attribute modifier with multiple modifiableGroups. Below a config example.
| Code Block | ||
|---|---|---|
| ||
<locationAttributeModifier id="example" name="example">
			<modifiableGroup name="exampleGroupA">
				<locationSetId>MODIFIABLE_PROJECTS_QO_Avg_Min</locationSetId>
				<attribute id="wQO_Avg_Req_Day_RT">
					<comment>Original value: @wQO_Avg_Req_Day_RT@</comment>
				</attribute>
				<attribute id="wQO_Avg_Min_Day_RT">
					<comment>Original value: @wQO_Avg_Min_Day_RT@</comment>
				</attribute>
				<attribute id="QO_Avg_Min_Week_constraintType_RT">
					<selection>
						<predefined>
<option>hard</option> | ||
| Code Block | ||
| ||
<attribute id="URBS_IL_AWRA"> <timeSeriesValueClosestToStateSelectionStartTime> <timeSeriesSet> <moduleInstanceId>AWRAGrid_To_SubCatchments</moduleInstanceId> <valueType>scalar</valueType> <parameterId>AWRA.IL</parameterId> <locationSetId>AUS_URBS_subcatchments</locationSetId> <timeSeriesType>external historical</timeSeriesType> <timeStep unit="day"/> <relativeViewPeriod unit="day" start="-14" end="0"/> <readWriteMode>read only<<option>soft</readWriteMode>option> </timeSeriesSet>predefined> </timeSeriesValueClosestToStateSelectionStartTime>selection> <comment>No advice<<comment>Original value: @QO_Avg_Min_Week_constraintType_RT@</comment> </attribute> |
useSystemTimeAsDefaultValue
This element can be used define a default value for a date/time attribute. If this option is selected the initial value is set to the system time. When this option is used a checkbox will be shown after the date/time selection box. If this checkbox is selected then a modifier will be created for this attribute with the current value of the date/time box. When an existing modifier is selected and there is a modified value for the attribute in this modifier then the checkbox will also be selected.
useTimeOfFirstReliableValueInTimeSeries
This option is similar to the option useSystemTimeAsDefaultValue, but instead of setting the default value to the system time the default time will be derived from a time series. A time series set can be configured for this option. The first time of the time series array for which a reliable value is available will be used.
Selection
The element <selection> can be used to predefine the list of options which are available for a certain attribute. The predefined list op options can be defined by:
- a list of location id's,
- a location set,
- a hard-coded predefined list of options,
- a multi-value attribute which contains all the options which are available.
Below an example of a hard-coded list of options.
				</attribute>
				<tabularLayout>
					<showOriginalValues>false</showOriginalValues>
					<locationOrientation>row</locationOrientation>
				</tabularLayout>
			</modifiableGroup>
			<modifiableGroup name="exampleGroupB">
				<locationSetId>MODIFIABLE_PROJECTS_QO_Avg_Min</locationSetId>
				<attribute id="wQO_Avg_Min_Week_RT"/>
			</modifiableGroup>
</locationAttributeModifier> |
Because there are two modifiable groups defined in the config, the display will show two tabs instead of only one.
Attribute config options
The following config options are available for the <attribute> element:
- read only,
- visible,
- timeSeriesValueClosestToStateSelectionStartTime,
- useSystemTimeAsDefaultvalue,
- useTimeOfFirstReliableValueInTimeSeries,
- selection,
- conditional selection,
- comment.
Read only
This option will make attribute read-only in the display
Visible
It is possible to configure an export-button in the location attribute panel. In some cases it is necessary to export a complete set of location attributes which includes attributes which should not be editable or visible in the location attribute modifiers panel. For this special case it is possible to define location attributes which are invisible. These attributes will be exported to file but will not be editable in the location attribute modifiers panel.
TimeSeriesValueClosestTostateSelectionStartTime
This option can be used to define a set time series from which the value of the attribute should be derived.
The value will be determined in the following way:
- Select the time series from the defined set which has the same location as the location from the location attribute,
- Select the value at the selected state time from the IFD. If a state selection period is defined the start of the period will be used to select a value.
Below a config example.
| Code Block | ||
|---|---|---|
| ||
<attribute id="URBS_IL_AWRA">
					<timeSeriesValueClosestToStateSelectionStartTime>
						<timeSeriesSet>
							<moduleInstanceId>AWRAGrid_To_SubCatchments</moduleInstanceId>
							<valueType>scalar</valueType>
							<parameterId>AWRA.IL</parameterId>
							<locationSetId>AUS_URBS_subcatchments</locationSetId>
							<timeSeriesType>external historical</timeSeriesType>
							<timeStep unit="day"/>
<relativeViewPeriod unit="day" start="-14" end="0"/> | ||
| Code Block | ||
| ||
<attributeModifiers> <locationAttributeModifier id="example" name="example"> <modifiableGroup name="exampleGroupA"> <locationSetId>MODIFIABLE_PROJECTS_QO_Avg_Min</locationSetId> <attribute id="wQO_Avg_Req_Day_RT"> <comment>Original value: @wQO_Avg_Req_Day_RT@</comment> </attribute> <attribute id="wQO_Avg_Min_Day_RT"> <comment>Original value: @wQO_Avg_Min_Day_RT@</comment> </attribute> <attribute id="QO_Avg_Min_Week_constraintType_RT"> <selection> <predefined> <option>hard</option> <option>soft<<readWriteMode>read only</option>readWriteMode> </predefined>timeSeriesSet> </selection>timeSeriesValueClosestToStateSelectionStartTime> <comment>Original value: @QO_Avg_Min_Week_constraintType_RT@<<comment>No advice</comment> </attribute> <tabularLayout> <showOriginalValues>false</showOriginalValues> <locationOrientation>row</locationOrientation> </tabularLayout> </modifiableGroup> <modifiableGroup name="exampleGroupB"> <locationSetId>MODIFIABLE_PROJECTS_QO_Avg_Min</locationSetId> <attribute id="wQO_Avg_Min_Week_RT"/> </modifiableGroup> </locationAttributeModifier> |
The display will look like the example below.
Conditional selection
The conditional selection can be used to disable other attributes depending on which option is selected for an attribute. For example if option A is selected for a certain attribute X then attribute Y should be disabled and attribute Z should be enabled. If option B is selected then attribute Z should be disabled and attribute Y should be enabled. Below an example.
useSystemTimeAsDefaultValue
This element can be used define a default value for a date/time attribute. If this option is selected the initial value is set to the system time. When this option is used a checkbox will be shown after the date/time selection box. If this checkbox is selected then a modifier will be created for this attribute with the current value of the date/time box. When an existing modifier is selected and there is a modified value for the attribute in this modifier then the checkbox will also be selected.
useTimeOfFirstReliableValueInTimeSeries
This option is similar to the option useSystemTimeAsDefaultValue, but instead of setting the default value to the system time the default time will be derived from a time series. A time series set can be configured for this option. The first time of the time series array for which a reliable value is available will be used.
Selection
The element <selection> can be used to predefine the list of options which are available for a certain attribute. The predefined list of options can be defined by:
- a list of location id's,
- a location set,
- a hard-coded predefined list of options, by using the <predefined> or <predefinedInteger> elements
- a multi-value attribute which contains all the options which are available, by using the optionsControllingLocationAttributeId.
Below an example of a hard-coded list of options.
| Code Block | ||
|---|---|---|
| ||
<attributeModifiers>
		<locationAttributeModifier id="example" name="example">
| ||
| Code Block | ||
| ||
<locationAttributeModifier id="example" name="example"> <modifiableGroup name="exampleGroupA"> <locationSetId>MODIFIABLE_PROJECTS_QO_Avg_Min</locationSetId> <attribute id="wQO_Avg_Req_Day_RT"> <comment>Original value: @wQO_Avg_Req_Day_RT@</comment> </attribute> <attribute id="wQO_Avg_Min_Day_RT"> <comment>Original value: @wQO_Avg_Min_Day_RT@</comment> </attribute> <attribute id="QO_Avg_Min_Week_constraintType_RT"> <conditionalSelection><selection> <option value="hard"><predefined> <disabledAttributeId>wQO_Avg_Req_Day_RT</disabledAttributeId> </option> <option value="soft"><option>hard</option> <disabledAttributeId>wQO_Avg_Min_Day_RT</disabledAttributeId><option>soft</option> </option>predefined> </conditionalSelection>selection> <comment>Original value: @QO_Avg_Min_Week_constraintType_RT@</comment> </attribute> <tabularLayout> <showOriginalValues>false</showOriginalValues> <locationOrientation>row</locationOrientation> </tabularLayout> </modifiableGroup> </locationAttributeModifier> |
...
<modifiableGroup name="exampleGroupB"> <locationSetId>MODIFIABLE_PROJECTS_QO_Avg_Min</locationSetId> <attribute id="wQO_Avg_ |
...
Min_ |
...
Week_RT"/>
			</modifiableGroup>
</locationAttributeModifier> |
The display will look like the example below.
Conditional selection
The conditional selection can be used to disable other attributes depending on which option is selected for an attribute. For example if option A is selected for a certain attribute X then attribute Y should be disabled and attribute Z should be enabled. If option B is selected then attribute Z should be disabled and attribute Y should be enabled. Below an example.
| Code Block | ||
|---|---|---|
| ||
<locationAttributeModifier id="example" name="example">
<modifiableGroup name="exampleGroupA |

Comment
The bottom line of the display shows the comment for each attribute. The comment can be defined by using this element. It is possible to use location attribute in the comment. The unmodified value of the defined attribute will be used in the comment. Below an example.
| Code Block | ||
|---|---|---|
| ||
<attribute id="QO_Avg_Min_Week_constraintType_RT"> <conditionalSelection><locationSetId>MODIFIABLE_PROJECTS_QO_Avg_Min</locationSetId> <option<attribute valueid="hardwQO_Avg_Req_Day_RT"> <disabledAttributeId>wQO<comment>Original value: @wQO_Avg_Req_Day_RT<RT@</disabledAttributeId>comment> </option>attribute> <option<attribute valueid="softwQO_Avg_Min_Day_RT"> <disabledAttributeId>wQO<comment>Original value: @wQO_Avg_Min_Day_RT<RT@</disabledAttributeId>comment> </option>attribute> </conditionalSelection> <comment>Original value: @QO<attribute id="QO_Avg_Min_Week_constraintType_RT"> <conditionalSelection> <option value="hard"> <disabledAttributeId>wQO_Avg_Req_Day_RT</disabledAttributeId> </option> <option value="soft"> <disabledAttributeId>wQO_Avg_Min_Day_RT</disabledAttributeId> </option> </conditionalSelection> <comment>Original value: @QO_Avg_Min_Week_constraintType_RT@</comment> </attribute> |
Define which locations are modifiable
To define from which locations the attributes can be modified there are 3 options available:
- locationSetId,
- locationId,
- timeSeries
When the first two options are used the set of modifiable locations is determined in the following way. After selecting a topology node the module config quick scanner will determine which locations are available in the workflow of the selected node. The intersection of the locations which are found for the selected node and the configured locations (by either a location set or a list of locations) is the set of modifiable locations for the selected node.
The option timeSeries can be used to define a filter. First all the time series which are used in the topology workflow are determined. Then the found time series are filtered by using the defined filter the locations of the resulting time series are the modifiable locations for a toplogy node.
				</attribute>
				<tabularLayout>
					<showOriginalValues>false</showOriginalValues>
					<locationOrientation>row</locationOrientation>
				</tabularLayout>
			</modifiableGroup>
</locationAttributeModifier> |
If the option hard is selected, the attribute wQO_Avg_Req_Day_RT should be disabled. If the second option is selected the attribute wQO_Avg_Min_Day_RT should be disabled. Below an example of the display
Comment
The bottom line of the display shows the comment for each attribute. The comment can be defined by using this element. It is possible to use location attribute in the comment. The unmodified value of the defined attribute will be used in the comment. Below an exampleBelow a configuration example of the option <timeSeries>.
| Code Block | ||
|---|---|---|
| ||
<modifiableGroup<attribute nameid="exampleGroupAQO_Avg_Min_Week_constraintType_RT"> <timeSeries> <conditionalSelection> <parameterId>QO</parameterId> <option value="hard"> </timeSeries> <attribute id="wQO<disabledAttributeId>wQO_Avg_Req_Day_RT"> RT</disabledAttributeId> <comment>Original</option> <option value="soft"> <disabledAttributeId>wQO_Avg_Min_Day_RT</disabledAttributeId> </option> </conditionalSelection> <comment>Original value: @wQO@QO_Avg_Min_ReqWeek_DayconstraintType_RT@</comment> </attribute> |
...
Define which locations are modifiable
To define from which locations the attributes can be modified there are 3 options available:
- locationSetId,
- locationId,
- timeSeries
When the first two options are used the set of modifiable locations is determined in the following way. After selecting a topology node the module config quick scanner will determine which locations are available in the workflow of the selected node. The intersection of the locations which are found for the selected node and the configured locations (by either a location set or a list of locations) is the set of modifiable locations for the selected node.
The option timeSeries can be used to define a filter. First all the time series which are used in the topology workflow are determined. Then the found time series are filtered by using the defined filter the locations of the resulting time series are the modifiable locations for a toplogy node.
Below a configuration example of the option <timeSeries>If this option is configured an additional button "export" will be shown in the modifiers display. It is possible to export the location attribute modifiers to dbf-format or csv-format. Each modifierGroup will be exported to a separate file. In addition a file called description.txt will be exported. This file will contain general information about the exported modifier. By default the data will be exported to dbf-format. Below an example of a location attribute modifier which is exported to csv-format.
| Code Block | ||
|---|---|---|
| ||
Location id,URBS_LOSSTYPE,URBS_IL,URBS_CL,URBS_PR,URBS_IF,URBS_ILMX,URBS_RF,URBS_IFRF
tweed_eungella,ILCL,2.0,22.0,0.0,1.0E31,0.0,0.0,0.0 |
Below an example.
| Code Block | ||
|---|---|---|
| ||
<locationAttributeModifier id="example" name="example"<modifiableGroup name="exampleGroupA"> <exportFile> <timeSeries> <fileName>example</fileName> <exportAllAttributes>true<<parameterId>QO</exportAllAttributes>parameterId> <dataFormat>csv</dataFormat> </exportFile>timeSeries> <modifiableGroup name="exampleGroupA"> <locationSetId>MODIFIABLE_PROJECTS_QO_Avg_Min</locationSetId> <attribute id="wQO_Avg_Req_Day_RT"> <comment>Original value: @wQO_Avg_Req_Day_RT@</comment> </attribute> <attribute id="wQO_Avg_Min_Day_RT"> <comment>Original value: @wQO_Avg_Min_Day_RT@</comment> </attribute> <tabularLayout> <showOriginalValues>false</showOriginalValues> <locationOrientation>row</locationOrientation> </tabularLayout> </modifiableGroup> </locationAttributeModifier> |
Export file
If this option is configured an additional button "export" will be shown in the modifiers display. It is possible to export the location attribute modifiers to dbf-format or csv-format. Each modifierGroup will be exported to a separate file. In addition a file called description.txt will be exported. This file will contain general information about the exported modifier. By default the data will be exported to dbf-format. Below an example of a location attribute modifier which is exported to csv-format.
| Code Block | ||
|---|---|---|
| ||
Location id,URBS_LOSSTYPE,URBS_IL,URBS_CL,URBS_PR,URBS_IF,URBS_ILMX,URBS_RF,URBS_IFRF
tweed_eungella,ILCL,2.0,22.0,0.0,1.0E31,0.0,0.0,0.0 |
Below an example.
| Code Block | ||
|---|---|---|
| ||
<locationAttributeModifier id="example" name="example">
			<exportFile>
				<fileName>example</fileName>
				<exportAllAttributes>true</exportAllAttributes>
				<dataFormat>csv</dataFormat>
			</exportFile>
			<modifiableGroup name="exampleGroupA">
				<locationSetId>MODIFIABLE_PROJECTS_QO_Avg_Min</locationSetId>
				<attribute id="wQO_Avg_Req_Day_RT">
					<comment>Original value: @wQO_Avg_Req_Day_RT@</comment>
				</attribute>
				<attribute id="wQO_Avg_Min_Day_RT">
					<comment>Original value: @wQO_Avg_Min_Day_RT@</comment>
				</attribute>
				<tabularLayout>
					<showOriginalValues>false</showOriginalValues>
					<locationOrientation>row</locationOrientation>
				</tabularLayout>
			</modifiableGroup>
</locationAttributeModifier> |
The The element <fileName> is used to define the name of export file. The element <exportAllAttributes> can be used to define if only the visible attributes (exportAllAttributes=false) should be exported or all the attributes (exportAllAttributes=true). Currently two dataFormats are supported for the export function csv and dbf. The dataFormat can be configured by using the element <dataFormat>. Below an example of a modifier with the element <exportFile> configured.
...
| Code Block | ||
|---|---|---|
| ||
<locationAttributeModifier id="example" name="example"> <exportFile> <fileName>example</fileName> <exportAllAttributes>true</exportAllAttributes> <dataFormat>csv</dataFormat> </exportFile> <modifiableGroup name="exampleGroupA"> <locationSetId>MODIFIABLE_PROJECTS_QO_Avg_Min</locationSetId> <attribute id="wQO_Avg_Req_Day_RT"> <comment>Original value: @wQO_Avg_Req_Day_RT@</comment> </attribute> <attribute id="wQO_Avg_Min_Day_RT"> <comment>Original value: @wQO_Avg_Min_Day_RT@</comment> </attribute> <tabularLayout> <showOriginalValues>false</showOriginalValues> <locationOrientation>row</locationOrientation> </tabularLayout> <summaryFunction>My summary= @wQO_Avg_Req_Day_RT@</summaryFunction> </modifiableGroup> </locationAttributeModifier> |
Below an example of the modifiers display.
...
The (changed) location attribute modifier can also be applied to multiple locations. For this purpose the button “Apply to …” can be used.
Note that “Apply to …” button only becomes visible when we are modifying attributes for a single location.
ShiftDateTimeModifier
This modifier can be used to modifiy a single date/time attribute. The default value of the date/time attribute can be configured.
It is possible to define an offset and a time step. The initial value in the display will determined by adding the offset to the time zero of the node. After that the calculated time will be shifted toward the first valid time of the configured time step.
The date/time box in the modifiers panel has label. The content of this label can be configured in the modifierTypes.xml. It is also possible to configure a editablePeriodTimeSeries.
The value of the date/time attribute should always be in the period for which the configured time series has reliable data.
The user can also set the valid time of the date/time attribute modifier. When the time zero of a run is beyond the valid time of the modifier then the modifier will no longer be applied.
The default value of the valid time can be configured by configuring an offset. The default value of the valid time will be set to time zero plus the offset.
| Code Block | ||
|---|---|---|
| ||
<attributeModifiers>
		<shiftDateTimeModifier id="shiftDateTimeModifier" name="shiftDateTimeModifier">
			<attributeId>wMarketChoice_RT</attributeId>
			<locationId>BPA</locationId>
			<defaultModifierTime>
				<offset unit="day"/>
				<timeStep unit="day"/>
			</defaultModifierTime>
			<customLabel>My custom label text</customLabel>
			<editablePeriodTimeSeries>
				<moduleInstanceId>Publish_RT</moduleInstanceId>
				<valueType>scalar</valueType>
				<parameterId>GN_Sim</parameterId>
				<locationId>BPA</locationId>
				<timeSeriesType>simulated forecasting</timeSeriesType>
				<timeStep unit="hour"/>
				<relativeViewPeriod unit="day"  start="0" startOverrulable="false" end="24" endOverrulable="false"/>
				<readWriteMode>read only</readWriteMode>
			</editablePeriodTimeSeries>
			<offsetValidTime unit="day"/>
		</shiftDateTimeModifier>
</attributeModifiers> |
Module parameter modifiers
Module parameter modifiers can be used to modify module parameters. The most common usage is to modify the module parameters of a model directly but it is also possible to modify transformations with this modifier.
To modify the parameters of a transformation the transformation must have a module parameter file configured.
Module parameter modifiers
Module parameter modifiers are used to modify module parameter file which are used by a model. Currently there are two types available:
- module parameter modifier
- multiple model parameter modifier
Module parameter modifier
The module parameter modifier is a generic module parameter file editor which can be used to modify every module parameter file.
It is possible to limit the number of module parameter files which can be modified by applying a filter. It is possible to have
more than one module parameter modifier type configured in a Delft-FEWS application.
An example of the use of this modifier is the BASEFLOW-modifier available in NWS (National Weather Service) applications. This modifier modifies the BASEFLOW-parameter of the UNITHG-
model.
Below an example of a module parameter modifier.
| Code Block | ||
|---|---|---|
| ||
<moduleParameterModifier id="baseflow" name="baseflow">
        <filter>
            <moduleParameterId>CONSTANT_BASE_FLOW</moduleParameterId>
        </filter>
        <defaultValidTime/>
        <overwriteParameterValues>true</overwriteParameterValues>
</moduleParameterModifier> |
Below an example of the display of a module parameter modifier

With the element <filter> can be identified which module parameter files can be modified. In the example above every module parameter file with the element CONSTANT_BASE_FLOW can be modified. The filter is also used to filter which part of the module parameter file can be modified. In the example below only the module parameters with id CONSTANT_BASE_FLOW are editable by this modifier.
Multiple model parameter modifier
This type of modifier can also be used to modify module parameter files of models. The difference with the module parameter modifier type is that this type can be used to modify multiple parameter files with a single modifier. This type of modifier is mainly used for calibration purposes but it can also be used in an operational environment. Below an basic example of this modifier.
| Code Block |
|---|
    <multipleModuleParameterModifier id="example" name="example">
        <numberParameter id="SCF"/>
</multipleModuleParameterModifier> |
The configuration above declares that all module parameter files which have parameter SCF can be modified with the modifier "example". Below an example of the display of this modifier.

Multi-value attribute modifiers
Multi-value attribute modifier is intended to modify multi-value location attributes, for example pump curves. An example:
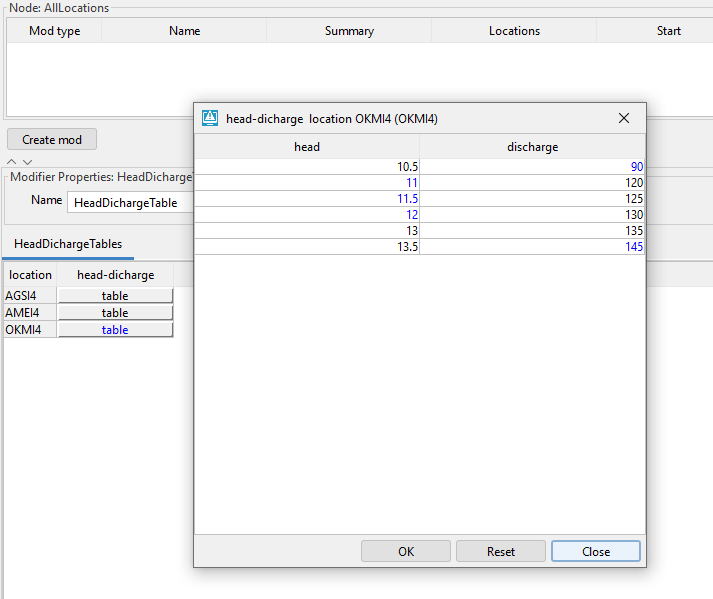
Both attribute head and discharge are multi-value attributes
The values are modified in a table-popup that can be opened from the normal locationattribute modifier table by clicking on a cell-button.
The table-popup is updated every time the cell-button is clicked. To confirm the changes in the table-popup, press OK button. To get the original values back, press Reset button.
Similar to all other modifier types, the modified table will be stored as a modifier after pressing button Apply
The configuration associated with the head-discharge example can be found below. Note that it is possible to set a column to read only using <attributeId readOnly="true">head</attributeId>
| Code Block |
|---|
<locationAttributeModifier id="HeadDichargeTable" name="HeadDichargeTable">
	<modifiableGroup name="HeadDichargeTables">
	 	<locationSetId>AllLocations</locationSetId>

		<attributesTable id="head-dicharge">
		    <attributeId>head</attributeId>
		    <attributeId>discharge</attributeId>
		</attributesTable>

		<tabularLayout>
			 <showOriginalValues>false</showOriginalValues>
			 <locationOrientation>row</locationOrientation>
		</tabularLayout>
	</modifiableGroup>
</locationAttributeModifier> |
Multi-value attributes and single-value attributes can be combined in one modifiableGroup . An example:
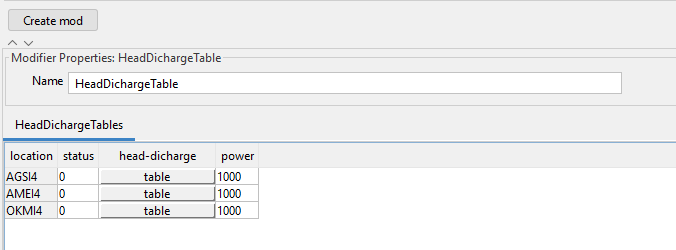
The modified multi-value tables together with the single-value modified attributes will be stored after pressing button Apply.
The configuration associated with this example can be found below:
| Code Block |
|---|
<locationAttributeModifier id="HeadDichargeTable" name="HeadDichargeTable">
	<modifiableGroup name="HeadDichargeTables">
	 	<locationSetId>AllLocations</locationSetId>

		<attribute id="status"/>

		<attributesTable id="head-dicharge">
		    <attributeId>head</attributeId>
		    <attributeId>discharge</attributeId>
		</attributesTable>

		<attribute id="power"/>

		<tabularLayout>
			 <showOriginalValues>false</showOriginalValues>
			 <locationOrientation>row</locationOrientation>
		</tabularLayout>
	</modifiableGroup>
</locationAttributeModifier> |
Multi-value attribute modifier supports number and text attributes. It does not support boolean and date-time attributes (yet)
Also, it supports only layout with locationOrientation=row
ShiftDateTimeModifier
This modifier can be used to modifiy a single date/time attribute. The default value of the date/time attribute can be configured.
It is possible to define an offset and a time step. The initial value in the display will determined by adding the offset to the time zero of the node. After that the calculated time will be shifted toward the first valid time of the configured time step.
The date/time box in the modifiers panel has label. The content of this label can be configured in the modifierTypes.xml. It is also possible to configure a editablePeriodTimeSeries.
The value of the date/time attribute should always be in the period for which the configured time series has reliable data.
The user can also set the valid time of the date/time attribute modifier. When the time zero of a run is beyond the valid time of the modifier then the modifier will no longer be applied.
The default value of the valid time can be configured by configuring an offset. The default value of the valid time will be set to time zero plus the offset.
| Code Block | ||
|---|---|---|
| ||
<attributeModifiers>
		<shiftDateTimeModifier id="shiftDateTimeModifier" name="shiftDateTimeModifier">
			<attributeId>wMarketChoice_RT</attributeId>
			<locationId>BPA</locationId>
			<defaultModifierTime>
				<offset unit="day"/>
				<timeStep unit="day"/>
			</defaultModifierTime>
			<customLabel>My custom label text</customLabel>
			<editablePeriodTimeSeries>
				<moduleInstanceId>Publish_RT</moduleInstanceId>
				<valueType>scalar</valueType>
				<parameterId>GN_Sim</parameterId>
				<locationId>BPA</locationId>
				<timeSeriesType>simulated forecasting</timeSeriesType>
				<timeStep unit="hour"/>
				<relativeViewPeriod unit="day"  start="0" startOverrulable="false" end="24" endOverrulable="false"/>
				<readWriteMode>read only</readWriteMode>
			</editablePeriodTimeSeries>
			<offsetValidTime unit="day"/>
		</shiftDateTimeModifier>
</attributeModifiers> |
Module parameter modifiers
Module parameter modifiers can be used to modify module parameters. The most common usage is to modify the module parameters of a model directly but it is also possible to modify transformations with this modifier.
To modify the parameters of a transformation the transformation must have a module parameter file configured.
Module parameter modifiers
Module parameter modifiers are used to modify module parameter file which are used by a model. Currently there are two types available:
- module parameter modifier
- multiple model parameter modifier
Module parameter modifier
The module parameter modifier is a generic module parameter file editor which can be used to modify every module parameter file.
It is possible to limit the number of module parameter files which can be modified by applying a filter. It is possible to have
more than one module parameter modifier type configured in a Delft-FEWS application.
An example of the use of this modifier is the BASEFLOW-modifier available in NWS (National Weather Service) applications. This modifier modifies the BASEFLOW-parameter of the UNITHG-
model.
Below an example of a module parameter modifier.
| Code Block | ||
|---|---|---|
| ||
<moduleParameterModifier id="baseflow" name="baseflow">
        <filter>
            <moduleParameterId>CONSTANT_BASE_FLOW</moduleParameterId>
        </filter>
        <defaultValidTime/>
        <overwriteParameterValues>true</overwriteParameterValues>
</moduleParameterModifier> |
Below an example of the display of a module parameter modifier
With the element <filter> can be identified which module parameter files can be modified. In the example above every module parameter file with the element CONSTANT_BASE_FLOW can be modified. The filter is also used to filter which part of the module parameter file can be modified. In the example below only the module parameters with id CONSTANT_BASE_FLOW are editable by this modifier.
Multiple model parameter modifier
This type of modifier can also be used to modify module parameter files of models. The difference with the module parameter modifier type is that this type can be used to modify multiple parameter files with a single modifier. This type of modifier is mainly used for calibration purposes but it can also be used in an operational environment. Below an basic example of this modifier.
| Code Block |
|---|
    <multipleModuleParameterModifier id="example" name="example">
        <numberParameter id="SCF"/>
</multipleModuleParameterModifier> |
The configuration above declares that all module parameter files which have parameter SCF can be modified with the modifier "example". Below an example of the display of this modifier.
The display will show all the module parameter files of the selected segment which have a parameter SCF. In this case there are two module parameter files which have parameter SCF. It is possible to define a minimum and/or a maximum value for the applied The display will show all the module parameter files of the selected segment which have a parameter SCF. In this case there are two module parameter files which have parameter SCF. It is possible to define a minimum and/or a maximum value for the applied changes to a certain parameter. Below an example.
| Code Block | ||
|---|---|---|
| ||
    <multipleModuleParameterModifier id="example" name="example">
        <numberParameter id="SCF">
            <minimumValue>0.1</minimumValue>
            <maximumValue>10</maximumValue>
        </numberParameter>
</multipleModuleParameterModifier> |
If an invalid value is entered then the display will show an error.

In addition it is also possible to keep the difference of the parameter value between models the same (interModelRelation = preserve difference) or keep the ratio of the values of a parameter the same between models (interModelRelation = preserve ration). Below an configuration example.
| Code Block |
|---|
<multipleModuleParameterModifier id="example" name="example">
        <numberParameter id="SCF">
            <minimumValue>0.1</minimumValue>
            <maximumValue>10</maximumValue>
        </numberParameter>
        <numberParameter id="SI">
            <interModelRelation>preserve difference</interModelRelation>
        </numberParameter>
</multipleModuleParameterModifier> |
...
If the user changes the value of the parameter SI of one of the module parameter files then the values of the SI parameter of the other module parameter will automatically be adjusted so that the difference between the values is still the same. In the example below the difference between the two values of SI is 550.
...
| Code Block | ||
|---|---|---|
| ||
 <singleTableRowParameter id="AREA_DEPLETION_CURVE">
            <xAxisTitle>WE/A(i)</xAxisTitle>
            <yAxisTitle>Areal extent of snow cover (percent)</yAxisTitle>
            <switchAxis>true</switchAxis>
            <columnName>0</columnName>
            <columnName>0.1</columnName>
            <columnName>0.2</columnName>
            <columnName>0.3</columnName>
            <columnName>0.4</columnName>
            <columnName>0.5</columnName>
            <columnName>0.6</columnName>
            <columnName>0.7</columnName>
            <columnName>0.8</columnName>
            <columnName>0.9</columnName>
            <columnName>1.0</columnName>
</singleTableRowParameter> |
The The example below shows that the AREA_DEPLETION_CURVE has a button "curve".
...
The values can editted by changing the values in the table and by clicking in the graph.
It is also possible to edit multiple parameters by using the <userDefinedXYEditor> option.
An config example is given below.
| Code Block | ||
|---|---|---|
| ||
        <userDefinedXYEditor>
            <xAxisParameterId>percolation demand</xAxisParameterId>
            <xAxisTitle>lzdefr</xAxisTitle>
            <invertXAxis>true</invertXAxis>
            <yAxisTitle>percolation demand</yAxisTitle>
            <xAxisStart>0</xAxisStart>
            <xAxisEnd>1</xAxisEnd>
            <xAxisScaleUnit>0.1</xAxisScaleUnit>
            <expression>(LZFPM*LZPK + LZFSM* LZSK)*(1+ZPERC*lzdefr^REXP)</expression>
</userDefinedXYEditor> |
If a this option is used a button will appear at the bottom of the table, after clicking this button the following display will appear.
...
| Code Block | ||
|---|---|---|
| ||
<unitHydrographModifiers> <changeOrdinatesModifier id="unithg" name="unithg"> <defaultStartTime>start run</defaultStartTime> <defaultEndTime>end run</defaultEndTime> <defaultValidTime/> <overwriteParameterValues>false</overwriteParameterValues> </changeOrdinatesModifier> </unitHydrographModifiers> |
...
defaultStartTime
The default start time of the modifier. The available options are startrun and time zero. It corresponds to the same fields in the modifier display. This is only a default value, which can be changed by the user.
...
defaultValidTime
If this option is configured than a valid time can be chosen for this modifier. The valid time always default to time zero.
priorityModifier
Modifier by which module parameter type 'table' can be modified. This modifier presently supports reordening of the table rows for the given moduleParameterId. This moduleParameterId refers to the 'table' parameter defined in pi_modelparameters.xml. When a modifier is created, the original table values are filled in by default. It enables the user to re-order the "priorities" in the modifier display.

Transformation module parameter modifiers
...
| Code Block | ||
|---|---|---|
| ||
<mergeSimpleModifiers> <reverseOrderModifiers id="switchts" name="SWITCHTS"> <defaultStartTime>start run</defaultStartTime> <defaultEndTime>time zero</defaultEndTime> </reverseOrderModifiers> </mergeSimpleModifiers> |
defaultStartTime
The default start time of the modifier. The available options are startrun and time zero. It corresponds to the same field in the modifier display.
...
defaultValidTime
If this option is configured than a valid time can be choosen for this modifier. The valid time always default to time zero. It corresponds to the same fields in the modifier display.
Blending steps modifier
The blending steps modifier is a modifier which can only be used in combination with the transformation <adjust><adjustQ>.
...
| Code Block | ||
|---|---|---|
| ||
<transformation id="BRGN6NVR"> <adjust> <adjustQUsingObservedInstantaneousDischarge> <observedDischarge> <variableId>BRGN6_QIN_6</variableId> </observedDischarge> <simulatedInstantaneousDischarge> <variableId>BRGN6TOT_SQIN_6</variableId> </simulatedInstantaneousDischarge> <moduleParameterFile>ADJUSTQ_BRGN6NVR_BRGN6NVR_UpdateStates</moduleParameterFile> <adjustedForecastDischarge> <variableId>BRGN6NVR_QINE_6</variableId> </adjustedForecastDischarge> </adjustQUsingObservedInstantaneousDischarge> </adjust> </transformation> |
This transformation uses observed discharges and simulated discharges to create an output timeseries.
...
Below is an example of a blending steps modifier. The forecaster can enter the value in the text box and/or change it with the up and down arrows next to the text box.
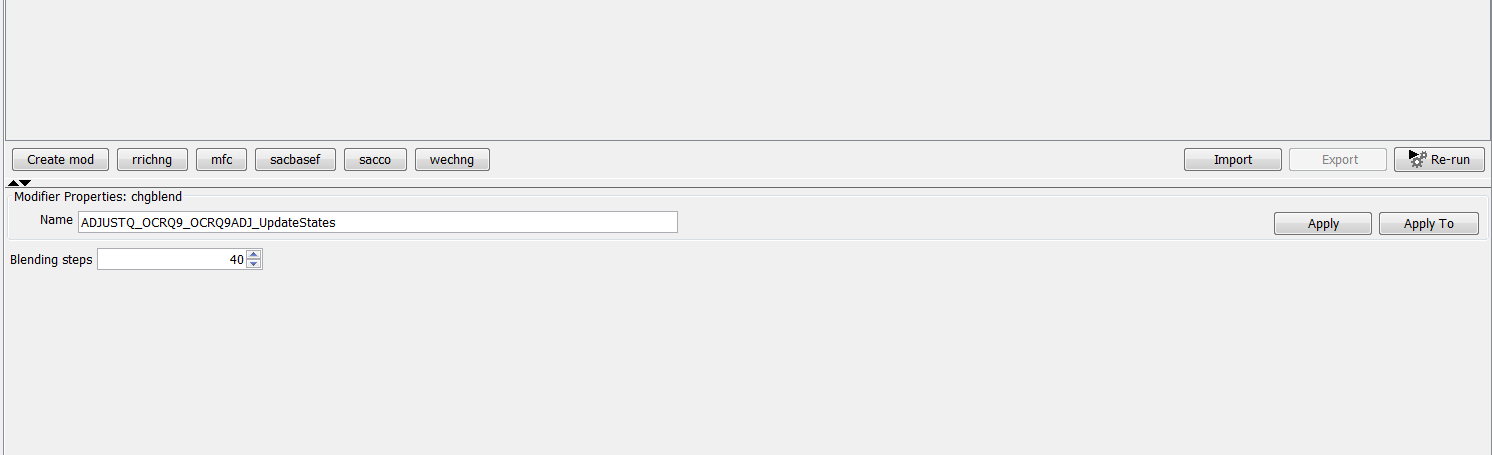
Below an example of the configuration an adjustQModifier.
| Code Block |
|---|
<adjustQModifiers> <blendingStepsModifier id="CHGBLEND" name="CHGBLEND"/> </adjustQModifiers> |
The only thing the configurator has to configure is the id of the modifier and its name.
By doing this the configuration declares that it is allowed to use the blending steps modifier.
...
To be able to use this modifier the transformation sample historic should use a module parameter file to define its configuration options. Make sure all the following parameters are defined in the parameter file:
| Code Block |
|---|
<parameter id="startYear"> <intValue>1966</intValue> </parameter> <parameter id="firstEnsembleMemberIndex"> <intValue>1966</intValue> </parameter> <parameter id="ensembleMemberCount"> <intValue>44</intValue> </parameter> <parameter id="startWaterYear"> <stringValue>--10-01</stringValue> </parameter> |
...
An example of the use of this modifier is the modifier HistoricWaterYears which is in use by NWS.
It is used by the forecasters to overrule the default sample years in the transformation.
...
The forecaster can modifiy the default sample years by changing the start year and end year in the display.
Configuration example
Below an example of the configuration of this modifier.
| Code Block |
|---|
<sampleHistoricalModifiers> <sampleYearsModifier id="historicwateryears" name="historicwateryears"> </sampleYearsModifier> </sampleHistoricalModifiers> |
...
Disable adjustment modifier
...
The moduleparameterfile should define the parameter disableAdjustment.
Below an example
| Code Block |
|---|
<parameters xmlns="http://www.wldelft.nl/fews/PI" xmlns:xsi="http://www.w3.org/2001/XMLSchema-instance" version="1.5" xsi:schemaLocation="http://www.wldelft.nl/fews/PI httphttps://chps1fewsdocs.deltares.nl/schemas/version1.0/pi-schemas/pi_modelparameters.xsd"> <group id="default"> <parameter id="blendingSteps"> <intValue>1</intValue> </parameter> <parameter id="interpolationType"> <stringValue>difference</stringValue> </parameter> <parameter id="disableAdjustment"> < <boolValue>false</boolValue> </parameter> </group> </parameters> |
...
Display
Below an example of the display for this modifier. The forecaster cannot select a start- and/or enddate which means that the modifier will always be active.
...
The picture below shows both the original and the referenced rating curves:

Configuration example
| Code Block | ||
|---|---|---|
| ||
<ratingCurveModifiers> <tableRatingCurveModifier id="tableRC" name="table RC"> <defaultStartTime>start run</defaultStartTime> <defaultEndTime>end run</defaultEndTime> </tableRatingCurveModifier> </ratingCurveModifiers> |
...
Shift rating curve modifier
...
| Code Block | ||
|---|---|---|
| ||
<ratingCurveModifiers> <shiftMultiplyRatingCurveModifier id="qpcshift" name="qpcshift"> <defaultStartTime>start run</defaultStartTime> <defaultEndTime>end run</defaultEndTime> <offsetDefaultEndTime unit="day" multiplier="3"/> </shiftMultiplyRatingCurveModifier> </ratingCurveModifiers> |
defaultStartTime
The default start time of the modifier. The available options are startrun and time zero. It corresponds to the same fields in the modifier display. This is only a default value, which can be changed by the user.
...
| Code Block | ||
|---|---|---|
| ||
<singleValueModifier id="wechng" name="wechng"> <timeSeries> <parameterId>WECHNG</parameterId> </timeSeries> <softLimits> <maximumValue>25</maximumValue> <minimumValue>0</minimumValue> </softLimits> <hardLimits> <maximumValue>100</maximumValue> <minimumValue>0</minimumValue> </hardLimits> <defaultTime>time zero</defaultTime> <defaultValue>1</defaultValue> </singleValueModifier> |
...
timeSeries
The element timeseries is used to define to which timeseries this modifier can be applied.
...
| Code Block | ||
|---|---|---|
| ||
<constantValueModifier id="mfc" name="mfc">
		<timeSeries>
			<parameterId>MFC</parameterId>
		</timeSeries>
		<softLimits>
			<maximumValue>3</maximumValue>
			<minimumValue>0</minimumValue>
		</softLimits>
		<hardLimits>
			<maximumValue>10</maximumValue>
			<minimumValue>0</minimumValue>
		</hardLimits>
		<sliderTicksStepSize>1</sliderTicksStepSize>
		<spinnerStepSize>1</spinnerStepSize>
		<defaultStartTime>start run</defaultStartTime>
		<defaultEndTime>end run</defaultEndTime>
		<defaultValidTime/>
		<offsetValidTime unit="day"/>
		<defaultValue>1</defaultValue>
</constantValueModifier> |
timeseries
The user can define a timeseries filter in this element to define to which time series the modifier can be applied.
...
Possible options are: "time zero" or "end run"
defaultvalue
defaultValidTime
Forecast time after which the modifier is no longer valid. If omitted, this value will be default to the year 3000 and the valid time entry box will not be shown in the modifier display. Note that the only way to get the validTime option available, is to add: <defaultValidTime/> (without attributes or content)
offsetValidTime
an offset to the default valid time, compared to the T0 of the run
defaultvalue
A default A default value can be defined here.
...
- The time series modifier has always a start- and end date.
- The time series modifier can (Optionally, if configured) have a valid time.
When a valid time is used the behaviour is different for time series types:
- When a modified time series is a simulated forecast timeseries and the valid time is equal to time zero (or later) then the entire modifier will be applied, otherwise the modifier will only be applied up to the valid time. When a modifier is created the valid time will be equal to the system time. In this situation the entire modifier will be applied. When the modifier is still available and used in later runs with a later time zero then the modifier will only be partly applied up to the valid time. This functionality was developed for the following situation. When the data of a simulated time series before time zero is a copy of the observed data this part of the simulation is not likely to change in simulations which are executed at a later time. So the part of the modifier before time zero (valid time) is still valid in later runs. However the part of the modifier after time zero is likely to be invalid because this part of the time series more likely to change in later runs.
- When a modified time series is an external forecast time series, and no valid time is configured, the modifier is valid for all external forecast times.
- When a modified time series is an external forecast time series, and a valid time is configured, the modifier is valid for the valid time only.
The forecaster can modify time series by making changes in table or in the graph. The changes in the graph are made by clicking in the graph.
- When the user clicks from left to right then the values between the points are interpolated.
- When the user clicks from right to left only the newly added or changed points are adjusted but no interpolation will be done between the last two points.
- When more than one time series is shown in the display it is possible to make a selection of which time series should edited when making changes by clicking in the graph.
- The time series which should be changed can be selected by clicking on the legend of that example time series in the graph.
Besides modifying the time series by editing values in the graph or table, processing functions can be selected from the dropdownbox. Available processing functions are:
- add
- subtract
- multiply
- divide
- replace
- missing
- ignore time series
- time series
When one of the options add, subtract, multiply, divide or replace is chosen than a text box in which a value can be entered appears next to the operation type-dropdownbox.

The options add, subtract, multiply, divide or replace are self-explaining. They add, subtract, multiply, divide or replace the timeseries with the specified value over the specified period of time.
The option missing replaces the values in the time series with missing values over the specified period of time, the ignore time series sets the value over the specified period of time to unreliable.
The last option time series is the default option which will be selected after the initial creation of this modifier and this option allows the forecaster to freely edit the timeseries.
An example of the use of the time series modifier is the RRICHNG modifier.
Display
Below a screenshot of the timeseries modifier.

Configuration example
| Code Block | ||
|---|---|---|
| ||
<timeSeriesModifier id="rrichng" name="rrichng">
		<timeSeries>
			<moduleInstanceSetId>SNOW17_Forecast</moduleInstanceSetId>
			<valueType>scalar</valueType>
			<parameterId>RAIM</parameterId>
			<locationSetId>Gages_Catchments</locationSetId>
			<timeSeriesType>simulated forecasting</timeSeriesType>
			<timeStep unit="hour" multiplier="6"/>
		</timeSeries>
		<defaultStartTime>start run</defaultStartTime>
		<defaultEndTime>end run</defaultEndTime>
		<defaultValidTime/>
		<resolveInWorkflow>true</resolveInWorkflow>
		<resolveInPlots>false</resolveInPlots>
		<createContinuousModifiers>true</createContinuousModifiers>
</timeSeriesModifier> |
timeSeries
This element can be used to identify to which timeseries this modifier can be applied.
onlyApplyLastModifier
If this option is enabled only the most recent applicable modifier of this type will be applied
mergeUncommittedModifiers
If this option is enabled uncommitted modifiers will be merged into one modifier. This option is limited to modifiers which only modify a single time series
referenceTimeSeries
This option can be used to define a filter for reference time series. The available time series for the selected node in the topology will be filtered by using the defined filter.
Only the reference time series which belong to the same parameter group as the modifiers which are being editted in the display will be displayed.
In addition only the reference time series which have the same location(s) as the time series which are being modified will be shown.
resolveInWorkflow
In the element timeSeries is a filter defined which defines which timeseries can be modified with this timeseries. If the element resolveInWorkflow is set than the modifier can be applied to all timeseries in the current workflow to which the defined time
series filter applies. In an IFD-environment the current workflow is the workflow which is associated to the selected topology node.
resolveInPlots
This element can only be used in IFD-environments. If this element is enabled than the timeseries-filter is also applied to all timseries in the plots associated with the current selected topology node.
editInPlots
It is possible to create a timeseries modifier in the plot displays. This can be done by selecting a timeseries by selecting a legend. After selection the timeseries can be modified by graphically editing the timeseries or by changing values in the graph. This feature can
be disabled by setting this option to false.
The forecaster can modify time series by making changes in table or in the graph. The changes in the graph are made by clicking in the graph.
- When the user clicks from left to right then the values between the points are interpolated.
- When the user clicks from right to left only the newly added or changed points are adjusted but no interpolation will be done between the last two points.
- When more than one time series is shown in the display it is possible to make a selection of which time series should edited when making changes by clicking in the graph.
- The time series which should be changed can be selected by clicking on the legend of that example time series in the graph.
Besides modifying the time series by editing values in the graph or table, processing functions can be selected from the dropdownbox. Available processing functions are:
- add
- subtract
- multiply
- divide
- replace
- missing
- ignore time series
- time series
When one of the options add, subtract, multiply, divide or replace is chosen than a text box in which a value can be entered appears next to the operation type-dropdownbox.
The options add, subtract, multiply, divide or replace are self-explaining. They add, subtract, multiply, divide or replace the timeseries with the specified value over the specified period of time.
The option missing replaces the values in the time series with missing values over the specified period of time, the ignore time series sets the value over the specified period of time to unreliable.
The last option time series is the default option which will be selected after the initial creation of this modifier and this option allows the forecaster to freely edit the timeseries.
An example of the use of the time series modifier is the RRICHNG modifier.
Display
Below a screenshot of the timeseries modifier.
Configuration example
| Code Block | ||
|---|---|---|
| ||
<timeSeriesModifier id="rrichng" name="rrichng">
		<timeSeries>
			<moduleInstanceSetId>SNOW17_Forecast</moduleInstanceSetId>
			<valueType>scalar</valueType>
			<parameterId>RAIM</parameterId>
			<locationSetId>Gages_Catchments</locationSetId>
			<timeSeriesType>simulated forecasting</timeSeriesType>
			<timeStep unit="hour" multiplier="6"/>
		</timeSeries>
		<defaultStartTime>start run</defaultStartTime>
		<defaultEndTime>end run</defaultEndTime>
		<defaultValidTime/>
		<resolveInWorkflow>true</resolveInWorkflow>
		<resolveInPlots>false</resolveInPlots>
		<createContinuousModifiers>true</createContinuousModifiers>
</timeSeriesModifier> |
timeSeries
This element can be used to identify to which timeseries this modifier can be applied.
onlyApplyLastModifier
If this option is enabled only the most recent applicable modifier of this type will be applied
mergeUncommittedModifiers
If this option is enabled uncommitted modifiers will be merged into one modifier. This option is limited to modifiers which only modify a single time series
referenceTimeSeries
This option can be used to define a filter for reference time series. The available time series for the selected node in the topology will be filtered by using the defined filter.
Only the reference time series which belong to the same parameter group as the modifiers which are being editted in the display will be displayed.
In addition only the reference time series which have the same location(s) as the time series which are being modified will be shown.
defaultValidTime
Forecast time after which the modifier is no longer valid. If omitted, this value will be default to the year 3000 and the valid time entry box will not be shown in the modifier display. Note that the only way to get the validTime option available, is to add: <defaultValidTime/> (without attributes or content)
offsetValidTime
an offset to the default valid time, compared to the T0 of the run
resolveInWorkflow
In the element timeSeries is a filter defined which defines which timeseries can be modified with this timeseries. If the element resolveInWorkflow is set than the modifier can be applied to all timeseries in the current workflow to which the defined time
series filter applies. In an IFD-environment the current workflow is the workflow which is associated to the selected topology node.
resolveInPlots
This element can only be used in IFD-environments. If this element is enabled than the timeseries-filter is also applied to all timseries in the plots associated with the current selected topology node.
editInPlots
It is possible to create a timeseries modifier in the plot displays. This can be done by selecting a timeseries by selecting a legend. After selection the timeseries can be modified by graphically editing the timeseries or by changing values in the graph. This feature can
be disabled by setting this option to false.
createContinousModifiers
If a modifier is created in the graph by default one modifier will be created. However when the option createContinousModifiers is disabled one modifier will be created for every continuous range of modifications made. For example if the forecaster changes a 6 hours timeseries at 00z and at 12z but not a createContinousModifiers
If a modifier is created in the graph by default one modifier will be created. However when the option createContinousModifiers is disabled one modifier will be created for every continuous range of modifications made. For example if the forecaster changes a 6 hours timeseries at 00z and at 12z but not a 0600z than by default this will result in creating a single modifier, but when this option is disabled two modifiers will be created. One for each continuous range of changes. In this case there is a change at 00z and one at 12z therefore two modifiers will be created.
Graphical appointment of modifiers (aka GAM)

To In order to make use of the graphical appointment of modifiers menu, it is adviced to configure the TimeSeries Display as PlotsTimeSeriesDialog in Explorer.xml:
| Code Block |
|---|
		<explorerTask name="Data Display">
            ..
			<taskClass>nl.wldelft.fews.gui.plugin.timeseries.PlotsTimeSeriesDialog</taskClass>
            ..
</explorerTask> |
Then, you need to configure you need to configure several things in the ModifierTypes.xml
Create a modifier type for the parameter you want to modify (as described on this page), e.g.:
| Code Block | ||
|---|---|---|
| ||
<timeSeriesModifier id="timeseries.to.modify" name="GAM.timeseries"> <timeSeries> <moduleInstanceId>My.Module.Instance.Id</moduleInstanceId> <!-- optional --> <parameterId>My.parameter</parameterId> </timeSeries> <defaultStartTime>start run</defaultStartTime> <defaultEndTime>end run</defaultEndTime> <resolveInWorkflow>true</resolveInWorkflow> <resolveInPlots>true</resolveInPlots> </timeSeriesModifier> |
...
| Code Block | ||
|---|---|---|
| ||
<markUnreliableModifier id="ignorets" name="ignorets"> <expiryTime unit="day" multiplier="150"/> <timeSeries> <moduleInstanceId>ImportIHFSDB</moduleInstanceId> <valueType>scalar</valueType> <parameterId>QIN</parameterId> <locationSetId>Gages_AK</locationSetId> <timeSeriesType>external historical</timeSeriesType> <timeStep unit="hour" multiplier="1"/> </timeSeries> <defaultStartTime>start run</defaultStartTime> <defaultEndTime>end run</defaultEndTime> </markUnreliableModifier> |
...
timeSeries
This element can be used to identify which timeseries this modifier can be applied.
...
 Schema
Configuration example
| Code Block | ||
|---|---|---|
| ||
<compoundModifier id="sacco" name="sacco"> <slider> <currentTimeSeries> <moduleInstanceSetId>SACSMA_Forecast</moduleInstanceSetId> <valueType>scalar</valueType> <parameterId>UZTWC</parameterId> <locationSetId>Gages_Catchments</locationSetId> <timeSeriesType>simulated forecasting</timeSeriesType> <timeStep unit="hour" multiplier="6"/> </currentTimeSeries> <modifiedTimeSeries> <moduleInstanceId>ExportMODS</moduleInstanceId> <valueType>scalar</valueType> <parameterId>UZTWC</parameterId> <locationSetId>Gages_Catchments</locationSetId> <timeSeriesType>external historical</timeSeriesType> <timeStep unit="nonequidistant"/> </modifiedTimeSeries> <hardLimits> <maximumValue>10</maximumValue> <minimumValue>0</minimumValue> </hardLimits> </slider> <slider> <currentTimeSeries> <moduleInstanceSetId>SACSMA_Forecast</moduleInstanceSetId> <valueType>scalar</valueType> <parameterId>UZFWC</parameterId> <locationSetId>Gages_Catchments</locationSetId> <timeSeriesType>simulated forecasting</timeSeriesType> <timeStep unit="hour" multiplier="6"/> </currentTimeSeries> <modifiedTimeSeries> <moduleInstanceId>ExportMODS</moduleInstanceId> <valueType>scalar</valueType> <parameterId>UZFWC</parameterId> <locationSetId>Gages_Catchments</locationSetId> <timeSeriesType>external historical</timeSeriesType> <timeStep unit="nonequidistant"/> </modifiedTimeSeries> <maximumAllowedValueParameterId>UZFWM</maximumAllowedValueParameterId> </slider> <slider> <currentTimeSeries> <moduleInstanceSetId>SACSMA_Forecast</moduleInstanceSetId> <valueType>scalar</valueType> <parameterId>LZTWC</parameterId> <locationSetId>Gages_Catchments</locationSetId> <timeSeriesType>simulated forecasting</timeSeriesType> <timeStep unit="hour" multiplier="6"/> </currentTimeSeries> <modifiedTimeSeries> <moduleInstanceId>ExportMODS</moduleInstanceId> <valueType>scalar</valueType> <parameterId>LZTWC</parameterId> <locationSetId>Gages_Catchments</locationSetId> <timeSeriesType>external historical</timeSeriesType> <timeStep unit="nonequidistant"/> </modifiedTimeSeries> <maximumAllowedValueParameterId>LZTWM</maximumAllowedValueParameterId> </slider> <slider> <currentTimeSeries> <moduleInstanceSetId>SACSMA_Forecast</moduleInstanceSetId> <valueType>scalar</valueType> <parameterId>LZFSC</parameterId> <locationSetId>Gages_Catchments</locationSetId> <timeSeriesType>simulated forecasting</timeSeriesType> <timeStep unit="hour" multiplier="6"/> </currentTimeSeries> <modifiedTimeSeries> <moduleInstanceId>ExportMODS</moduleInstanceId> <valueType>scalar</valueType> <parameterId>LZFSC</parameterId> <locationSetId>Gages_Catchments</locationSetId> <timeSeriesType>external historical</timeSeriesType> <timeStep unit="nonequidistant"/> </modifiedTimeSeries> <maximumAllowedValueParameterId>LZFSM</maximumAllowedValueParameterId> </slider> <slider> <currentTimeSeries> <moduleInstanceSetId>SACSMA_Forecast</moduleInstanceSetId> <valueType>scalar</valueType> <parameterId>LZFPC</parameterId> <locationSetId>Gages_Catchments</locationSetId> <timeSeriesType>simulated forecasting</timeSeriesType> <timeStep unit="hour" multiplier="6"/> </currentTimeSeries> <modifiedTimeSeries> <moduleInstanceId>ExportMODS</moduleInstanceId> <valueType>scalar</valueType> <parameterId>LZFPC</parameterId> <locationSetId>Gages_Catchments</locationSetId> <timeSeriesType>external historical</timeSeriesType> <timeStep unit="nonequidistant"/> </modifiedTimeSeries> <maximumAllowedValueParameterId>LZFPM</maximumAllowedValueParameterId> </slider> <slider> <currentTimeSeries> <moduleInstanceId>ExportMODS</moduleInstanceId> <valueType>scalar</valueType> <parameterId>ADIMC</parameterId> <locationSetId>Gages_Catchments</locationSetId> <timeSeriesType>external historical</timeSeriesType> <timeStep unit="nonequidistant"/> </currentTimeSeries> <modifiedTimeSeries> <moduleInstanceSetId>SACSMA_Forecast</moduleInstanceSetId> <valueType>scalar</valueType> <parameterId>ADIMC</parameterId> <locationSetId>Gages_Catchments</locationSetId> <timeSeriesType>simulated forecasting</timeSeriesType> <timeStep unit="hour" multiplier="6"/> </modifiedTimeSeries> <maximumAllowedValueParameterId>UZTWM+LZTWM</maximumAllowedValueParameterId> </slider> <defaultTime>start run</defaultTime> <offsetDefaultTime unit="day" multiplier="1"/> </compoundModifier> |
...
slider
For each slider the time series which holds the reference values should be configured, and the time series which should contain the modified value should be configured. Each slider also has maximum value. This maximum is retrieved from the module parameter file of the model. The element maximumAllowedValueParameterId identifies which parameter should be used to identify the maximum. Note that the parameters of the current time series and of the modified time series must be the same.
...
An example of the missing value modifier is shown below.

Configuration example
| Code Block | ||
|---|---|---|
| ||
<missingValueModifier id="setmsng" name="setmsng"> <timeSeries> <moduleInstanceId>ImportIHFSDB</moduleInstanceId> <valueType>scalar</valueType> <parameterId>STG</parameterId> <locationSetId>Gages_AK</locationSetId> <timeSeriesType>external historical</timeSeriesType> <timeStep unit="hour" multiplier="6"/> </timeSeries> <timeSeries> <moduleInstanceId>ImportIHFSDB</moduleInstanceId> <valueType>scalar</valueType> <parameterId>STG</parameterId> <locationSetId>Gages_AK</locationSetId> <timeSeriesType>external historical</timeSeriesType> <timeStep unit="hour" multiplier="1"/> </timeSeries> <defaultStartTime>start run</defaultStartTime> <defaultEndTime>end run</defaultEndTime> <resolveInWorkflow>false</resolveInWorkflow> <resolveInPlots>true</resolveInPlots> </missingValueModifier> |
...
timeseries
This element can be used to identify to which timeseries this modifier should be applied.
...
| Code Block | ||
|---|---|---|
| ||
<optionModifier id="Rainfall_Switch" name="Rainfall Switch"> <booleanTimeSeries> <parameterId>Grid</parameterId> <qualifierId>observed</qualifierId> </booleanTimeSeries> <booleanTimeSeries> <parameterId>Stations</parameterId> <qualifierId>observed</qualifierId> </booleanTimeSeries> <booleanTimeSeries> <parameterId>SeqGrid</parameterId> <qualifierId>observed</qualifierId> </booleanTimeSeries> <booleanTimeSeries> <parameterId>SeqStations</parameterId> <qualifierId>observed</qualifierId> </booleanTimeSeries> <booleanTimeSeries> <parameterId>Forecast ON</parameterId> <qualifierId>forecast</qualifierId> </booleanTimeSeries> <booleanTimeSeries> <parameterId>Forecast OFF</parameterId> <qualifierId>forecast</qualifierId> </booleanTimeSeries> <booleanTimeSeries> <parameterId>User ON</parameterId> <qualifierId>forecast</qualifierId> </booleanTimeSeries> <expiryTime unit="day" multiplier="1000"/> </optionModifier> |
timeValueTimeSeries
First the timeValueTimeSeries are defined. The parameterid of the defined timeseries will be used as an identifier
in radiobutton which can be used to select an option. When an option is selected which is defined as a timeValue-timeseries
than the user can also define a value.
...
| Code Block | ||||
|---|---|---|---|---|
| ||||
	<spatialProfileModifier id="SpatialProfile" name="Spatial Profile">
		<expiryTime unit="day" multiplier="2"/>
		<userDefinedDescriptionField id="Comment" descriptionField="Comment"/>
		<timeSeries>
			<moduleInstanceId>Import_NWP_Mediumrange</moduleInstanceId>
			<qualifierId>BE</qualifierId>
		</timeSeries>
		<timeSeries>
			<moduleInstanceId>Import_NWP_Mediumrange</moduleInstanceId>
			<qualifierId>RWC</qualifierId>
		</timeSeries>
		<descriptiveFunctionGroups>
			<descriptiveFunctionGroup name="Basic statistics">
				<descriptiveFunction function="startTime" ignoreMissings="true"/>
				<descriptiveFunction function="endTime" ignoreMissings="true"/>
				<descriptiveFunction function="timeLength" ignoreMissings="true"/>
			</descriptiveFunctionGroup>
			<descriptiveFunctionGroup name="Accumulation">
				<descriptiveFunction function="movingAccumulationMax" ignoreMissings="true">
					<timeSpan unit="hour" multiplier="1"/>
					<timeSpan unit="hour" multiplier="2"/>
					<timeSpan unit="hour" multiplier="3"/>
					<timeSpan unit="hour" multiplier="4"/>
					<timeSpan unit="hour" multiplier="6"/>
					<timeSpan unit="hour" multiplier="12"/>
					<timeSpan unit="hour" multiplier="24"/>
					<timeSpan unit="hour" multiplier="48"/>
					<timeSpan unit="hour" multiplier="72"/>
					<timeSpan unit="hour" multiplier="96"/>
					<timeSpan unit="hour" multiplier="120"/>
				</descriptiveFunction>
				<descriptiveFunction function="sum" ignoreMissings="true"/>
			</descriptiveFunctionGroup>
		</descriptiveFunctionGroups>
</spatialProfileModifier> |
The regular modifier type configuration elements such as <expiryTime> and <userDefinedDescription> field are available. The configuration elements specific for this modifier are explained below.
timeSeries
The <timeSeries> elements are time series filters used to configure to which time series the spatial profile modifier can be applied. In the given example, any time series with module instance id "Import_NWP_Mediumrange" and qualifier id "BE" or "RWC" can be modified with a spatial profile modifier. If such a time series is shown in the spatial display, the spatial modifier mode button and the spatial profile button used to create spatial profile modifiers will be available. The configured time series should always be a grid time series. Configuring a spatial copy modifier for a time series with a different type will have no effect.
descriptiveFunctionGroups
="Accumulation">
				<descriptiveFunction function="movingAccumulationMax" ignoreMissings="true">
					<timeSpan unit="hour" multiplier="1"/>
					<timeSpan unit="hour" multiplier="2"/>
					<timeSpan unit="hour" multiplier="3"/>
					<timeSpan unit="hour" multiplier="4"/>
					<timeSpan unit="hour" multiplier="6"/>
					<timeSpan unit="hour" multiplier="12"/>
					<timeSpan unit="hour" multiplier="24"/>
					<timeSpan unit="hour" multiplier="48"/>
					<timeSpan unit="hour" multiplier="72"/>
					<timeSpan unit="hour" multiplier="96"/>
					<timeSpan unit="hour" multiplier="120"/>
				</descriptiveFunction>
				<descriptiveFunction function="sum" ignoreMissings="true"/>
			</descriptiveFunctionGroup>
		</descriptiveFunctionGroups>
</spatialProfileModifier> |
The regular modifier type configuration elements such as <expiryTime> and <userDefinedDescription> field are available. The configuration elements specific for this modifier are explained below.
timeSeries
The <timeSeries> elements are time series filters used to configure to which time series the spatial profile modifier can be applied. In the given example, any time series with module instance id "Import_NWP_Mediumrange" and qualifier id "BE" or "RWC" can be modified with a spatial profile modifier. If such a time series is shown in the spatial display, the spatial modifier mode button and the spatial profile button used to create spatial profile modifiers will be available. The configured time series should always be a grid time series. Configuring a spatial copy modifier for a time series with a different type will have no effect.
descriptiveFunctionGroups
This is an optional element to configure the statistics shown in the statistics panel. When this element is not configured, the statistics panel (and button) will be hidden in the spatial profile modifier editor. More information on the available descriptiveFunctions can be found in Configuration Guide > System Configuration > Time Series Display Configuration.
"Apply to" option
Via "Apply To" button it is possible to apply a single modifier to an entire set of IFD-segments . In case of time series modifiers and reverseOrderModifiers an option “create unique modifiers for each segment” can also be used.
This option is only available when creating a new modifier and makes possible to create a modifier as an unique independent modifier for each of the selected segments. The option is useful when many segments need the same type of modifier but the forecaster needs to make adjustments to a subset of the initial group modifier.

Copy time series modifiers
It is possible to copy time series modifiers to another set of modifiers with a different set of module instance descriptors.
This option is available after selecting one or more time series modifiers in the modifiers panels in the menu which appears after a right mouse click.
This option is by default not available. To enable this feature the copyModifiers section needs to configured.
An example is given below.
| Code Block |
|---|
<copyModifiers>
		<timeSeriesModifiersPattern>
			<pattern>MAP</pattern>
			<patternDescription>MAP</patternDescription>
		</timeSeriesModifiersPattern>
		<timeSeriesModifiersPattern>
			<pattern>_HTMS</pattern>
			<patternDescription>1D</patternDescription>
		</timeSeriesModifiersPattern>
		<timeSeriesModifiersPattern>
			<pattern>_Delft3D_UpdateStates</pattern>
			<patternDescription>D3D Update States</patternDescription>
		</timeSeriesModifiersPattern>
		<timeSeriesModifiersPattern>
			<pattern>_Delft3D_0</pattern>
			<patternDescription>D3D Scenario 0</patternDescription>
		</timeSeriesModifiersPattern>
		<timeSeriesModifiersPattern>
			<pattern>_Delft3D_1</pattern>
			<patternDescription>D3D Scenario 1</patternDescription>
		</timeSeriesModifiersPattern>
</copyModifiers> |
The configured pattern is the pattern which is actually used when copying modifiers. The pattern description is a pretty name which only used for display purposes in the "Copy modifiers dialog"
After selecting one or more time series modifiers which comply to one of the patterns defined in the copyModifiers section the option "Copy the selected time series modifiers to another module instance id" will appear in the menu.
After selecting the option a panel (see below) in which the user can select a pattern will appear.

The user can select a new pattern (only one) from the list. After pressing the OK button the selected time series modifiers will be copied to a new module instance id.
The new module instance id will be determined by replacing the pattern from the existing module instance id with the new selected pattern.
For example if the original module instance id is original_MAP and we have configured two patterns original and copy and we select the pattern copy from the list the new module instance id will be copy_MAP.
All the other characteristics of the time series modifiers will be kept the same. The new copied modifier will only differ in module instance idThis is an optional element to configure the statistics shown in the statistics panel. When this element is not configured, the statistics panel (and button) will be hidden in the spatial profile modifier editor. More information on the available descriptiveFunctions can be found in Configuration Guide > System Configuration > Time Series Display Configuration.