Introduction
The dimrThe DIMR-software is used to run a SOBEK 3 model in Delft-FEWS. In the General Adapter of Delft-FEWS we refer to the different components of the dimr-tool. This wiki will describe what you need to do to convert a SOBEK3 model to a dimr-model and how to set-up the different components of your Delft-FEWS configuration. Read the steps in this guide to implement your SOBEK 3 model in Delft-FEWS using the dimr-software. When updating an existing model, some steps are not necessary.
Table of Contents:
| Table of Contents |
|---|
0: modules folder structure of dimr
The dimr-tool expects a fixed folder structure for its binaries, model files, input timeseries and logging. We start the implementation of the dimr-tool by recreating this folder structure.
Open your Delft-FEWS configuration and create a new folder in FEWS_YourSystem / Modules / NewFolder. In the example on this wiki page we use the folder name ovd_dv as this was the name of the SOBEK 3 model we used to implement in Delft-FEWS. This folder has to contain a total of five sub-folders:
| Table of Contents |
|---|
How to set-up a DIMR Modules folder?
The Delft-FEWS DIMR-adapter requires a fixed folder structure:
| dimr_bin | sub-folder with binaries for the DIMR-software. |
|---|---|
| dimr_model | sub-folder with DIMR- |
...
| files that describe the SOBEK3 model. |
...
| fews-dimr-adapter-bin |
|---|
...
| sub-folder with binaries for the fews adapter that communicates with the |
...
| DIMR. |
| Input |
|---|
...
| sub-folder |
...
| with input files requried to run the model. |
| Logs |
|---|
...
| sub-folder for |
...
| the log-files that are created during the model run. |
Follow the steps below to set-up a DIMR model folder in your Delft-FEWS system. Step 1 can be skipped when updating an existing model.
| Info | ||
|---|---|---|
| ||
| Create a rootDir folder for your SOBEK 3 model at $REGION_HOME$/Modules/<put_your_rootDir_here>. All sub-folders described in the table above can be put in this Modules folder. |
The contents of the Modules folder can now be filled. We will start with the getting the dimr_bin files.
| Info | ||
|---|---|---|
| ||
There are two ways for getting the dimr_bin files:
It is good practice to add a README.txt file in the dimr_bin directory where you document to DIMR version and from where you got the DIMR files. |
The actual model files must be created by converting your SOBEK 3 model. DeltaShell contains standard functionality to aid you in this step.
| Info | ||
|---|---|---|
| ||
When your model can finish a
|

The contents of the fews-dimr-adapter-bin folder can be downloaded.
| Info | ||
|---|---|---|
|
Create all these folders in your newly created dimr folder.
1-A: download the dimr_bin
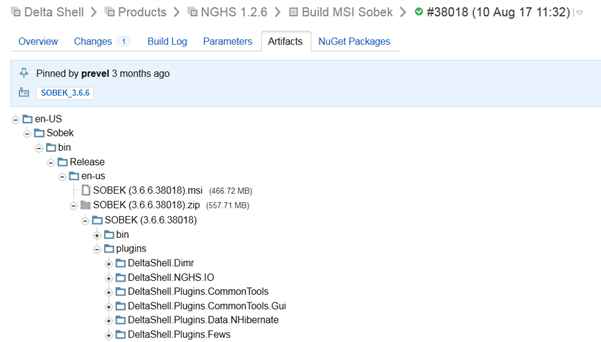
The dimr-tool is part of DeltaShell. The binaries for the dimr can be downloaded from build.deltares.nl:
- http://build.deltares.nl/viewType.html?buildTypeId=DeltaShell_Products_Nghs126_BuildMsiSobek
- The dimr-tool binaries can be found in the /plugins/DeltaShell.Dimr/
- It is necessary to modify the run_dimr to point to the libraries in cli.
- Put all these unzipped files in the folder dimr_bin.
It is necessary that the build number of the dimr-tool corresponds with your SOBEK 3 model. It is recommended to write down the build number of the dimr-tool for comparison in step 1B.
1-B: create the dimr_model files
...
| |
The |
...
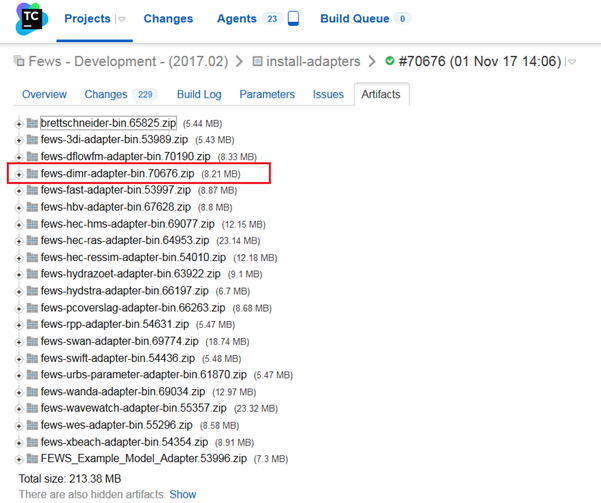
DIMR and Delft-FEWS are communicating through the fews adapter. This adapter is part of Delft-FEWS and must be downloaded from |
...
the dpcbuild.deltares.nl: |
...
...
...
...
|
The folders Input and Logs will be filled when you run the model.
...
How to run the DIMR model?
| Info | ||
|---|---|---|
| ||
When the contents of every directory is set-up, we can run the DIMR model. The model can be executed using a batch file with an argument pointing to the DIMR configuration xml file.
You could enter this command in a seperate batch file for easier starting the model run. |
How to get the desired output from the DIMR model?
| Info | ||
|---|---|---|
| ||
In SOBEK 3 you can specify for which parameters you want to write the output. This is the same in the DIMR model and can be specified in the *.md1d file located in .\dimr_model\dflow1d. Default, all results options are set to None. Apply the same output options as used in the SOBEK 3 model (e.g. Current, Average, ...) |
How to generate cache files to read the SOBEK 3 DIMR model faster?
| Info | ||
|---|---|---|
| ||
DIMR has the option to make cache files of the SOBEK 3 model to read the model itself faster. This can be up to 100 times faster, because it does not have to processing large ASCII files. Therefore, it is good practice to generate the cache files. To make the cache files, do the following:
|


How to generate ColdStateFiles?
| Info | ||
|---|---|---|
| ||
Delft-FEWS will need a state file to be able to run the SOBEK model. In order to generate the first state files of the SOBEK model it is recommended to do a stand-alone run of the DIMR from the command line (see How to run the DIMR model? how to do that).
|


What information should I put in the ModuleDataSetFiles?
| Info | ||
|---|---|---|
| ||
Delft-FEWS can distribute model files to FSS machines. It is recommended to zip the model files and put it in the Delft-FEWS configuration.
|
How do I get hold of the import and export timeseries of the SOBEK 3 / DIMR model?
Not yet completed
How to create the General Adapter Module?
For more detailed information on the use of the General Adapter Module, see this link.
An example of the general section of the general adapter can be found below.
| Info | ||
|---|---|---|
| ||
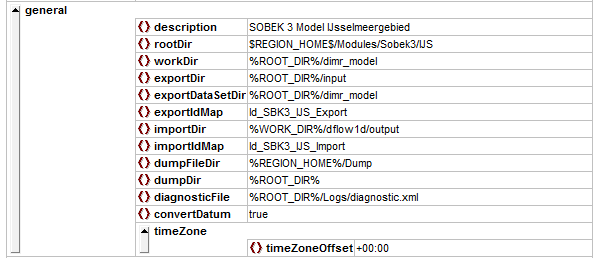
In the example configuration above it can be seen that the working directory of the DIMR should always be the folder ./dimr_model. The Delft-FEWS exports timeseries to the folder .\Input. After the modelrun is completed the output of the model is expected in the folder .\dflow1d/output. |
The activities section is divided into four sub-sections: startUp-, export-, execute- and importActivities. The contents of all of these sections will be discussed in the info sections below. When you want to test your configuration during the building process then it is recommended to start with the startUpActivity, ExportActivities and ExecuteActivity sections. When no information (e.g. timeseries, states) are provided to the model DIMR will take its own default timeseries and states to perform a model run. Hence, this trick enables you to test if the model can be run from Delft-FEWS. The importDir can be checked to see if output has been generated.
Similarly, it is also possible to define a single input timeseries in the exportActivities. The DIMR will add default values to the missing timeseries in order to start the run. This trick allows you to check early on whether your ExportActivity and IdMapping is working properly.
| Info | ||
|---|---|---|
| ||
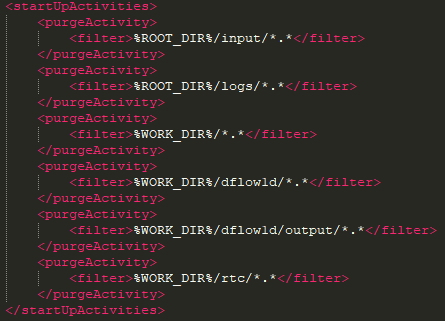
The startUpActivities are typically used to purge the model directory in the Modules folder to ensure a clean slate. See example below
|
| Info | ||
|---|---|---|
| ||
The exportActivities are used to export all the necessary data and the model itself. These typically consists of (in order): exportStateActivity, exportTimeSeriesActivities, exportDataSetActivity and exportRunFileActivity. See examples below. exportStateActivity This activity exports the state of the model. This can be a cold state (the one generated under How to generate ColdStateFiles?) or a warm state saved in the Delft-FEWS database.
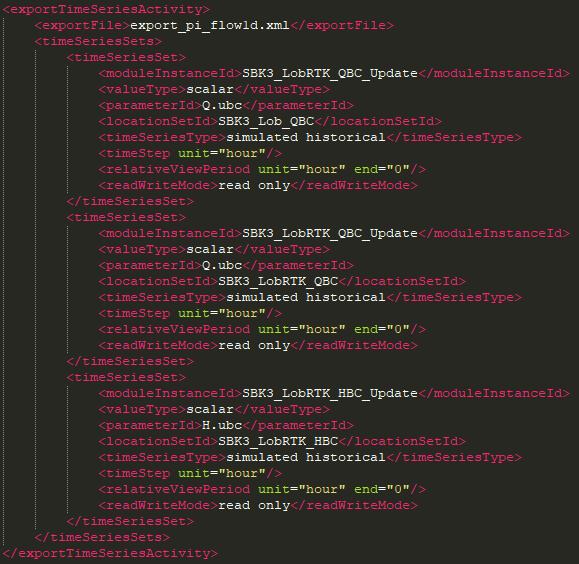
exportTimeSeriesActivity This activity exports all the necessary data from FEWS to be used in the model. There can be multiple activities.
exportDataSetActivity This activity exports the ModuleDataSet file to the working directory.
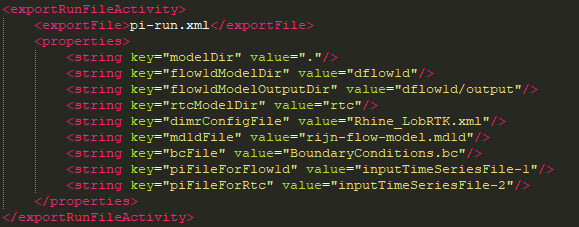
exportRunFileActivity This activity makes a run xml file which the pre- and post adapter uses to distribute the timeseries to the correct locations for the model to pick up.
|


| Info | ||
|---|---|---|
| ||
|

| Info | ||
|---|---|---|
| ||
In the ImportActivities the state files and the timeseries can be imported to Delft-FEWS. It is important to convert the extension of the state files before you import it to Delft-FEWS, this can be done by adding the </relativeExportFile> to your configuration. 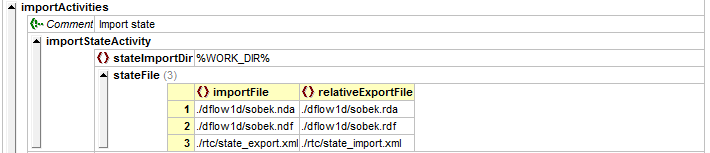  |
Improved DIMR adapter
The new DimrPreAdapter needs to be called with as only argument a reference to the run file.
Diagnostics can be ignored because it will write a plain text file dimr_pre_adapter.log in the workDir.
| Code Block | ||||
|---|---|---|---|---|
| ||||
			<executeActivity>
				<description>Run DIMR FEWS pre-adapter</description>
				<command>
					<className>nl.deltares.dimr.DimrPreAdapter</className>
					<binDir>%ROOT_DIR%/fews-dimr-adapter-bin</binDir>
				</command>
				<arguments>
					<argument>%ROOT_DIR%/input/pi-run.xml</argument>
				</arguments>
				<timeOut>1200000</timeOut>
				<ignoreDiagnostics>true</ignoreDiagnostics>
			</executeActivity>
|
In the pi run file property with key="dimrConfigFile" must be present with a reference to the dimr configuration file. This reference must be relative to the parent directory of the pi run file.
If multiple pi time series files are exported, it must be specified which file is meant for which component, there are 3 different properties for the components:
key="piFileForFlow1d"
key="piFileForFm"
key="piFileForFbc"
The time series xml files must be numbered in the order they appear in the <inputTimeSeriesFile> elements
| Code Block | ||||
|---|---|---|---|---|
| ||||
<?xml version="1.0" encoding="UTF-8"?>
<Run xmlns:xsi="http://www.w3.org/2001/XMLSchema-instance" xmlns="http://www.wldelft.nl/fews/PI" xsi:schemaLocation="http://www.wldelft.nl/fews/PI http://fews.wldelft.nl/schemas/version1.0/pi-schemas/pi_run.xsd" version="1.5">
    <timeZone>0.0</timeZone>
    <startDateTime date="2017-03-26" time="06:00:00"/>
    <endDateTime date="2017-03-29" time="06:00:00"/>
    <time0 date="2017-03-26" time="06:00:00"/>
    <workDir>X:\XXX\DimrPreAdapterTest\piRunFile1d2dRTC\dimr_model</workDir>
    <inputTimeSeriesFile>X:\XXX\piRunFile1d2dRTC\Input\export_pi_flow1d.xml</inputTimeSeriesFile>
    <inputTimeSeriesFile>X:\XXX\piRunFile1d2dRTC\Input\export_pi_fm.xml</inputTimeSeriesFile>
    <inputTimeSeriesFile>X:\XXX\piRunFile1d2dRTC\Input\export_pi_fbc.xml</inputTimeSeriesFile>
    <outputDiagnosticFile>notUsed.xml</outputDiagnosticFile>
    <properties>
		<!-- Reference to dimr configuration file, relative to parent directory of the/this pi-run.xml file -->
		<!-- This file will be read to see which components of the dimr are used and find references to .md1d, .mdu, flow1d2d.ini and/or fbc runtime config -->
        <string key="dimrConfigFile" value="../dimr_config.xml"/>
        <!-- Specify which of the above time series xml files is meant for flow1d -->
        <string key="piFileForFlow1d" value="inputTimeSeriesFile-1"/>
        <!-- Overwrite RstInterval value in the .mdu file with this property -->
        <string key="restartIntervalForFm" value="600"/>
        <!-- Specify which of the above time series xml files is meant for FM -->
        <string key="piFileForFm" value="inputTimeSeriesFile-2"/>
        <!-- Specify which of the above time series xml files is meant for FBC (rtc1) -->
        <string key="piFileForFbc" value="inputTimeSeriesFile-3"/>
        <!-- Will write the pi time series values for fbc as binary in timeseries_import.bin-->
        <string key="piTimeSeriesAsBin" value="true"/>
		<!-- Will convert the specified boundary NetCDF file to ASCII write the pi time series values for fbc as binary in timeseries_import.bin-->
		<string key="dWaveNetcdfBoundaryFileToConvert" value="input/boundary.nc"/>
		<!-- Optional settings for conversion of boundary file to ASCII, values shown here are default-->
        <string key="dWaveBoundaryFilePrefix" value="WW3_"/>
		<string key="dWaveBoundaryFileNumberOfCopies" value="3"/>


    </properties>
</Run>
|
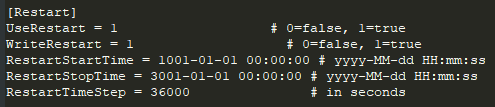
Important: the adapter doesn't support timezones. Therefore, the timezone in the General Adapter should be set at +00:00 and the timezones in the model too. This means for example for D-Flow FM that in the mdu file the Tzone property is set to 0.
Important: if the exported timeseries from the GA are exceeding the T0 (like in case of RR is often the case with daily evaporation timeseries), use the <ignoreRunPeriod> option in the export timeseries activity to ignore the timeseries that exceed the T0. This ensures that the modelstate is imported into FEWS on the proper time (in most cases T0) instead of the last timestamp. See also 05 General Adapter Module - DELFT-FEWS Documentation - Deltares Public Wiki
The dimr configuration file will be read to find the components that are being used so it knows which files need to be changed.
| Code Block | ||||
|---|---|---|---|---|
| ||||
<?xml version="1.0" encoding="UTF-8"?>
<dimrConfig xsi:schemaLocation="http://schemas.deltares.nl/dimr http://content.oss.deltares.nl/schemas/dimr-1.0.xsd" xmlns="http://schemas.deltares.nl/dimr" xmlns:xsi="http://www.w3.org/2001/XMLSchema-instance">
  <documentation>
    <fileVersion>1.00</fileVersion>
    <createdBy>Deltares, Coupling Team</createdBy>
    <creationDate>2018-07-07T14:49:48.9157275Z</creationDate>
  <control>
    <parallel>
      <startGroup>
        <time>1 60 2678500</time>
        <coupler name="1d2d_to_rtc"/>
        <start name="real-time control"/>
        <coupler name="rtc_to_1d2d"/>
      </startGroup>
      <start name="1d2d"/>
    </parallel>
  </control>
  <component name="real-time control">
    <library>FBCTools_BMI</library>
    <workingDir>rtc</workingDir>
    <inputFile>.</inputFile>
  </component>
  <component name="1d2d">
    <library>flow1d2d</library>
    <workingDir>1d2dcoupler</workingDir>
    <inputFile>1d2d.ini</inputFile>
  </component>
  <coupler name="rtc_to_1d2d">
    <sourceComponent>real-time control</sourceComponent>
    <targetComponent>1d2d</targetComponent>
    <item>
      <sourceName>output_Langel_zu_Crest level (s)</sourceName>
      <targetName>water flow 1d/weirs/Langel_zu/structure_crest_level</targetName>
    </item>
    <item>
      <sourceName>output_02_Wehr_Duis~~1_Crest level (s)</sourceName>
      <targetName>water flow 1d/weirs/02_Wehr_Duis~~1/structure_crest_level</targetName>
    </item>
  </coupler>
  <coupler name="1d2d_to_rtc">
    <sourceComponent>1d2d</sourceComponent>
    <targetComponent>real-time control</targetComponent>
    <item>
      <sourceName>water flow 1d/observations/P_Langel/water_level</sourceName>
      <targetName>input_P_Langel_Water level (op)</targetName>
    </item>
    <item>
      <sourceName>water flow 1d/observations/RuhrOWDuisburg/water_level</sourceName>
      <targetName>input_RuhrOWDuisburg_Water level (op)</targetName>
    </item>
  </coupler>
</dimrConfig>
|
Also when the <time> element is present within <control> <parallel> <startGroup> its contents will be replaced with the appropriate values.
FBC component
Will be used if library "FBCTools_BMI" is configured as component within the dimr config file
| Code Block | ||||
|---|---|---|---|---|
| ||||
  <component name="real-time control">
    <library>FBCTools_BMI</library>
    <workingDir>rtc</workingDir>
    <!-- Look hardcoded for  rtcRuntimeConfig.xml -->
    <inputFile>.</inputFile>
  </component>
|
It will look for the hardcoded file name rtcRuntimeConfig.xml in working directory relative to the parent dir of dimr config file.
It will replace start date and end date in rtcRuntimeConfig.xml with the appropriate values.
It will look for the hardcoded file name timeseries_import.xml in the working dir and insert all timeseries from the time series file configured by "piFileForFbc" (or the first time series xml if there is only 1) by matching headers.
DFlowFM component
Will be used if library "dflowfm" is configured as component within the dimr config file
| Code Block | ||||
|---|---|---|---|---|
| ||||
  <component name="dflowFM">
    <library>dflowfm</library>
    <workingDir>fm</workingDir>
    <inputFile>mackay.mdu</inputFile>
  </component>
|
It will look for the .mdu file in working directory relative to the parent dir of dimr config file.
It will read "ExtForceFileNew" value and "ExtForceFile" specifically for wind forcing.
| Code Block | ||
|---|---|---|
| ||
[external forcing]
ExtForceFile      =
ExtForceFileNew   = FlowFM_bnd.ext
|
It will look for .ext file relative to .mdu file parent directory and extract all "forcingfile" properties from it.
| Code Block | ||
|---|---|---|
| ||
[boundary]
quantity       = waterlevelbnd
locationfile   = mackay_bnd.pli
forcingfile    = mackay_bnd.bc

[boundary]
quantity       = rainfall
locationfile   = mackay_ugrid_wgs84_net.nc
forcingfile    = ..\input\mackay_rain.bc


[lateral]
Id             = MA_2.20_R_Beek_Berwinne
Type           = discharge
locationType   = 2d
numCoordinates = 1
xCoordinates   = 175903.0000
yCoordinates   = 307314.0000
discharge = Maas_D4118_lat.bc |
Insert all timeseries from "piFileForFm" (or the first time series xml if there is only 1) into all .bc files (relative to .ext file parent dir) by matching headers.
Since 2020.02, it also parses the [lateral] section in the .mdu file, uses the value of the Type property to find the .bc file (in the above case the value of Type is discharge, and discharge points to the Maas_D4118_lat.bc file). The times series with locationIds which match the Id property are inserted in the identified .bc file.
Other parameters like wind, precipitation and atmospheric pressure can be supplied by FEWS only for 2D using a netcdf export directly to the file-location the model expects the nc-file to be. In the model you can use the old-style ext format file (in mdu keyword ExtForceFile) to use these netcdf-files. How to do this can be found in the D-Flow FM manual.
Since 2022.02 there is support for windxy tim files. Only 1 timeseries for windspeed and 1 for winddirection are supported in the pi xml file. The adapter looks at the parameterIds "Windspeed" and "Winddirection" and replaces the whole tim file with the values from these timeseries including new timesteps referenced to the refdate in the mdu file. It is advised to set METHOD=7 in the .ext file for wind timeseries.
In the .mdu file itself it will replace Tstart, Tstop and RstInterval with the appropriate values.
RstInterval can be overwritten by a property in the run info file called "restartIntervalForFm"
rr_dll component
Will be used if library "rr_dll" is configured as component within the dimr config file:
| Code Block | ||||
|---|---|---|---|---|
| ||||
  <component name="DRR">
    <library>rr_dll</library>
    <workingDir>rr</workingDir>
    <inputFile>Sobek_3b.fnm</inputFile>
  </component>
|
It will look in the working dir for DELFT_3B.INI and will update the StartTime and EndTime variables of the [TimeSettings] section according to the start and end time from the run info file. Thus, the content would look like the following extracted example:
| Code Block | ||||
|---|---|---|---|---|
| ||||
[TimeSettings]
EvaporationFromHrs=7
EvaporationToHrs=19
PeriodFromEvent=0
TimestepSize=900
StartTime='2021/05/06;11:00:00'
EndTime='2021/05/09;00:00:00'
|
Precipitation, evapotranspiration and temperature can be supplied using netcdf-files exported from FEWS with the proper IDs related to the catchmentname/weatherstation in the model. In order to use the netcdf-file data in the model, you have to change both the DELFT_3B.ini and the sobek_3b.fnm files. See code snippets below.
| Code Block | ||
|---|---|---|
| ||
GenerateNetCdfOutput = -1
GenerateHisOutput = 0
MeteoNetCdfInput = -1
PrecipitationNetCdfSeriesId = RAINFALL  (note: you need to reference the netcdf variable id here that holds the precipitation data)
EvaporationNetCdfSeriesId = E
TemperatureNetCdfSeriesId = RAINFALL |
| Code Block | ||
|---|---|---|
| ||
'Precipitation_RR.nc'             *125. Optional meteo NetCdf timeseries inputfile rainfall
'Evaporation_RR.nc'               *126. Optional meteo NetCdf timeseries inputfile evaporation
'Precipitation_RR.nc' *127. Optional meteo NetCdf timeseries inputfile temperature (only for RR-HBV) |
Important: notice that the above snippet starts at number 125. You need the lines till 125 in the sobek_3b.fnm file for it to work. If you are missing the lines for numbers 121 till 124, see the snippet below to add them. Another very important step after adding the lines is to make an empty file in the rr model directory called CacheFile.txt. If this file doesn't exists, this could lead the model to use infinity precipitation values!
| Code Block |
|---|
'wqrtc.his'                               *121. coupling WQ salt RTC
'BoundaryConditions.bc'                           *122. RR Boundary conditions file for SOBEK3
'ASCIIRestartOpenDA.txt'                          *123. Optional RR ASCII restart (test) for OpenDA
'CacheFile.txt' *124. Optional LGSI cachefile |
DFlow1D component (Sobek 3)
Will be used if library "cf_dll" is configured as component within the dimr config file
| Code Block | ||||
|---|---|---|---|---|
| ||||
  <component name="Hydrodynamics">
    <library>cf_dll</library>
    <workingDir>dflow1d</workingDir>
    <inputFile>Hydrodynamics.md1d</inputFile>
  </component>
|
It will look for the .md1d file in working directory relative to the parent dir of dimr config file.
It will replace StartTime and StopTime with the appropriate values.
It will look for "boundCondFile" to find .bc file (relative to .md1d file parent dir) and insert all timeseries from "piFileForFlow1d" (or the first time series xml if there is only 1) by matching headers.
Flow1D2D component
Will be used if library "flow1d2d" is configured
| Code Block | ||||
|---|---|---|---|---|
| ||||
  <component name="1d2d">
    <library>flow1d2d</library>
    <workingDir>1d2dcoupler</workingDir>
    <!-- Will be read to find references to .md1d and. mdu file-->
    <inputFile>1d2d.ini</inputFile>
  </component>
|
It will look for the .ini file in working directory relative to the parent dir of dimr config file.
| Code Block | ||
|---|---|---|
| ||
[Model]
    type                  = Flow1D
    name                  = water flow 1d
    directory             = ..\dflow1d
    modelDefinitionFile   = water flow 1d.md1d

[Model]
    type                  = FlowFM
    name                  = FlowFM
    directory             = ..\dflowfm
    modelDefinitionFile   = FlowFM.mdu
|
It will extract .md1d file (with directory and model definition file relative to parent dir of the .ini file) by looking for model = Flow1D
It will extract .mdu file (with directory and model definition file relative to parent dir of the .ini file) by looking for model = FlowFM
It will process the .md1d and .mdu file the same way as described in DFlow1D and DFlowFM component
D-Waves component
Will be used if library "wave" is configured
| Code Block | ||||
|---|---|---|---|---|
| ||||
  <component name="1d2d">
	<library>wave</library>
	<workingDir>wave</workingDir>
	<inputFile>stmartin.mdw</inputFile>
  </component>
|
It will look for the .mdw file in working directory relative to the parent dir of dimr config file.
At this point the DIMR adapter only performs a conversion of the boundary conditions NetCDF file to ASCII format. The relative path of the netCDF file to convert must be provided in the PI runinfo file using the dWaveNetcdfBoundaryFileToConvert property as shown in the example runinfo file above. Two additional properties are provided, to summarize:
- dWaveNetcdfBoundaryFileToConvert = relative path of the boundary conditions netCdf file
- dWaveBoundaryFilePrefix = prefix for the filenames of the output ASCII files, the default prefix is "WW3_"
- dWaveBoundaryFileNumberOfCopies = the number of file copies to provide for each boundary, the default number is 3
Installing and running the Delft3D-FM model on Windows and Linux
A Delft3D-FM model can be run on Windows and LINUX. Installation of the model binaries on Windows and Linux can be straight forward when simple models are run on single VM's. A typical Delft-FEWS configuration solution can be the following.
- Create a ModuleDataSet "D3D_bin_Windows.zip" with the Windows binaries
- Create a ModuleDataSet "D3D_bin_Linux.zip" with the Linux binaries
- Create a ModuleDataSet "D3D_bin_adapter.zip" with the Delft3D Dimr Java Adapter
- In your fss_windows_clientConfig.xml file add a line: <autoExportModuleDataSet name="D3D_bin_Windows" exportDir="Modules"/>
- In your fss_linux_clientConfig.xml file add a line: <autoExportModuleDataSet name="D3D_bin_Linux" exportDir="Modules"/>
- In your Windows and Linux clientConfig.xml file add a line: <autoExportModuleDataSet name="D3D_bin_adapter" exportDir="Modules"/>
- In your Delft-FEWS General Adapter executeActivity element, start the Delft3D model with the following command <executable>%REGION_HOME%/Modules/Delft3DFM/bin_delft3dfm/$D3D_MODEL_EXE$</executable>
- In your fss_linux_global.properties add a line: D3D_MODEL_EXE=/bin/run_dimr.sh
- In your fss_windows_global.properties add a line: D3D_MODEL_EXE=dimr\\scripts\\run_dimr.bat
When a Delft-FEWS FSS is started the clientConfig.xml file automatically unzips the correct Delft3D-FM binaries to your \Modules folder ( \Delft3DFM). When the Delft3D-FM model is started in a workflow from the General Adapter the correct script is started to run the DIMR.