...
Creating a Spatial Profile Modifier
TODO: write section
Spatial Modifier Creation Dialog
When a spatial A spatial profile modifier is created , for example when the paste button is clicked to by defining an area, period and scalar time series with which the values in the grid cells within the area will be replaced. To create a spatial copy profile modifier, the spatial modifier creation dialog is shown. This dialog allows the user to set the modifier properties like it's name and priority, and select the valid time they wish to use.
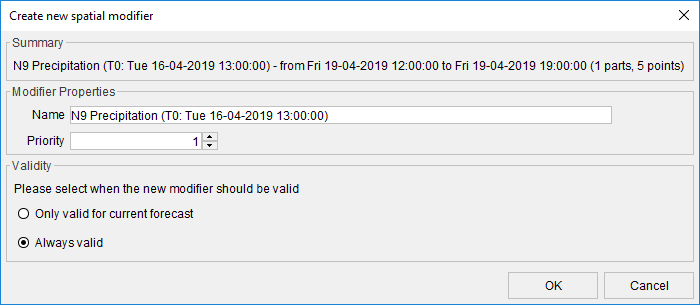
Modifier Properties
The modifier properties shown and set in the spatial modifier creation dialog are the same as the modifier properties that would be set through the modifiers panel for non-spatial modifiers. This includes the name, any user-defined description fields and the modifier priority. These properties can later be edited through the modifiers panel by selecting the modifier you wish to edit in the table.
Name
The name of the modifier. This field will be automatically filled with a summary of the modifier as a suggestion. It can contain at most 64 characters.
User Defined Description Fields
These can be configured in the modifier types. In the example shown above, there is one user defined description field configured called "Comment". These description fields can be used to allow users to add some additional information on the modifier they created.
Priority
The priority controls the order in which spatial modifiers are applied. This can be relevant if spatial modifiers have areas that overlap. For example, you may wish to create a spatial modifier for a large area, then modify a smaller subarea in a different way with a second spatial modifier. Modifiers are applied from the one with the highest value for priority to the one with the lowest value (so a modifier with priority 1 will be applied after a modifier with priority 2). This causes the modifier with the lowest value to be "on top". By default the priority is set to 1. In the previous example, you should set the priority of the modifier for the large area to a higher number, so the spatial modifier for the smaller area will appear on top (with default priority of 1). When two spatial modifiers have the same priority, there is no guarantee they will be applied in a certain order.
Validity
The validity options allow setting the forecast(s) a spatial modifier should be applied to. There are two options:
- Only valid for current forecast. If this option is selected, the newly created modifier will only be applied to the current forecast. Its valid time will be set to the forecast time of the current forecast.
- Always valid. If this option is selected, the newly created modifier will be applied to all forecasts (for the same time series). Its valid time will be left blank. This means the modifier will also be applied to previous forecasts and any new forecasts. Note that if the time period of the modifier falls outside the time period of a forecast, naturally applying the modifier will have no effect.
Viewing Existing Spatial Modifiers
spatial modifier mode must be activated and an area and time period must be selected as explained in the sections above.
Select the "Spatial Profile"-button to make the spatial profile modifier dialog appear. This dialog is used to specify the scalar time series that will be used to replace the grid cell values. The time series can be edited through the table.

When the ok-button is pressed, the spatial modifier creation dialog will appear to set the general modifier properties and confirm the creation of the new modifiers. The contents of this dialog are explained below.
When an existing spatial profile modifier is selected in the modifier panel, the scalar time series can be edited. The selected area and period can not be edited.
Spatial Modifier Creation Dialog
When a spatial modifier is created, for example when the paste button is clicked to create a spatial copy modifier, the spatial modifier creation dialog is shown. This dialog allows the user to set the modifier properties like it's name and priority, and select the valid time they wish to use.
Modifier Properties
The modifier properties shown and set in the spatial modifier creation dialog are the same as the modifier properties that would be set through the modifiers panel for non-spatial modifiers. This includes the name, any user-defined description fields and the modifier priority. These properties can later be edited through the modifiers panel by selecting the modifier you wish to edit in the table.
Name
The name of the modifier. This field will be automatically filled with a summary of the modifier as a suggestion. It can contain at most 64 characters.
User Defined Description Fields
These can be configured in the modifier types. In the example shown above, there is one user defined description field configured called "Comment". These description fields can be used to allow users to add some additional information on the modifier they created.
Priority
The priority controls the order in which spatial modifiers are applied. This can be relevant if spatial modifiers have areas that overlap. For example, you may wish to create a spatial modifier for a large area, then modify a smaller subarea in a different way with a second spatial modifier. Modifiers are applied from the one with the highest value for priority to the one with the lowest value (so a modifier with priority 1 will be applied after a modifier with priority 2). This causes the modifier with the lowest value to be "on top". By default the priority is set to 1. In the previous example, you should set the priority of the modifier for the large area to a higher number, so the spatial modifier for the smaller area will appear on top (with default priority of 1). When two spatial modifiers have the same priority, there is no guarantee they will be applied in a certain order.
Validity
The validity options allow setting the forecast(s) a spatial modifier should be applied to. There are two options:
- Only valid for current forecast. If this option is selected, the newly created modifier will only be applied to the current forecast. Its valid time will be set to the forecast time of the current forecast.
- Always valid. If this option is selected, the newly created modifier will be applied to all forecasts (for the same time series). Its valid time will be left blank. This means the modifier will also be applied to previous forecasts and any new forecasts. Note that if the time period of the modifier falls outside the time period of a forecast, naturally applying the modifier will have no effect.
Viewing Existing Spatial Modifiers
When viewing a modified grid time series while spatial modifier mode is not active, the time slider will show colors to indicate the maximum value at a certain time step as usual, but these colors will be replaced by the configured "modifier color" to indicate at which time steps a modifier is applied. When hovering over the time slider on a time step where a modifier is applied, the tool-tip will show the names and any user defined descriptions of the applied modifiers.
When spatial modifier mode is activated, the time slider will no longer show the maximum value colors, but will still mark the periods on which modifiers are active with the "modifier color". When a time step is selected for which modifiers are active, the areas on which these modifiers are active will be shown on the map (with a dashed border). When hovering near the border of one of these areas, a tool-tip with the name and any user defined descriptions of this modifier will be shown and the area on which it is active will be highlighted.
 TODO: write section
Setting the display time
The display time in the spatial display can be changed in the standalone system only . The use is similar to the setting the display time in the data display, but with less modification possibilities.
...