| scrollbar |
|---|
| Table of Contents |
|---|
Manual Forecast Display
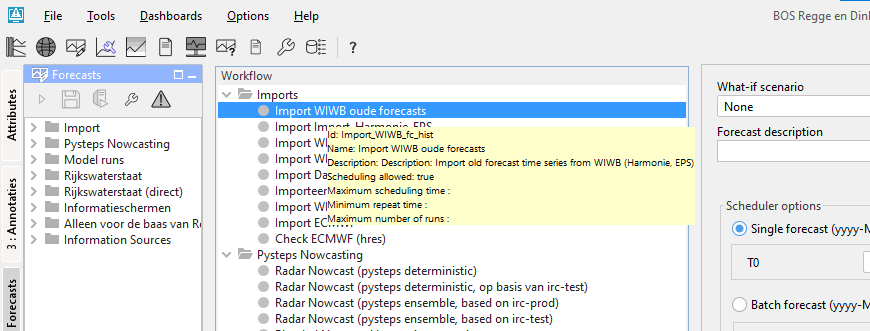
The Manual Forecast display (see below) in the Operator Client allows for the running of single or a manually scheduled forecast.


The Manual Forecast display (see below) in a Standalone system is slightly different from the one in the Operator Client and allows for running of a single forecast or a batch of forecasts.

unmigrated-wiki-markup
A single or a series of forecasts can be submitted to the system by pressing \ [Run\]. With \ [Close\], a user can leave the Manual Forecast display.
The various items in the Manual Forecast display are described below.
Workflow
Wiki Markup
Notification after completion workflow
An automatic notification pops up after the completion of the workflow.
What-if Scenario
...
A What-if Scenario can be selected from a drop-down list with predefined What-if Scenarios. By pressing \[INFO\] a description of the selected What-if Scenario can be displayed. What-if Scenarios are defined via the What-if Scenario By hovering over a What-if Scenario, a tooltip appears containing the description of the selected What-if Scenario. What-if Scenarios are defined via the What-if Scenario display.
Forecast description
A forecast description can be entered in this field. Entering of a description is not obligatory.
Please note that the forecast name is generated automatically by the system and consists of the ![]() start time of a forecast, (ii) the selected workflow and (iii) the selected What-if Scenario.
start time of a forecast, (ii) the selected workflow and (iii) the selected What-if Scenario.
Scheduler options (only in Operator Client)
Two types of manual forecasts can be defined:
...
A single forecast will only run once. For single forecast only the T~0~ T0 of the forecast has to be entered in the date & time field (yyyy-MM-dd HH:mm).
...
- Period of time for which a scheduled manual forecast should run is defined by entering the Start time and End time (yyyy-MM-dd HH:mm). The first forecast run is done at the Start time.
- Via menu item Interval , the time interval at which the scheduled manual should run can be defined.
- Entering Shift T~0~T0 allows the user to define a period of time over which the T~0~ T0 of the forecast itself should be set back in relation to the Start time of the forecast run.
For example: In case for example a scheduled manual forecasts should always be made at 8:00 AM but and the T0 of the forecast itself should start at 12be midnight (00:00 PM the previous dayAM), the Shift T~0~T0 should be set at -8 hours while the Start time is set at 08:00 AM.
Batch Forecast options (only in standalone)
...
A single forecast will only run once. For single forecast only the T~0~ T0 of the forecast has to be entered in the date & time field (yyyy-MM-dd HH:mm).
...
Automatically approving forecasts
Ticking the approve box [Approve] checkbox will set the status of the forecast automatically to current after it has been completed. In case you want to cancel this action or suspend it, please use the Scheduled Forecast tab in the System Monitor. When using the default synchprofiles.xml, non-approved runs will not be automatically downloaded by the synchronising OC and need to be downloaded manually before they can be opened.
Run for selected locations
The [Run for selected locations] checkbox is enabled when the selected workflow has an option <allowSelection=true> in WorkflowDescriptors.xml. The workflow will be then run only for locations selected in the Explorer Filters. It is not allowed to configure a forecast workflow with the allowSelection option set to true.
Run for selected ensemble member indices
Specify for which ensemble member indices the workflow should run. Separated by comma use - for ranges. For example 1,5-7,11
The ensemble member selection will apply to ANY ensemble that is present in the workflow.
Not setting a selection results in the full ensemble to be ran.
The user will need to know if the selection given is plausible: FEWS will not check if the specified ensemble members indeed exist.
State Selection
Leaving Select initial state unchecked, the default state- as has been configured by the system manager- will be used to start the historic run preceding a forecast simulation (see also Running Modules ). For statefull simulation models- like hydrodynamic models- this means that the state selection for a model will follow the state selection rules as configured in the General Adapter Module Instances.
...
A Warm state is a module state that has been generated in a previous forecasting run and stored in the Central Database. In order to find a suitable warm state to start the historic run, a time interval needs to be defined within which the system will look for a warm state. The time interval is defined relative to the T~0~ T0 of the forecast by the using the following entry fields:
...
- Start & end time:
The start and end time of the search interval are defined by multiplying the above mentioned Time interval with the values respectively entered in the first and second field. The system will look for the warm state with the date/time stamp closest to T~0~ T0, which means that the multiplier for the Start time should always be set at a lower value than for the End time.
...
A default forecast length is configured when setting up the forecasting system. Please note that within an area different forecasts lengths may have been configured depending on for example the hydrological (sub-) system and/or the forecasting models used.
F12 popup menu options
"Select modules to include in next run Ctrl+R" : since 2020.01 a workflow can be run for the selected modules also on FSS.