Installation
Deltares users without administrative privileges install PostgreSQL from the appstore followed by PostGIS.
Non Deltares users or the ones with administrative privileges install PostgreSQL using the PostgreSQL download for there appropriate Operating system. Windows users best download the installer from http://www.enterprisedb.com/products/pgdownload.do#windows. Don't forget to install the spatial extensions when the stackbuilder (see image) pops up.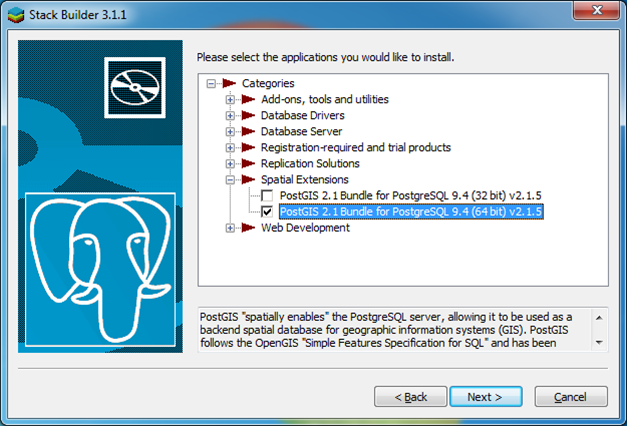
Note, don't forget you username and password that you enter during the process. In most cases (for non-Deltarians and/or admins) your username is postgres. For the Appstore users it is super_postgres and Sup3m4n.
Creating a database
What you really get right now is you own database server installed with as reference localhost. What else you got:
- pgAdminIII, a user interface for PostgreSQL
- PostGIS extension (postgis.net)
- PostGIS20 shapefile and dbf loader
- psql (cheatsheet)
- pg_dump (cheatsheet)
- pg_restore (see previous)
The user interface pgAdminIII is used as a primary user interface to manage your database. This OpenEarth page gives you all the steps to create a PostGIS database using pgAdminIII.
For the specific example to insert and manipulate a very simple set of locations located in the Dutch Voordelta, please proceed below. For a more detailed tutorial please follow the Workshop PostgreSQL/PostGIS/QGis.
Enabling PostGIS
The first action to perform is enabling the PostGIS extension in PostgreSQL. Open the query window (in pgAdminIII that is Ctrl+E, in pgAdmin4 navigate to the Tools menu and select Query Tool. Type the command listed in the code block below.
CREATE EXTENSION postgis;
CREATE EXTENSION postgis_topology;
Execute with Ctrl+E in pgAdminIII and F5 in pgAdmin4.
Simple data insertion
This part of the tutorial show how to insert a simple dataset (test.zip) and turn it into a table with geometry.Unpack the zip file and store in locally.
Open the file in a text editor and investigate the header and the rows.The first few rows contain:
station_ID;latitude;longitude;station_code
184000 ;51.820165 ;3.78767 ;13b
184001 ;51.827835 ;3.78975 ;12b
184002 ;51.84458 ;3.79375 ;11b
184003 ;51.862165 ;3.889835 ;7b
Now open the SQL window ( ) and start the definition of your table by using the following code:
create table locations (
station_id integer,
latitude double precision,
longitude double precision,
station_code text)
Execute the query using the green button ( ).
).
Load the data using the import tool (select the table locations, right mouse button, choose import). Select the file using the browse button and select csv.
Don't forget to watch very carefully your file and try to answer the following questions:
- does it have a header (in this case yes)
- is it a true csv (no it is not, it has ; as separator)
Fill in the tabpage Misc. Options (in this case it should be) like this.

Press import. If nothing goes wrong then the data will be inserted.
Adding geometry
Previous step result in a table without geometry. So now add a column called geom with datatype geometry (via the Query window and the green execute button)
alter table locations add column geom geometry(POINT,4326)
We know that the data is in WGS84 (which has the specific code 4326, see spatialreference.org which gives the full description of the WGS84 projection), so a point geometry with spatial reference id (SRID) 4326 is created. This step results in the creation of a column called geom.
Update the table with the following query
update locations set geom = st_setsrid(st_point(longitude,latitude),4326)
Pressing the green execute button updates the column geom with a geometry based on the columns longitude and latitude.
This layer can be added to QGIS, please check this in the Workshop PostgreSQL/PostGIS/QGIS.