This tutorial shows how to add a filtered WFS to QGIS. The Dutch government releases large open data files, for instance the so called BAG (Basis Registratie Adressen en Gebouwen), which is a nation wide registration of addresses and buildings. It is hard to use those data without any filtering, because the files are huge. It is however very nice that this information comes as so called OGC services like WMTS, WMS and WFS. The latter is especially suited for filtering and using in applications. This tutorial shows how to filter and load a part of the data into a QGIS project.
Tip, if you don't have QGIS, it is open source and you can find it at http://qgis.org/.
The data
Where to find data. We will focus on Dutch data for this particular example. A lot of countries have there own data portals and strategies. A list of these portals have been made available via another part of this wiki, this list is not complete. Dutch data can be best discovered via the Nationaal Georegister which lists all publicly available data sets. Search for BAG and a list of all BAG related data will appear.
Add WFS to QGIS
The step after discovery is usage. In the OpenGIS world, QGIS is a very common tool to handle all kinds of geographic information. QGIS enables loading of OGC services via the tool in 'manage layers toolbar'. There you can find the following buttons.

three of these buttons (below the Elephant Icon) enable connections to online sources of data via the OGC specification. The third one (from above) is the WFS button.
Start the add WFS dialog via the WFS button. The following dialog will appear:

Paste the WFS URL until the question mark in the URL box, provide with a name and press OK. Now a connection will be made with the server where the URL refers to. After OK a complete list of layers will be made available. It should look like this.

Select pand (the question we want to ask, present me buildings (=pand) which are build after 2015) and press Build Query button. The following dialog will appear after a few seconds. The delay is caused by the fact that the layer chosen is examined resulting in a list of available columns to filter on. This is presented in next dialog.
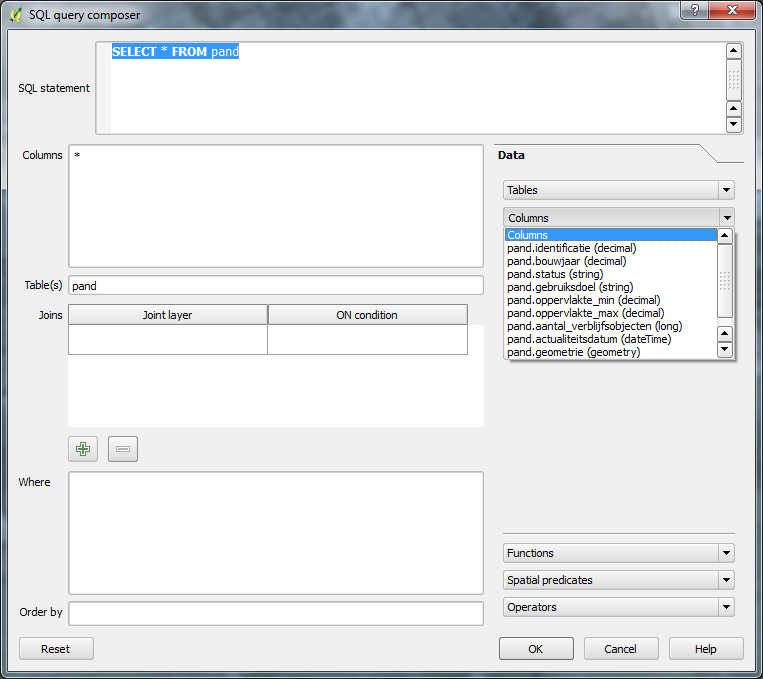
Now here are various parts that need some explanation. The SQL statement part is filled by default with:
SELECT * FROM pand
This means that all records will be selected. That was not what the intention. The intention was to only select buildings build after 2015. In the figure above, the columns list is made available. Here all columns available in the WFS is listed. The second column is called pand.bouwjaar (year of construction). this means that the query can be extended as follows.
SELECT * FROM pand WHERE bouwjaar > 2015
This is nice, although the drawback is that you need to be a bit familiar with SQL scripting.
Finish the query with the code presented above. Ah, the nice thing is the auto completion and the fact that also the more basic query is created in the where box. So before ok, the final result should look like.

Pressing OK results in next figure, where the result of the query windows above is added to the add WFS layer from a server request.

If you don't apply this to the entire Netherlands but only for a small region (for instance Delft) the result of this transaction is quite fast. For this particular instance the result looks like this (after only a few seconds), see the red buildings which are build after 2015.
