The DIMR-software is used to run a SOBEK 3 model in Delft-FEWS. In the General Adapter of Delft-FEWS we refer to the different components of the dimr-tool. This wiki will describe what you need to do to convert a SOBEK3 model to a dimr-model and how to set-up the different components of your Delft-FEWS configuration. Read the steps in this guide to implement your SOBEK 3 model in Delft-FEWS using the dimr-software. When updating an existing model, some steps are not necessary.
| Table of Contents |
|---|
How to set-up a DIMR Modules folder?
...
Follow the steps below to set-up a DIMR model folder in your Delft-FEWS system. Step 1 can be skipped when updating an existing model.
| Info | ||
|---|---|---|
| ||
| Create a rootDir folder for your SOBEK 3 model at $REGION_HOME$/Modules/<put_your_rootDir_here>. All sub-folders described in the table above can be put in this Modules folder. |
The contents of the Modules folder can now be filled. We will start with the download of getting the dimr_bin files.
| Info | ||
|---|---|---|
| ||
The DIMR is part of DeltaShell and its binaries can be downloaded from our build server.
|
The actual model files must be created by converting your SOBEK 3 model. DeltaShell contains standard functionality to aid you in this step.
There are two ways for getting the dimr_bin files:
It is good practice to add a README.txt file in the dimr_bin directory where you document to DIMR version and from where you got the DIMR files. |
The actual model files must be created by converting your SOBEK 3 model. DeltaShell contains standard functionality to aid you in this step.
| Info | ||
|---|---|---|
| ||
| ||
| Info | ||
| ||
Take a look at the build numer of the dimr-tool from step 3. Open an instance of DeltaShell with a build number that corresponds to the build number of the dimr_bin.
When your model can finish a
|

...
| Info | ||
|---|---|---|
| ||
The DIMR and Delft-FEWS are communicating through the fews adapter. This adapter is part of Delft-FEWS and must be downloaded from the build.deltares.nl:
|
The folders Input and Logs will be filled when you run the model.
How to
...
run the DIMR model?
| Info | ||
|---|---|---|
| ||
Delft-FEWS will need a state file to be able to run the SOBEK model. In order to generate the first state files of the SOBEK model it is recommended to do a stand-alone run of the DIMR/SOBEK from the command line.
|


What information should I put in the ModuleDataSetFiles?
| Info | ||
|---|---|---|
| ||
Delft-FEWS can distribute model files to FSS machines. It is recommended to zip the model files and put it in the Delft-FEWS configuration.
|
How do I get hold of the import and export timeseries of the SOBEK 3 / DIMR model?
Not yet completed
How to create the General Adapter Module?
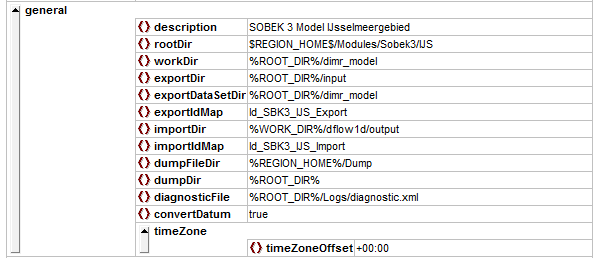
An example of the general section of the general adapter can be found below.
| Info | ||
|---|---|---|
| ||
In the example configuration above it can be seen that the working directory of the DIMR should always be the folder ./dimr_model. The Delft-FEWS exports timeseries to the folder .\Input. After the modelrun is completed the output of the model is expected in the folder .\dflow1d/output. |
...
| |
When the contents of every directory is set-up, we can run the DIMR model. The model can be executed using a batch file with an argument pointing to the DIMR configuration xml file.
You could enter this command in a seperate batch file for easier starting the model run. |
How to get the desired output from the DIMR model?
| Info | ||
|---|---|---|
| ||
In SOBEK 3 you can specify for which parameters you want to write the output. This is the same in the DIMR model and can be specified in the *.md1d file located in .\dimr_model\dflow1d. Default, all results options are set to None. Apply the same output options as used in the SOBEK 3 model (e.g. Current, Average, ...) |
How to generate cache files to read the SOBEK 3 DIMR model faster?
| Info | ||
|---|---|---|
| ||
DIMR has the option to make cache files of the SOBEK 3 model to read the model itself faster. This can be up to 100 times faster, because it does not have to processing large ASCII files. Therefore, it is good practice to generate the cache files. To make the cache files, do the following:
|


How to generate ColdStateFiles?
| Info | ||
|---|---|---|
| ||
Delft-FEWS will need a state file to be able to run the SOBEK model. In order to generate the first state files of the SOBEK model it is recommended to do a stand-alone run of the DIMR from the command line (see How to run the DIMR model? how to do that).
|
What information should I put in the ModuleDataSetFiles?
| Info | ||
|---|---|---|
| ||
Delft-FEWS can distribute model files to FSS machines. It is recommended to zip the model files and put it in the Delft-FEWS configuration.
|
How do I get hold of the import and export timeseries of the SOBEK 3 / DIMR model?
Not yet completed
How to create the General Adapter Module?
For more detailed information on the use of the General Adapter Module, see this link.
An example of the general section of the general adapter can be found below.
| Info | ||
|---|---|---|
| ||
In the example configuration above it can be seen that the working directory of the DIMR should always be the folder ./dimr_model. The Delft-FEWS exports timeseries to the folder .\Input. After the modelrun is completed the output of the model is expected in the folder .\dflow1d/output. |
The activities section is divided into four sub-sections: startUp-, export-, execute- and importActivities. The contents of all of these sections will be discussed in the info sections below. When you want to test your configuration during the building process then it is recommended to start with the startUpActivity, ExportActivities and ExecuteActivity sections. When no information (e.g. timeseries, states) are provided to the model DIMR will take its own default timeseries and states to perform a model run. Hence, this trick enables you to test if the model can be run from Delft-FEWS. The importDir can be checked to see if output has been generated.
Similarly, it is also possible to define a single input timeseries in the exportActivities. The DIMR will add default values to the missing timeseries in order to start the run. This trick allows you to check early on whether your ExportActivity and IdMapping is working properly.
| Info | ||
|---|---|---|
| ||
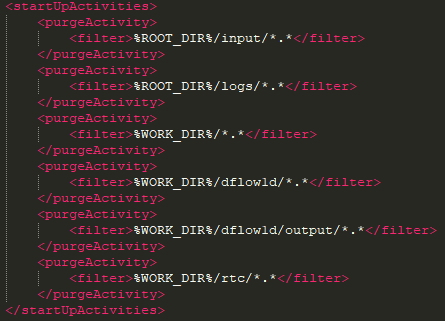
The startUpActivities are typically used to purge the model directory in the Modules folder to ensure a clean slate. See example below
|
| Info | ||
|---|---|---|
| ||
The exportActivities are used to export all the necessary data and the model itself. These typically consists of (in order): exportStateActivity, exportTimeSeriesActivities, exportDataSetActivity and exportRunFileActivity. See examples below. exportStateActivity This activity exports the state of the model. This can be a cold state (the one generated under How to generate ColdStateFiles?) or a warm state saved in the Delft-FEWS database.
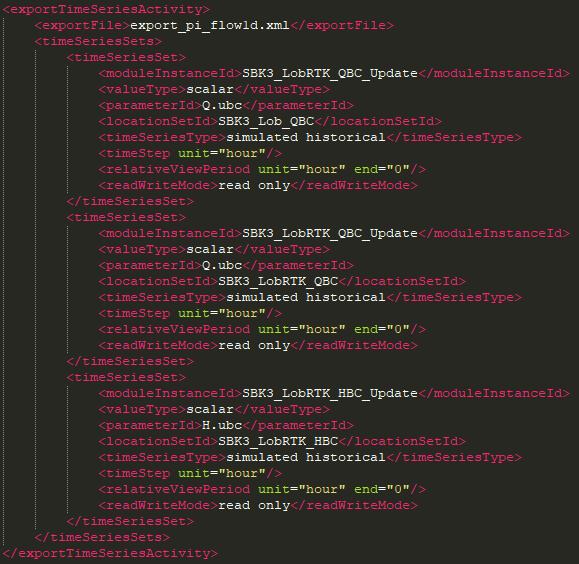
exportTimeSeriesActivity This activity exports all the necessary data from FEWS to be used in the model. There can be multiple activities.
exportDataSetActivity This activity exports the ModuleDataSet file to the working directory.
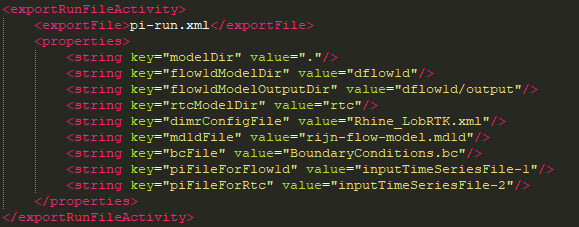
exportRunFileActivity This activity makes a run xml file which the pre- and post adapter uses to distribute the timeseries to the correct locations for the model to pick up.
|


| Info | ||
|---|---|---|
| ||
|

Similarly, it is also possible to define a single input timeseries in the exportActivities. The DIMR will add default values to the missing timeseries in order to start the run. This trick allows you to check early on whether your ExportActivity and IdMapping is working properly.
| Info | ||
|---|---|---|
| ||
Not yet completed |
| Info | ||
|---|---|---|
| ||
Not yet completed |
| Info | ||
|---|---|---|
| ||
Not yet completed |
| Info | ||
|---|---|---|
| ||
In the ImportActivities the state files and the timeseries can be imported to Delft-FEWS. It is important to convert the extension of the state files before you import it to Delft-FEWS, this can be done by adding the </relativeExportFile> to your configuration. 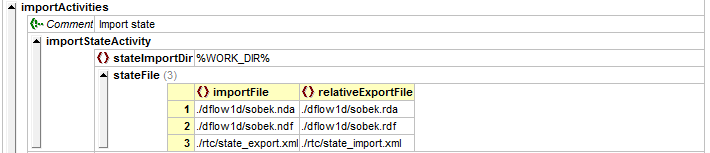  |
Improved DIMR adapter
...