The DIMR-software is used to run a SOBEK 3 model in Delft-FEWS. In the General Adapter of Delft-FEWS we refer to the different components of the dimr-tool. This wiki will describe what you need to do to convert a SOBEK3 model to a dimr-model and how to set-up the different components of your Delft-FEWS configuration. Read the steps in this guide to implement your SOBEK 3 model in Delft-FEWS using the dimr-software.
How to set-up a DIMR Modules folder?
The Delft-FEWS DIMR-adapter requires a fixed folder structure:
| dimr_bin | sub-folder with binaries for the DIMR-software. |
|---|---|
| dimr_model | sub-folder with DIMR-files that describe the SOBEK3 model. |
| fews-dimr-adapter-bin | sub-folder with binaries for the fews adapter that communicates with the DIMR. |
| Input | sub-folder with input files requried to run the model. |
| Logs | sub-folder for the log-files that are created during the model run. |
Follow the steps below to set-up a DIMR model folder in your Delft-FEWS system.
Step 1: create the dimr model folder structure in Delft-FEWS
The contents of the Modules folder can now be filled. We will start with the download of the dimr_bin files.
Step 2: download the contents of the dimr_bin
The DIMR is part of DeltaShell and its binaries can be downloaded from our build server.
- The latest version of the DIMR can be found by clicking on this link. The binaries for the DIMR-tool can be found in the folder plugins/DeltaShell.Dimr/. You need to make sure that the run_dimr is modified so that it points to the libraries in cli. Now you can unzip all files and put them into the dimr_bin folder.
![]() Write down the build number of the dimr-tool you will need this in step 3.
Write down the build number of the dimr-tool you will need this in step 3.
The actual model files must be created by converting your SOBEK 3 model. DeltaShell contains standard functionality to aid you in this step.
Step 3: generate the dimr_model files
Take a look at the build numer of the dimr-tool from step 3. Open an instance of DeltaShell with a build number that corresponds to the build number of the dimr_bin.
- In DeltaShell open your SOBEK 3 model.
![]() It is possible that a message will appear in DeltaShell stating that your project was made in an older version and needs to be migrated to the latest version of DeltaShell. Press "Yes" and the model will automatically migrate to this version.
It is possible that a message will appear in DeltaShell stating that your project was made in an older version and needs to be migrated to the latest version of DeltaShell. Press "Yes" and the model will automatically migrate to this version.
- Before you continue it is recommended to run the model by pressing the
 button in the DeltaShell GUI. This is an easy way to check if all functionality is up-to-date. Check the log messages and fix all issues that are mentioned.
When your model can finish awithout displaying errors it is possible to convert the SOBEK 3 model to a dimr-model.
- In DeltaShell right-click on your Integrated Model and select the option "Export...". In the menu that opens you now select the option "DIMR configuration" and you follow the instructions.
- Put the all model files that are generated in the folder dimr_model.
The contents of the fews-dimr-adapter-bin folder can be downloaded.
Step 4: download the contents of the fews-dimr-adapter-bin folder
The DIMR and Delft-FEWS are communicating through the fews adapter. This adapter is part of Delft-FEWS and must be downloaded from the build.deltares.nl:
- http://build.deltares.nl/project.html?projectId=FewsDevelopment&tab=projectOverview
- Select the latest stable version (or the Delft-FEWS development version): FEWS – Development > install adapters > artifacts > fews-dimr-adapter-bin.XXXXX.zip.
- Put all these unzipped files in the folder fews-dimr-adapter-bin
The folders Input and Logs will be filled when you run the model.
How to generate ColdStateFiles?
ColdStateFiles
Delft-FEWS will need a state file to be able to run the SOBEK model. In order to generate the first state files of the SOBEK model it is recommended to do a stand-alone run of the DIMR/SOBEK from the command line.
- Go to FEWS_YourSystem / Modules / NewFolder / dimr_model / dflow1d and open the *.md1d file.
- Go to option WriteRestart and make sure to set this setting on true. The model will now generate its state files.

- The SOBEK 3 model has default timeseries. We can thus do a stand-alone run of the model without providing the model with data.
- Open your command line window from the dimr_model folder. This is your working directory. Run the run_dimr.bat and give the dimr_config file as an argument. This file was created in step 1B. In the example below this is the ovd_dv.xml file.
- Run the model.
 or in newer versions of the software
- After the model has run succesfully it is possible to create a state-file for Delft-FEWS.
- In the Config\ColdStateFiles\ create a zip for the cold state files. In our example this is the Walrus_Hydr_Sobek3_Update Default.zip
- The zip file for the ColdState files contains the following information
- Walrus_Hydr_Sobek3_Update Default \ dflow1d \ sobek.rda
- Walrus_Hydr_Sobek3_Update Default \ dflow1d \ sobek.rdf
- Walrus_Hydr_Sobek3_Update Default \ rtc \ state_import.xml
- When you analyse the model results you will find a sobek.nda and sobek.ndf file in the dimr_model \ dflow1d folder and a state_export.xml in the dimr_model \ rtc folder. You can use these files. Make sure to rename the extension of these files.
What information should I put in the ModuleDataSetFiles?
ModuleDataSetFiles
Delft-FEWS can distribute model files to FSS machines. It is recommended to zip the model files and put it in the Delft-FEWS configuration.
- In the Config\ModuleDataSetFiles create a zip file for the (update) model run. In our example the name for this zip file is Walrus_Hydr_Sobek3_Update.zip
- The zip file for the ModuleDataSetFile contains the following information:
- .\dlfow1d\.*.
- .\rtc\.*.
- ovd_dv.xml
- As you might have notice this is the content of the dimr_model file created previously.
How do I get hold of the import and export timeseries of the SOBEK 3 / DIMR model?
Not yet completed
How to create the General Adapter Module?
An example of the general section of the general adapter can be found below.
General section of Module
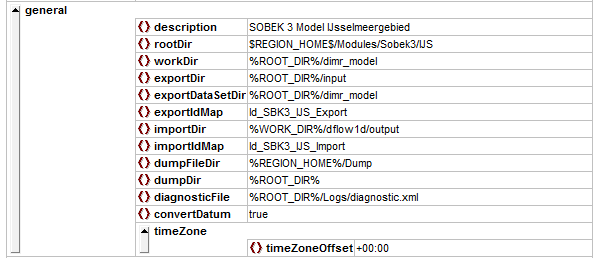
In the example configuration above it can be seen that the working directory of the DIMR should always be the folder ./dimr_model. The Delft-FEWS exports timeseries to the folder .\Input. After the modelrun is completed the output of the model is expected in the folder .\dflow1d/output.
The activities section is divided into four sub-sections: startUp-, export-, execute- and importActivities. The contents of all of these sections will be discussed in the info sections below. When you want to test your configuration during the building process then it is recommended to start with the startUpActivity, ExportActivities and ExecuteActivity sections. When no information (e.g. timeseries, states) are provided to the model DIMR will take its own default timeseries and states to perform a model run. Hence, this trick enables you to test if the model can be run from Delft-FEWS. The importDir can be checked to see if output has been generated.
Similarly, it is also possible to define a single input timeseries in the exportActivities. The DIMR will add default values to the missing timeseries in order to start the run. This trick allows you to check early on whether your ExportActivity and IdMapping is working properly.
startUpActivities
Not yet completed
exportActivities
Not yet completed
executeActivities
Not yet completed
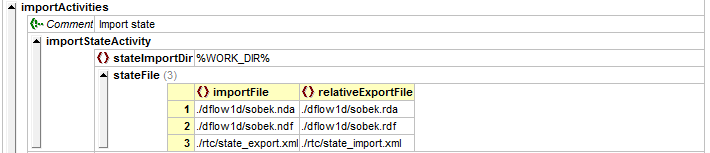
importActivities
Improved DIMR adapter
The new DimrPreAdapter needs to be called with as only argument a reference to the run file.
Diagnostics can be ignored because it will write a plain text file dimr_pre_adapter.log in the workDir.
			<executeActivity>
				<description>Run DIMR FEWS pre-adapter</description>
				<command>
					<className>nl.deltares.dimr.DimrPreAdapter</className>
					<binDir>%ROOT_DIR%/fews-dimr-adapter-bin</binDir>
				</command>
				<arguments>
					<argument>%ROOT_DIR%/input/pi-run.xml</argument>
				</arguments>
				<timeOut>1200000</timeOut>
				<ignoreDiagnostics>true</ignoreDiagnostics>
			</executeActivity>
In the pi run file property with key="dimrConfigFile" must be present with a reference to the dimr configuration file. This reference must be relative to the parent directory of the pi run file.
If multiple pi time series files are exported, it must be specified which file is meant for which component, there are 3 different properties for the components:
key="piFileForFlow1d"
key="piFileForFm"
key="piFileForFbc"
The time series xml files must be numbered in the order they appear in the <inputTimeSeriesFile> elements
<?xml version="1.0" encoding="UTF-8"?>
<Run xmlns:xsi="http://www.w3.org/2001/XMLSchema-instance" xmlns="http://www.wldelft.nl/fews/PI" xsi:schemaLocation="http://www.wldelft.nl/fews/PI http://fews.wldelft.nl/schemas/version1.0/pi-schemas/pi_run.xsd" version="1.5">
    <timeZone>0.0</timeZone>
    <startDateTime date="2017-03-26" time="06:00:00"/>
    <endDateTime date="2017-03-29" time="06:00:00"/>
    <time0 date="2017-03-26" time="06:00:00"/>
    <workDir>X:\XXX\DimrPreAdapterTest\piRunFile1d2dRTC\dimr_model</workDir>
    <inputTimeSeriesFile>X:\XXX\piRunFile1d2dRTC\Input\export_pi_flow1d.xml</inputTimeSeriesFile>
    <inputTimeSeriesFile>X:\XXX\piRunFile1d2dRTC\Input\export_pi_fm.xml</inputTimeSeriesFile>
    <inputTimeSeriesFile>X:\XXX\piRunFile1d2dRTC\Input\export_pi_fbc.xml</inputTimeSeriesFile>
    <outputDiagnosticFile>notUsed.xml</outputDiagnosticFile>
    <properties>
		<!-- Reference to dimr configuration file, relative to parent directory of the/this pi-run.xml file -->
		<!-- This file will be read to see which components of the dimr are used and find references to .md1d, .mdu, flow1d2d.ini and/or fbc runtime config -->
        <string key="dimrConfigFile" value="../dimr_config.xml"/>
        <!-- Specify which of the above time series xml files is meant for flow1d -->
        <string key="piFileForFlow1d" value="inputTimeSeriesFile-1"/>
        <!-- Overwrite RstInterval value in the .mdu file with this property -->
        <string key="restartIntervalForFm" value="600"/>
        <!-- Specify which of the above time series xml files is meant for FM -->
        <string key="piFileForFm" value="inputTimeSeriesFile-2"/>
        <!-- Specify which of the above time series xml files is meant for FBC (rtc1) -->
        <string key="piFileForFbc" value="inputTimeSeriesFile-3"/>
        <!-- Will write the pi time series values for fbc as binary in timeseries_import.bin-->
        <string key="piTimeSeriesAsBin" value="true"/>
    </properties>
</Run>
The dimr configuration file will be read to find the components that are being used so it knows which files need to be changed.
<?xml version="1.0" encoding="UTF-8"?>
<dimrConfig xsi:schemaLocation="http://schemas.deltares.nl/dimr http://content.oss.deltares.nl/schemas/dimr-1.0.xsd" xmlns="http://schemas.deltares.nl/dimr" xmlns:xsi="http://www.w3.org/2001/XMLSchema-instance">
  <documentation>
    <fileVersion>1.00</fileVersion>
    <createdBy>Deltares, Coupling Team</createdBy>
    <creationDate>2018-07-07T14:49:48.9157275Z</creationDate>
  <control>
    <parallel>
      <startGroup>
        <time>1 60 2678500</time>
        <coupler name="1d2d_to_rtc"/>
        <start name="real-time control"/>
        <coupler name="rtc_to_1d2d"/>
      </startGroup>
      <start name="1d2d"/>
    </parallel>
  </control>
  <component name="real-time control">
    <library>FBCTools_BMI</library>
    <workingDir>rtc</workingDir>
    <inputFile>.</inputFile>
  </component>
  <component name="1d2d">
    <library>flow1d2d</library>
    <workingDir>1d2dcoupler</workingDir>
    <inputFile>1d2d.ini</inputFile>
  </component>
  <coupler name="rtc_to_1d2d">
    <sourceComponent>real-time control</sourceComponent>
    <targetComponent>1d2d</targetComponent>
    <item>
      <sourceName>output_Langel_zu_Crest level (s)</sourceName>
      <targetName>water flow 1d/weirs/Langel_zu/structure_crest_level</targetName>
    </item>
    <item>
      <sourceName>output_02_Wehr_Duis~~1_Crest level (s)</sourceName>
      <targetName>water flow 1d/weirs/02_Wehr_Duis~~1/structure_crest_level</targetName>
    </item>
  </coupler>
  <coupler name="1d2d_to_rtc">
    <sourceComponent>1d2d</sourceComponent>
    <targetComponent>real-time control</targetComponent>
    <item>
      <sourceName>water flow 1d/observations/P_Langel/water_level</sourceName>
      <targetName>input_P_Langel_Water level (op)</targetName>
    </item>
    <item>
      <sourceName>water flow 1d/observations/RuhrOWDuisburg/water_level</sourceName>
      <targetName>input_RuhrOWDuisburg_Water level (op)</targetName>
    </item>
  </coupler>
</dimrConfig>
Also when the <time> element is present within <control> <parallel> <startGroup> its contents will be replaced with the appropriate values.
FBC component
Will be used if library "FBCTools_BMI" is configured as component within the dimr config file
  <component name="real-time control">
    <library>FBCTools_BMI</library>
    <workingDir>rtc</workingDir>
    <!-- Look hardcoded for  rtcRuntimeConfig.xml -->
    <inputFile>.</inputFile>
  </component>
It will look for the hardcoded file name rtcRuntimeConfig.xml in working directory relative to the parent dir of dimr config file.
It will replace start date and end date in rtcRuntimeConfig.xml with the appropriate values.
It will look for the hardcoded file name timeseries_import.xml in the working dir and insert all timeseries from the time series file configured by "piFileForFbc" (or the first time series xml if there is only 1) by matching headers.
DFlowFM component
Will be used if library "dflowfm" is configured as component within the dimr config file
  <component name="dflowFM">
    <library>dflowfm</library>
    <workingDir>fm</workingDir>
    <inputFile>mackay.mdu</inputFile>
  </component>
It will look for the .mdu file in working directory relative to the parent dir of dimr config file.
It will read "ExtForceFileNew" value.
[external forcing]
ExtForceFile      =
ExtForceFileNew   = FlowFM_bnd.ext
It will look for .ext file relative to .mdu file parent directory and extract all "forcingfile" properties from it.
[boundary]
quantity       = waterlevelbnd
locationfile   = mackay_bnd.pli
forcingfile    = mackay_bnd.bc

[boundary]
quantity       = rainfall
locationfile   = mackay_ugrid_wgs84_net.nc
forcingfile    = ..\input\mackay_rain.bc
Insert all timeseries from "piFileForFm" (or the first time series xml if there is only 1) into all .bc files (relative to .ext file parent dir) by matching headers.
In the .mdu file itself it will replace Tstart, Tstop and RstInterval with the appropriate values.
RstInterval can be overwritten by a property in the run info file called "restartIntervalForFm"
DFlow1D component
Will be used if library "cf_dll" is configured as component within the dimr config file
  <component name="Hydrodynamics">
    <library>cf_dll</library>
    <workingDir>dflow1d</workingDir>
    <inputFile>Hydrodynamics.md1d</inputFile>
  </component>
It will look for the .md1d file in working directory relative to the parent dir of dimr config file.
It will replace StartTime and StopTime with the appropriate values.
It will look for "boundCondFile" to find .bc file (relative to .md1d file parent dir) and insert all timeseries from "piFileForFlow1d" (or the first time series xml if there is only 1) by matching headers.
Flow1D2D component
Will be used if library "flow1d2d" is configured
  <component name="1d2d">
    <library>flow1d2d</library>
    <workingDir>1d2dcoupler</workingDir>
    <!-- Will be read to find references to .md1d and. mdu file-->
    <inputFile>1d2d.ini</inputFile>
  </component>
It will look for the .ini file in working directory relative to the parent dir of dimr config file.
[Model]
    type                  = Flow1D
    name                  = water flow 1d
    directory             = ..\dflow1d
    modelDefinitionFile   = water flow 1d.md1d

[Model]
    type                  = FlowFM
    name                  = FlowFM
    directory             = ..\dflowfm
    modelDefinitionFile   = FlowFM.mdu
It will extract .md1d file (with directory and model definition file relative to parent dir of the .ini file) by looking for model = Flow1D
It will extract .mdu file (with directory and model definition file relative to parent dir of the .ini file) by looking for model = FlowFM
It will process the .md1d and .mdu file the same way as described in DFlow1D and DFlowFM component