The dimr-software is used to run a SOBEK 3 model in Delft-FEWS. In the General Adapter of Delft-FEWS we refer to the different components of the dimr-tool. This wiki will describe what you need to do to convert a SOBEK3 model to a dimr-model and how to set-up the different components of your Delft-FEWS configuration. Read the steps in this guide to implement your SOBEK 3 model in Delft-FEWS using the dimr-software.
How to set-up a dimr Modules folder?
Step 1: Prepare modules folder structure of dimr
The dimr-tool expects a fixed folder structure for its binaries, model files, input timeseries and logging. We start the implementation of the dimr-tool by recreating this folder structure.

Open your Delft-FEWS configuration and create a new folder in FEWS_YourSystem / Modules / NewFolder . In the example on this wiki page we use the folder name ovd_dv as this was the name of the SOBEK 3 model we used to implement in Delft-FEWS. This folder has to contain a total of five sub-folders:
- dimr_bin: binaries for the dimr-software.
- dimr_model: dimr files that describe the SOBEK3 model.
- fews-dimr-adapter-bin: binaries for the fews adapter that communicates with the dimr.
- Input: folder for input files.
- Logs: folder for logging files.
Create all these folders in your newly created dimr folder.
Step 2: Download the dimr_bin
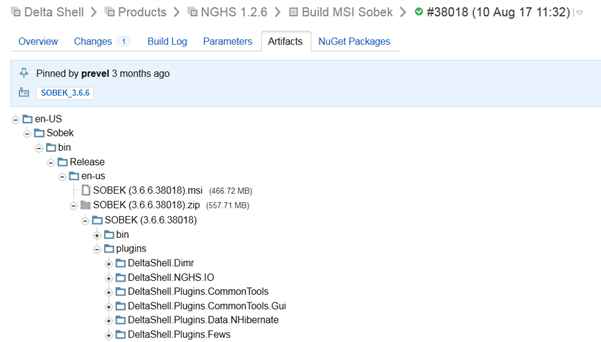
The dimr-tool is part of DeltaShell. The binaries for the dimr can be downloaded from build.deltares.nl:
- http://build.deltares.nl/viewType.html?buildTypeId=DeltaShell_Products_Nghs126_BuildMsiSobek
- The dimr-tool binaries can be found in the /plugins/DeltaShell.Dimr/
- It is necessary to modify the run_dimr to point to the libraries in cli.
- Put all these unzipped files in the folder dimr_bin.
It is necessary that the build number of the dimr-tool corresponds with your SOBEK 3 model. It is recommended to write down the build number of the dimr-tool for comparison in step 3.
Step 3: Create the dimr_model files
DeltaShell contains standard functionality that allows the user to convert the SOBEK 3 model to a dimr-model.
You have to open an instance of DeltaShell with a build number that corresponds to the build number of the dimr_bin.
- Open your SOBEK 3 model in the DeltaShell. When your model was build in an older verison of DeltaShell the following message will appear:
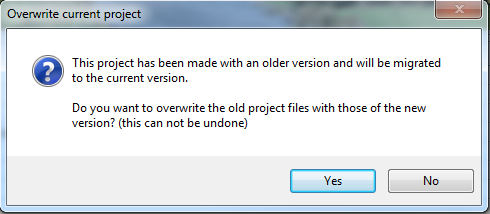
- Press "Yes" and the model will convert to the latest version of DeltaShell. To be sure that all functionality has been migrated to the latest version it is recommended to press the
 button. When your model was build in an older version it is likely that you will run into error messages, these will appear in the "Messages" menu. You will need to fix these issues before continuing the implementation of the dimr-model.
When your model can finish awithout errors it is possible to convert the SOBEK 3 model to a dimr-model.
- In DeltaShell right-click on your Integrated Model and select the option "Export...". In the menu that opens you now select the option "DIMR configuration" and you follow the instructions.
- Put the all model files that are generated in the folder FEWS_YourSystem / Modules / NewFolder / dimr_model.

Step 4: Download the fews-dimr-adapter-bin
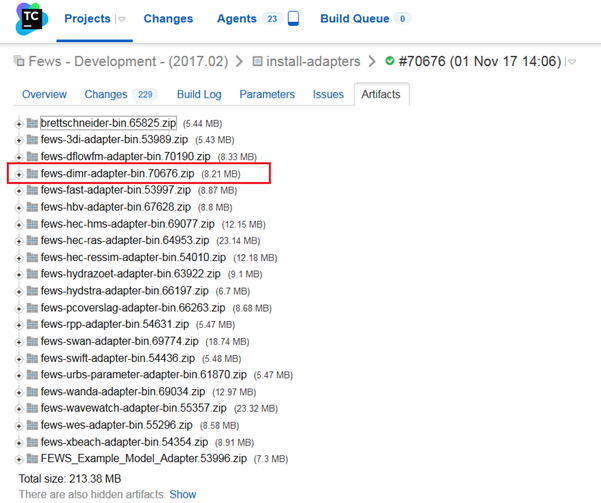
The dimr and Delft-FEWS are communicating through the fews adapter. This adapter is part of Delft-FEWS and must be downloaded from the build.deltares.nl:
- http://build.deltares.nl/project.html?projectId=FewsDevelopment&tab=projectOverview
- Select the latest stable version (or the Delft-FEWS development version): FEWS – Development > install adapters > artifacts > fews-dimr-adapter-bin.XXXXX.zip.
- Put all these unzipped files in the folder fews-dimr-adapter-bin
Make Delft-FEWS configuration files to run the model.
Step 5: create the ModuleDataSetFiles
Delft-FEWS can distribute model files to FSS machines. It is recommended to zip the model files and put it in the Delft-FEWS configuration.
- In the Config\ModuleDataSetFiles create a zip file for the (update) model run. In our example the name for this zip file is Walrus_Hydr_Sobek3_Update.zip
- The zip file for the ModuleDataSetFile contains the following information:
- .\dlfow1d\.*.
- .\rtc\.*.
- ovd_dv.xml
- As you might have notice this is the content of the dimr_model file that was created in step 1B.
Step 6: Create the ColdStateFiles
Delft-FEWS will need a state file to be able to run the SOBEK model. In order to generate the first state files of the SOBEK model it is recommended to do a stand-alone run of the DIMR/SOBEK from the command line.
- Go to FEWS_YourSystem / Modules / NewFolder / dimr_model / dflow1d and open the flow model 1d.md1d file.
- Go to option WriteRestart and make sure to set this setting on true. The model will now generate its state files.

- The SOBEK 3 model has default timeseries. We can thus do a stand-alone run of the model without providing the model with data.
- Open your command line window from the dimr_model folder. This is your working directory. Run the run_dimr.bat and give the dimr_config file as an argument. This file was created in step 1B. In the example below this is the ovd_dv.xml file.
- Run the model.

- After the model has run succesfully it is possible to craete a state-file for Delft-FEWS.
- In the Config\ColdStateFiles\ create a zip for the cold state files. In our example this is the Walrus_Hydr_Sobek3_Update Default.zip
- The zip file for the ColdState files contains the following information
- Walrus_Hydr_Sobek3_Update Default \ dflow1d \ sobek.rda
- Walrus_Hydr_Sobek3_Update Default \ dflow1d \ sobek.rdf
- Walrus_Hydr_Sobek3_Update Default \ rtc \ state_import.xml
- When you analyse the model results you will find a sobek.nda and sobek.ndf file in the dimr_model \ dflow1d folder and a state_export.xml in the dimr_model \ rtc folder. You can use these files. Make sure to rename the extension of these files.
Step 7: Create the General Adapter Module
An example of the general section of the general adapter can be found below.
General section of Module
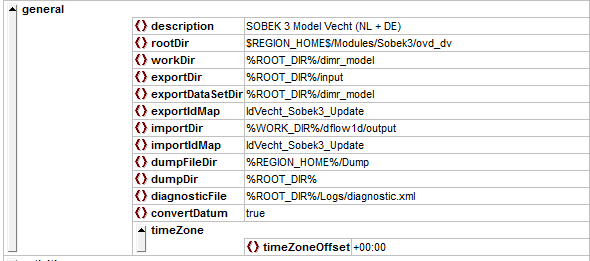
Note that the rootDir corresponds to the folder that was created in Step 1. The workDir and exportDir refer to sub-folders of the dimr model.
In the activities section the startUpActivities, exportActivities, executeAvtivities and importActivities can be distinguished
For an algorithm run: | -f <FEWS pi run file path relative to working dir> -a <OpenDA application config file (.oda file) path relative to working dir> |
|---|---|
Example: | -f run_info.xml -a enkf_run.oda |