Status archive
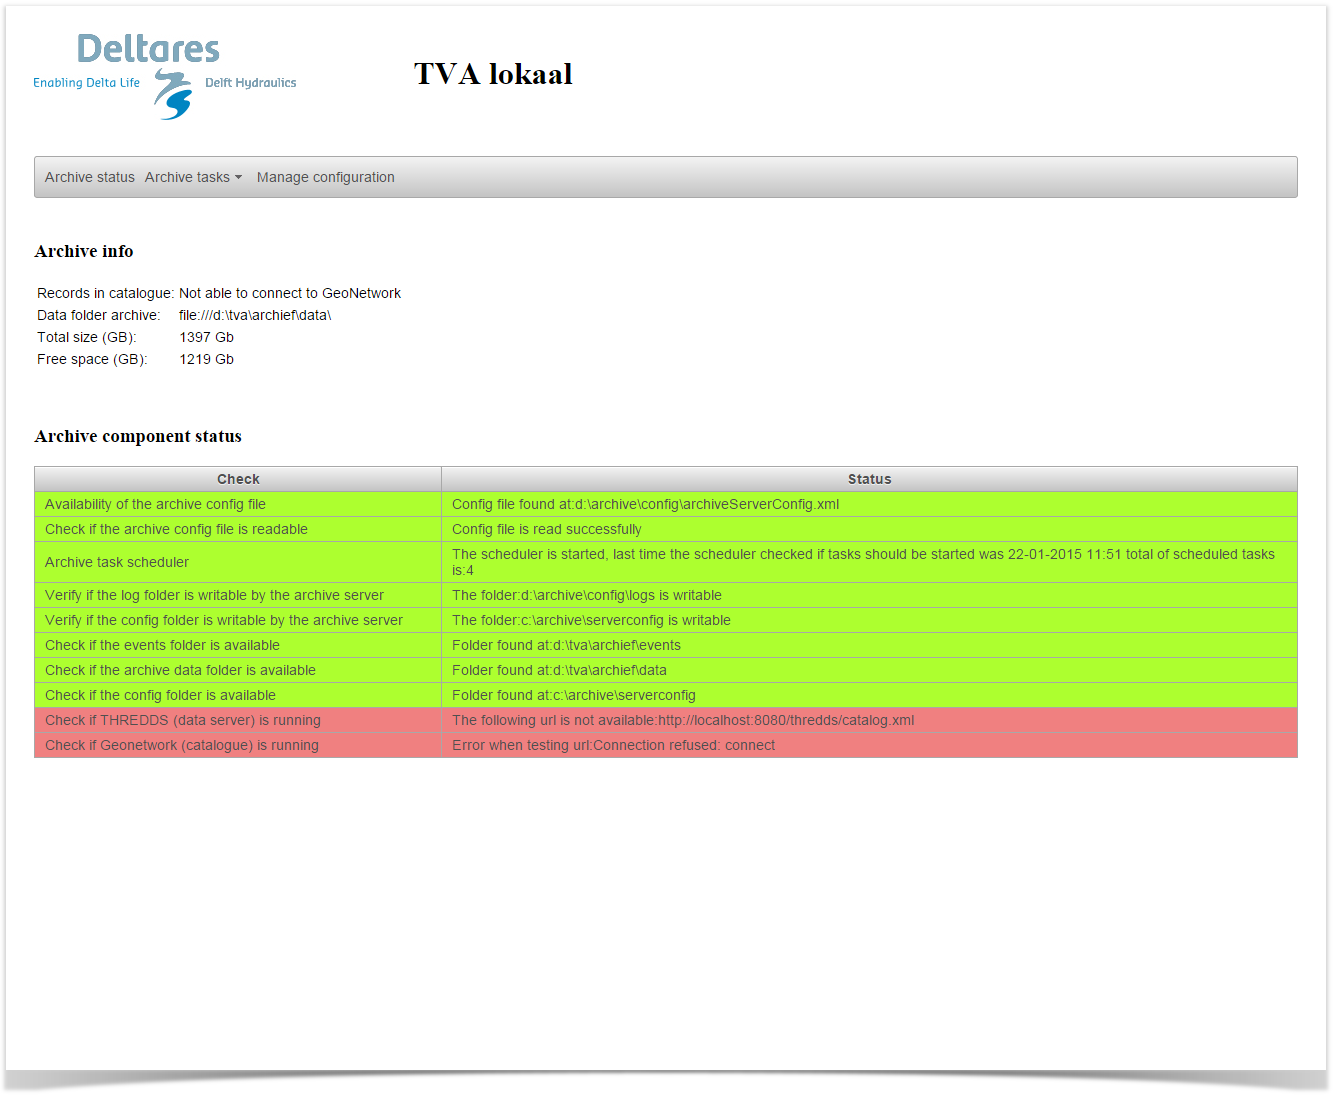
The user admin provides an overview of the current status of the archive with the display "status archive". This display is the default display which the use sees when it is accessed by
a web browser. The top section "Status archive" shows how many records there are available in geonetwork. If is not possible to login to Geonetwork than the message not able to login to Geonetwork is shown.
In addition the total amount of space and free space on disk is shown.
The lower section shows a health check of the archive. If a problem is detected with the archive this will be shown in the section below. The health check which has failed will be shown if red.
Archive tasks
From the 2014.02 it is possible to schedule the archive tasks from the archive web application. The menu item archive tasks has to sub items (schedule tasks and history task runs).
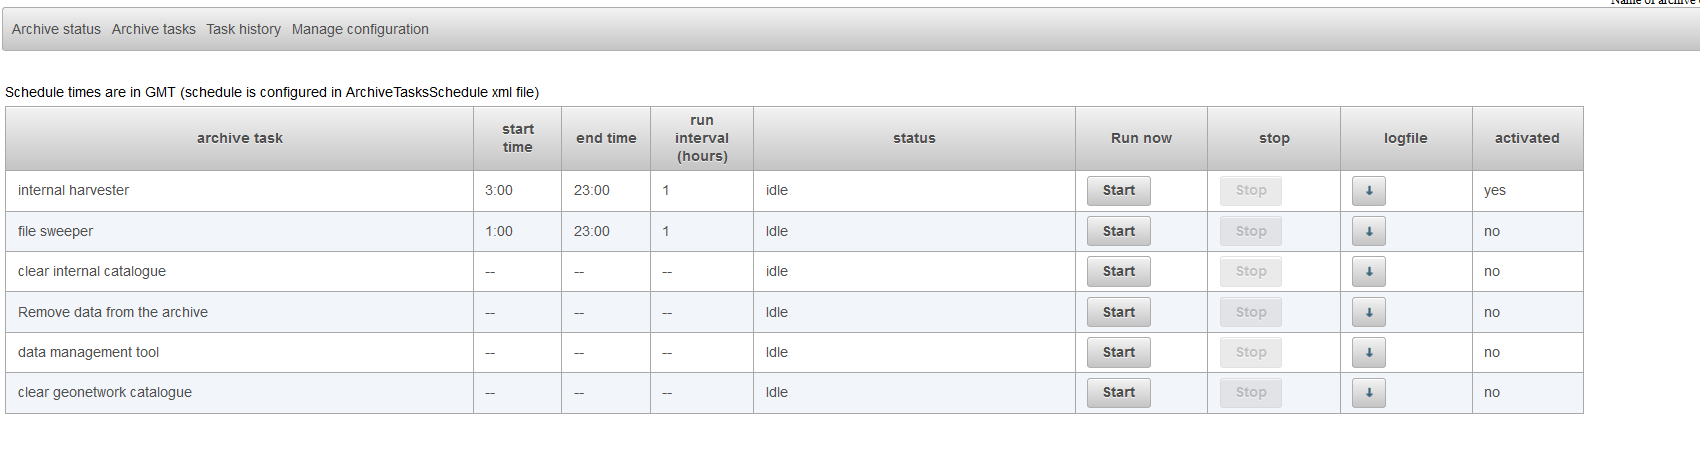
The item schedule tasks shows the archive tasks and how they scheduled. The schedule of the archive tasks can be configured by the config file ArchiveTasksSchedule.xml. This file is placed in the config directory of the archive. the menu option manage configuration can be used to change this file on the server.
However note that not all tasks shown in the display can be scheduled. The task clear archive can only be started manually. This task removes all metadata records from the archive.
It is also possible to run archive tasks manually from this display. This can be done by using the start button. Running tasks can be stopped by using the stop-button. This button is only available when the
task is running. The button logfile can be used to download the logfile of the selected task.
In addition to scheduling standard tasks it is also possible to define custom tasks in the ArchiveTasksSchedule.xml. If you want a custom task which is not scheduled but can only run manually than you should deactivate the schedule.
An example is shown below
<arc:scheduledArchiveTask>
<customArchiveTask>
<archiveTaskId>example</archiveTaskId>
<executableFile>c:/bin/example.bat</executableFile>
<logFile>c:/bin/log/example.log</logFile>
</customArchiveTask>
<arc:description>schedule for the historical events exporter</arc:description>
<arc:startTime>05:00:00</arc:startTime>
<arc:endTime>08:00:00</arc:endTime>
<arc:runInterval>1</arc:runInterval>
<arc:active>true</arc:active>
</arc:scheduledArchiveTask>
Below an screenshot of the display "schedule tasks"

The menu item history task runs shows when tasks are started and stopped by the scheduler. For the standard tasks like file sweeper, harvester, clear archive and the historical events exporter there is a tab available for eacht task. Custom defined tasks are shown in the tab custom.
Archive tasks
The sections above explained how to start archive tasks from the user interface. This section will explain what the archive tasks do.
Clear catalogue
The clear catalogue task will remove all the metadata from the catalogue. In addition it removes all the files named xxxx.recordid from the disk.The part xxxx in the file xxxx.recordid file name is the record id of the dataset in the catalogue. If the clear archive tasks has run successfully the catalogue (geonetwork) should be empty. In addition all xxxx.recordid files should be removed from the disk. Why is this useful? After running this task you can start a harvester task. This harvester task will rebuild the entire catalogue again. Beside each dataset in the archive there is a metadata.xml file. This file contains the metadata for the dataset it belongs to. The harvester will rebuild the catalogue by reading these files. In some cases the catalogue and the datasets on disk get out of synch for any reason (removing data from disk in an incorrect way, a crash of geonetwork). To get the catalogue and the datasets on disk in synch again you can run the clear archive task followed up by running the harvester. Also note that the next time the harvester runs the harvester will detect which datasets on disk it has already processed by the fact that there is a xxxx.recordid in the directory of the dataset.
Harvester
The harvester makes sure that the datasets on disk and the catalogue keep in synch. If for example a new dataset is added to the archive the harvester will detect this and create a metadata file in geonetwork for this dataset. The record id of the dataset in the catalogue is stored in the dataset on disk by creating an empty file with the format xxxxx.recordid. The xxxxx-part of the filename will define the record id in the catalogue. If a dataset has been removed by the administrator, the recordId file needs to be left in place. The harvester will then identify that a dataset has been removed and it will take out the record from the catalogue. The harvester will also remove the recordId file from disk and clean up the empty directory.
If a catalogue has been cleared and the harvester builds up a new catalogue, geonetwork may get a bit overloaded by the amount of inserts to be done. To prevent this overload, the harvester only prepares a queue of max.300 records for insertion. In addition, it monitors insertion progress. If no progress has been made in the last minute, the harvester goes into sleep mode for 30 minutes. After getting awake, the insertion process continues up till the entire catalogue is rebuild. At this moment, the admin console shows harvesting progress, but it does not (yet) indicate when the harvester is in sleep mode.
File sweeper
In some cases data files are exported twice to the archive. The system feeding the archive might have new data which overrides the previous data. In this data cases existing data files are overriden by new files. If the files which should be overriden are temporarily locked by archive for reading, the system feeding archive should store the new file besides the existing file with the same name but with the extension new. The filesweeper will detect these files and will replace the original data file with the new one as soon as the filesweeper runs and the lock the data file is released.
Historical events exporter
The historical events exporter exports Delft-FEWS historical events to a pre-defined directory. The historical event can be defined by an xml file in the events directory. The xml file and the data which is part of the historical event is exported to the pre-defined directory where a Delft-FEWS workflow will pickup the data.
Data management tool
This tool can be used to create a list of expired data sets in the archive. The file DataManagementTool.xml can be used to define the rules for the expiring of the data sets.
The output of this tool can be used as the input for a custom script to remove data from the archive. It is also possible to use the remove data from archive task which is available as a standard task in the archive admin console (if configured).
Remove data from archive
The output of the data management tool can be used as the input for this tool. Each data set which is listed in the output will be moved to the backup directory configured in the DataManagementTool.xml.
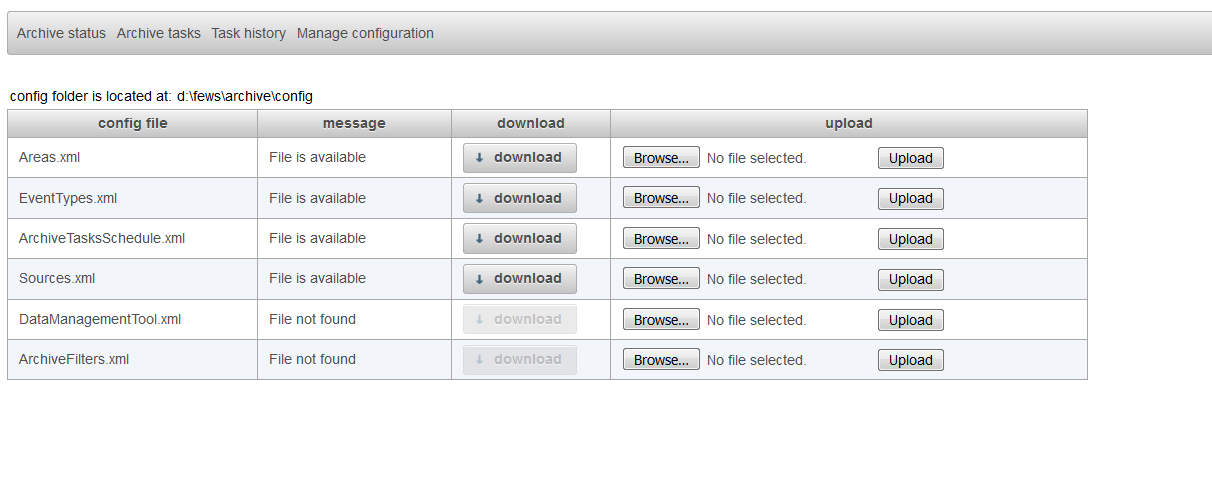
Manage configuration
The display "manage configuration" allows the configurator to download configuration files, change them manually on their own pc and upload the changed configuration files to the archive server. Files that can be managed are Areas.xml, EventTypes.xml and ArchiveTasksSchedule.xml
When an invalid file is uploaded to the archive server this will be detected by the system and the file will not be used.
Data management
The archive admin console provides tools to manage the data in the archive. To prevent that the amount of the data in the archive keeps growing several tools are available which can be used to remove expired data sets from the archive. This section will explain how to confgure and use these tools.
First step is to define the rules for expiring data sets. The file DataManagementTool.xml can be used to define the rules for expiring data sets.
Below is an example given this file.
<arc:dataManagementTool xmlns:arc="http://www.wldelft.nl/fews/archive" xsi:schemaLocation="http://www.wldelft.nl/fews/archive http://fews.wldelft.nl/schemas//version1.0/archive-schemas/dataManagementTool.xsd" xmlns="http://www.wldelft.nl/fews/archive" xmlns:xsi="http://www.w3.org/2001/XMLSchema-instance">
	<outputFile>d:\fews\output\managementreport.csv</outputFile>
	<lifeTimeRules>
		<defaultLifeTime unit="year" multiplier="10"/>
		<defaultAction>default</defaultAction>
		<lifeTimeSimulatedDataSets>
			<lifeTime unit="year" multiplier="15"/>
			<action>remove</action>
		</lifeTimeSimulatedDataSets>
		<lifeTimeObservedDataSets>
			<lifeTime unit="year" multiplier="15"/>
			<action>remove</action>
		</lifeTimeObservedDataSets>
	</lifeTimeRules>
</arc:dataManagementTool>
This example contains all the mandatory elements of this file. The output file defines were the data management tool should write its output. The output will be the list of data sets which are expired according the defined rules.
The default life time defines the life time of a data set in the archive when there is not a more specific rule defined. In the example above there is no rule defined for external data sets. This means that the defaul life time will used for external data sets. For simulated data sets there is a specific rule defined in the tag lifeTimeSimulatedDataSets. This means that for simulated data sets the default life time will not be used but the more specific rule in the lifeTimeSimulatedDataSets tag will be used. If needed it is possible to define specific rules for the other types of data sets in the archive like external forecasts, rating curves, configuration etc. An example is given below.
<arc:dataManagementTool xmlns:arc="http://www.wldelft.nl/fews/archive" xsi:schemaLocation="http://www.wldelft.nl/fews/archive http://fews.wldelft.nl/schemas//version1.0/archive-schemas/dataManagementTool.xsd" xmlns="http://www.wldelft.nl/fews/archive" xmlns:xsi="http://www.w3.org/2001/XMLSchema-instance">
	<outputFile>d:\fews\output\managementreport.csv</outputFile>
	<lifeTimeRules>
		<defaultLifeTime unit="year" multiplier="10"/>
		<defaultAction>default</defaultAction>
		<lifeTimeSimulatedDataSets>
			<lifeTime unit="year" multiplier="15"/>
			<action>remove</action>
		</lifeTimeSimulatedDataSets>
		<lifeTimeObservedDataSets>
			<lifeTime unit="year" multiplier="15"/>
			<action>remove</action>
		</lifeTimeObservedDataSets>
		<lifeTimeExternalForecastDataSets>
			<lifeTime unit="year" multiplier="10"/>
			<action>remove</action>
		</lifeTimeExternalForecastDataSets>
		<lifeTimeMessagesDataSets>
			<lifeTime unit="year" multiplier="10"/>
			<action>remove</action>
		</lifeTimeMessagesDataSets>
		<lifeTimeConfigurationDataSets>
			<lifeTime unit="year" multiplier="10"/>
			<action>remove</action>
		</lifeTimeConfigurationDataSets>
		<lifeTimeRatingCurveDataSets>
			<lifeTime unit="year" multiplier="10"/>
			<action>remove</action>
		</lifeTimeRatingCurveDataSets>
	</lifeTimeRules>
</arc:dataManagementTool>
In the FEWS OC or SA it is possible to define events. It is possible to configure a life time for data sets which belong to a certain event. Data sets which belong to an event are usually more important than other data sets in the same period. By configuring a different life time for data sets which belong to a event it is possible to keep these types of data sets longer in the archive.
An example is given below.
<arc:dataManagementTool xmlns:arc="http://www.wldelft.nl/fews/archive" xsi:schemaLocation="http://www.wldelft.nl/fews/archive http://fews.wldelft.nl/schemas//version1.0/archive-schemas/dataManagementTool.xsd" xmlns="http://www.wldelft.nl/fews/archive" xmlns:xsi="http://www.w3.org/2001/XMLSchema-instance">
	<outputFile>d:\fews\output\managementreport.csv</outputFile>
	<backupFolder>d:\fews\backup</backupFolder>
	<lifeTimeRules>
		<defaultLifeTime unit="year" multiplier="10"/>
		<defaultAction>default</defaultAction>
		<lifeTimeSimulatedDataSets>
			<lifeTime unit="year" multiplier="10"/>
			<action>remove</action>
		</lifeTimeSimulatedDataSets>
		<lifeTimeSimulatedDataSets>
			<sourceId>sourceId</sourceId>
			<lifeTime unit="year" multiplier="10"/>
			<action>remove</action>
		</lifeTimeSimulatedDataSets>
		<lifeTimeObservedDataSets>
			<lifeTime unit="year" multiplier="10"/>
			<action>remove</action>
		</lifeTimeObservedDataSets>
		<lifeTimeExternalForecastDataSets>
			<lifeTime unit="year" multiplier="10"/>
			<action>remove</action>
		</lifeTimeExternalForecastDataSets>
		<lifeTimeMessagesDataSets>
			<lifeTime unit="year" multiplier="10"/>
			<action>remove</action>
		</lifeTimeMessagesDataSets>
		<lifeTimeConfigurationDataSets>
			<lifeTime unit="year" multiplier="10"/>
			<action>remove</action>
		</lifeTimeConfigurationDataSets>
		<lifeTimeRatingCurveDataSets>
			<lifeTime unit="year" multiplier="10"/>
			<action>remove</action>
		</lifeTimeRatingCurveDataSets>
		<eventRule>
			<eventTypeId>historic event</eventTypeId>
			<lifeTime unit="year" multiplier="20"/>
		</eventRule>
		<eventRule>
			<eventTypeId>calibration event</eventTypeId>
			<lifeTime unit="year" multiplier="20"/>
		</eventRule>
		<eventRule>
			<eventTypeId>watercoach event</eventTypeId>
			<lifeTime unit="year" multiplier="20"/>
		</eventRule>
		<eventRule>
			<eventTypeId>review event</eventTypeId>
			<lifeTime unit="year" multiplier="20"/>
		</eventRule>
		<eventRule>
			<eventTypeId>flood watch event</eventTypeId>
			<lifeTime unit="year" multiplier="20"/>
		</eventRule>
	</lifeTimeRules>
</arc:dataManagementTool>
Once the configuration of the DataManagementTool.xml is finished it should be added to the configuration of the archive server. You can do this by uploading it to the archive.
Select the tab manage configuration and upload the new DataManagementTool.xml to the archive by using the browse (to select the file) and upload button in the row DataManagementTool.xml.
It is also possible to put this config file directly in the config folder of the archive but you will have to restart the tomcat instance of the archive server to make it aware of the fact that there is new file available.
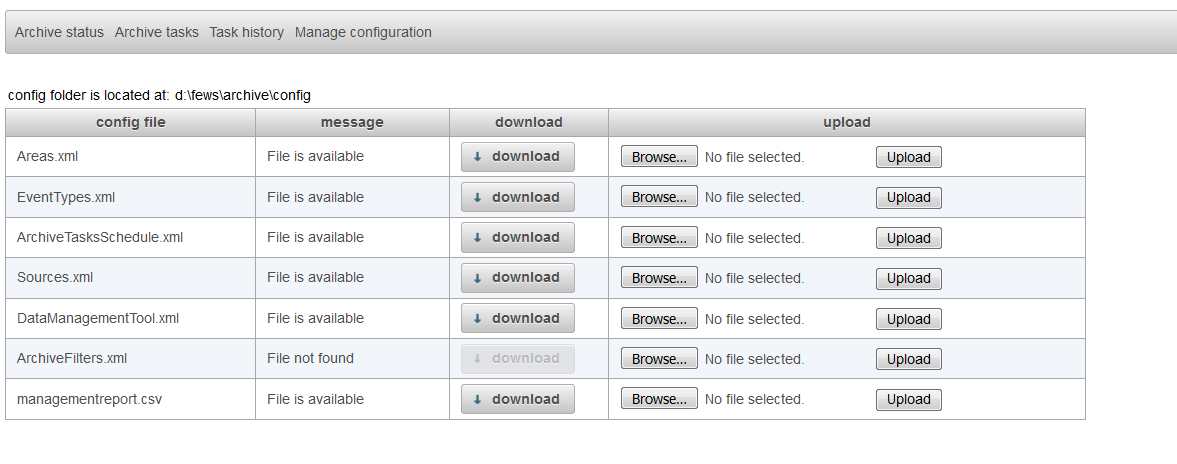
In the screenshot above the you can see that the file managementreport.csv can be downloaded by pressing the download button.
You can download this file by pressing this button to review which data sets are expired. If needed you can manual edit file by using a text editor or excel.
After you reviewed and/or changed this file you can upload the changed file to the archive by using the upload button.
You can then run a custom script which uses this file as input or you can use the task remove data from archive
After this step it is possible to run the data management tool to search for expired data sets in the archive. This task should be available as one of the tasks in the archive tasks tab. If it is not available there you should add it to your configuration. Go to the manage configuration tab and download the ArchiveTaskSchedule.xml file. Verify if there if the preDefinedArchiveTask remove data from archive is available.
An example is given below.
	<manualArchiveTask>
		<predefinedArchiveTask>data management tool</predefinedArchiveTask>
		<description>data management tool</description>
	</manualArchiveTask>
After adding this task you should upload the changed ArchiveTaskSchedule.xml to the archive server.
The task should now be available after selecting the tab archive tasks. You can start this tool by pressing the start-button. After running this task the output should be available in the output file which is configured in the DataManagementTool.xml. You can download this file in the tab manage configuration.